Vol-048-2 Flower Stamen Wire Bails PcT Tutorial (Intro)
Video #255: “I love that you are incorporating metal tutes alongside Polymer Clay.” ~Elaine-F
More...

** This post is an introduction to one of our paid tutorials.
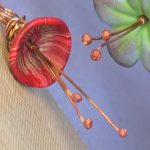
You know I love flowers and nature. I also love things that look a little quirky. Well this week I’m mixing those concepts together and adding a bit of flower stamen wire work for the member's video tutorial. Hopefully you like the design. But if not, you’ll still learn some basic techniques that may come in handy for other jewelry making projects you have on the go.
“What a great idea! Love the flower, but the wire stamens and wrapping make it extra special. Cannot wait for you to teach us how to make these. Be great in flower arrangements because you could bend the wire to make realistic settings.” ~Jocelyn-C
“Hey Cindy, love love love these earrings you’ve made here, so beautiful. I would like to do some similar ones but I have no clue as to how to do the stamens. What gauge of wire is best to use in this project? Please help!” ~Patricia-R
“
Cindy, you are so clever! I hadn't sold much of my jewelry, but after watching your videos my work has improved so much that the Museum of Art wanted 15 sets for their store. Your teaching style has given me a lot more confidence in myself, and made me work harder to expand my boundaries. ~DixieAnn-S
Dixie Ann S
“
Cindy, you are a wonder! The best, clearest and my favourite teacher. I have bought many video tutorials, and I have NEVER found any teacher, or quality of lesson that comes close to what you and Doug do. I feel as if I've "come home." Thank you for the latest, coolest wire wrapping technique. ~Julia-G
Julia G
“
Hi Cindy - Great video incorporating wire and metals with polymer clay. Cute translucent bead cones, they look so cool as 'jellyfish' with twisty wires attached, I love 'em. I'm so glad I found this site, as Cindy's PC art 'therapy' really works... cheers. ~Elaine-F
Elaine F
Transcript coming soon...
Transcript coming soon...
Our goal is to translate these videos into as many languages as possible. If you are interested in helping with this initiative, then please do contact us and we will figure out a way to make it worth your while :)
Shareable Images


Want to chat about today’s post? That’s what the comment section below is for. Scroll Down… We’d love to hear from you!
Or... if you would like to request a topic for a future post, here is the link to do that… PcT Suggestion Box
I just had a chance to watch the stamen/bail video. You never disappoint, Cindy. I love the how you used the balled headpins to make stamens. There are some wonderful tips in this video. The slap-me-in-the-forehead moment for me in this video was your trick for neatly finishing off the wrap. I’ve never seen it done that way before, but it makes SO much sense!
Cindy, I have loved this tutorial so much. Thanks for that!
I don’t do a lot of jewelry… but this does give me ideas.
I think you also just helped me solve a problem with my hand armatures, as well… :-)
Thanks Cindy for the info. I do have a pickling solution and a little crock pot to heat it up in so I will try that. I promise not to burn me or the house down….;)
not only do we learn clay, cindy is there to teach us jewelry findings too yahoo.
AWESOME – Didn’t get to watch as soon as I wanted but more than worth the wait. Hope to find out later today if this is as easy as you made it look Cindy. Just another wonderful tute to help us add yet more pazazz to our jewelry line. You are like the energizer bunny who just keeps on going and going. You and Doug just complement each other to a perfection like no other.
Thank you once again for giving so much and asking so little.
Many Uuuugggggs to a wonderful weekend for the 2 of you and your family of talent.
Wow Cindy I just watched your video on stamen bails and that is just about the neatest thing and so easy to do. Well at least you make it look easy. Will see when I try it. Oh goody, I get to try my new torch!
Hope I don’t burn down the garage!
To Lawrence and all, I forgot to mention, not to dip the flex tool for sanding in water. Keep a bowl of soapy water and just dip the bead into it so it stays wet, then when you are done sanding it, plop it into another bowl of fresh water. I always have 2 bowls of water on my table and I always change my water after completing each batch for each grit I use. Hope this helps.
Thanks Dixie. Now I’ve got it.
1st of all Dixie Ann Congrats on your wonderful offer from the Museum of Arts. What a thrill this must be for you. 2nd. Thank you so much for sharing all this wonderfull time saving and pain saving information you have given us. Your directions are superb and I am headed over now to look at your pictures.
You are another one of the fantastic reasons I love being a part of Cindy’s blog and tutes. We are all just one big family here and I love it.
Many Uuuuugggs!!!
Just spent a happy hour reading all the tips and helpful info from our clay family.
Wow Dixie Anne thanks, I have just got a flexi myself and made a felt buffing top cutting out all the circles by hand, took ages but works great for buffing. If you put enough discs on it tends to bury the end. But never thought to use your ingenious method for sanding through the grits and using a hole punch.
So off to the kiddie dept to find supplies. Thanks so much as have a ton of beads to sand, just waiting to come up with a quicker way to do it. Take 10 brownie points and go to the top of the class…cheers..xx
Cindy – what a great addition to our flowers etc. This gives a whole new “look” to them. The ideas about the ends of the head-pins sure helps too. I don’t have a torch ( on my Santa list) yet. So the substitutes will work !
Cindy, I adore this technique, it adds something special to a basic polymer clay flower. Thank you for a wonderful tute.
Dixie, thank you for sharing your sanding technique. I have a Dremel Flex Shaft as well, and your technique turns it into a nifty sanding tool. Congratulations on your contract with the Museum of Art! Wish you much success!
Hi Cindy – I love the way you wrap these wires one at a time, so simple and yet so effective. I’ve often wondered how to get that ‘messy’ wrap look, now I can practice it! It’s super to have things to complement the clay beads.
Marion
Dixie Ann, I love my FlexTool, too! It came in my (generic brand) Dremel set that I received at Christmas. It’s great for reducing the vibration and therefore the tendency of my fingers to go sleep when using it LOL; also a lot more stable when clamped in my bench vise. Are your photos on your own FB page? Are they public? I’d love to see your custom sanding pads! I meant to comment a while back when you mentioned the Museum requesting your work. Bravo! Sometimes we can’t see the beauty in our own work and we need the affirmation of others. I’m guilty of that also!
Hi Monique, I put the photo on BeadsandBeading so everyone could see it. I just finished my first large lentil bead with this sanding set-up and wow what a difference. The final buffing gave it a nice glossy finish. Aren’t these flex tools amazing! Wish I would have got one a long time ago.
talk about clever ! WOW..thanks for sharing. I am sure there will be Dixie Ann dupes used. You aqre so thoughtful to share ;}
Dixie – I bookmarked your pic. Soooo , if I forget how to do this, I can look at your pic. Ty so much !!!!
Ah Cindy, your skills are so clever, can’t wait to try these since I upgraded from a micro torch to a bigger one and am anxious to try it out. I also came up with a new sanding technique and if you all can get through these extended comments it is going to save so much time when sanding beads, at least for me.
I didn’t like the toothbrush idea because of all the glueing and you had to cut out all the little sandpaper discs to glue on the brush and you had to have a brush for each size grit etc; anyway not worth the time. I looked long and hard at my dremel tool and finally broke down and bought a Flex tool attachment. Then I went to Michaels and got a hole puncher 1 and 7/16″ from the scrapbook dept. as well as a package of Thermo Web Sticky Dots Die Cut Transfer paper, and a package of those sticky back foam sheets in the kids dept. All on sale 40% off, even the puncher. Whoo-Hoo! I cut out 8 plastic discs. from some Healthy Choice containers I had laying around the same size as the Hole puncher, I also cut out 8 foam circles the same size as the hole puncher. I marked for the hole in the center using a dremel cutting disc that was close to the same size. I got 7 #402 Dremel mandrels, punched the center hole in the plastic disc, slapped on a foam sticky circle and screwed them both on the mandre. Voila! I made 8 of these to hold a different size grit of sandpaper from 320 to 2000. I then punched out with the hole puncher,several discs of each grit. Now all I have to do is take a sandpaper disc and lay it on the sticky dots which will tranfer the adhesive and slap that disc on the foam circle covering up the screw so it doesn’t scratch the bead as your sanding. When your done and need to change your sandpaper disc, you can rip it off and slap on another. When the foam circle wears out, just screw on another. I have more control with speed with my flex tool, a flexible plastic disc that will move better over curves and a quick way to change my sandpaper grit sizes. It cost me about $30 for flex tool, about $22 at Michaels and about $16 at Lowes.
and it was worth every penny. I have posted a photo on Facebook if you want to take a look at the set-up.
I don’t sell a lot of my jewelry because I don’t think it is good enough, but the Museum of Art thought it was and wanted 15 sets for their store. I know I would not have gotten this far without Cindys wonderful videos. I am so grateful I finally bit the bullet and decided to join her group. Her teaching style has given me a lot more confidence in myself and a need to want to try harder to bring out whatever talents I do possess. So for anyone out there who is contemplating joining and spending the money, please don’t hesitate…it is the best investment you will ever make.
Wow, that sounds like a great time saving idea. I sometimes use my dremel flex tool for buffing smaller pieces and bowls but never thought of it for sanding.
How do you keep your beads wet and not by submerging the dremel tool I hope ?
I know dry sanding PC is definitely a no-no.
This is such an awesome idea Dixie!! Thank you so much for sharing it with us. This will help a ton of people. Am going to have to give it a shot myself. I already have most of the stuff, including the flex shaft! Thanks again!
Ooops sorry Dixie, I also meant to congratulate you on your museum of art acceptance!! That is super cool and I am very proud of you! Way to go!!
Thank you Cindy, I can hardly believe it myself. I do have a question on your torch fired stamens. What do you use or how do you clean the black off your wires? I always get an inch or so of black where the torch fires. Am I doing something wrong? Yours always looks so clean.
Dixie you’re not doing anything wrong but if you pop your torched headpins into a cup of room temp water to quench them while the tips are still red, you will maintain the red tips without too much blackening on the rest of the pin. But if you still do get some black oxidation (fire scale) that you would like to remove, you can always use a commercial pickling solution or the homemade version I like to use, which is several tablespoons of salt mixed into a couple cups of vinegar. Sounds like pickles to me. :)
Soak fire scaled pieces in some pickle for awhile and the black just kind of falls off. Warm pickle works fastest and make sure to NEVER get any iron or steel bits (like steel wire or steel wool) into your pickle solution or you could have a chemical reaction that causes caustic fumes. This includes steel tongs, so it is always best to use copper, wood or plastic tons or spoons to fish out your items from the pickle pot.
Pickle will change your rosy pink headpins to a more cherry red which some people prefer and others don’t. That is up to your taste.
Enjoy your torching and it never hurts to have a fire extinguisher close by. Definitely be careful! I don’t want to hear of any burns to your fingers, your lap or your house!
Congrats on picking you for the museum! What an honor. You go girl !!! teehee
Cindy, I have three words to describe you – clever, clever, clever!!! You rock teach! I had a dream about you a couple of nights ago. You were on YouTube doing a short polymer clay video. Ever think of promoting your site on YouTube?
Yes actually Michelle we have thought about promoting our site on YouTube. It is something we need to get to. Thanks for you cute comment… Hope the dreams I end up in are mostly good ones and not nightmares! LOL
Looking forward to this tute. Now I can put this beautiful finshed touch on some of my beads.
Back to looking forward to my Fridays and even trying the tute out on that day instead of months later. But as my hubby said better late then never at all. For sure when it comes to Cindy’s tutes. Most likely will be up in the middle of the night so I will watch it then. I would welcome a full nights sleep and wait till Friday morning like most normal people.
I love manipulating metal with my hands, and it goes so well with our different PC projects. These tutorials using basic tools and materials that most everyone has on hand are my favorites, because they really encourage our creativity! Looking forward to your latest, Cindy!
Hi Cindy
A great BIG THANKS for this latest episode of incorporating wire and metals with ~PC. I know we will love it.
Never made the trans. bead cones but now they look so cool as “jellyfish” with twisty wire attached I love,em.
Welcome to new member KAT-W. What part of the world do you come from?
Had to laugh when I read about PattW35 hanging up her inked beads in the sun to test for fading. Bet the birds wondered what was going on!! Thanks to PattW35 and her experiments we can now use our inks with confidence.
Lastly to all my fellow clay buddies, if you are feeling under the weather, or are in pain, or feeling blue, I’ve been there too, but I think that pain is something we have to learn to live with and manage. I hate it when I am too ill to even switch on my laptop. But so glad I made the effort, as Cindy,s PC Art as therapy really works………………………cheers xx…………………..