
Hollow Polymer Clay “Puffy” Beads: Quick & Easy to Make, No Mess
“I’m a jewellery maker with a graphic design background… falling in love with this polymer clay material.” ~Naum-G
More...

“I’m a jewellery maker with a graphic design background… falling in love with this polymer clay material.” ~Naum-G
If you are a member at the Polymer Clay Library, you probably already know that I release 4 video tutorials each and every month based on the following four main categories: (Please Note: This is how we used to do things. Tutorials are now sold separately, and the Membership has changed to a Member's Vault, both of which you can find more info on in our PcT Store.)
(1) Cane Making
(2) Clay Techniques
(3) Wire/Metal Techniques
(4) Bead Shapes
As well, you may know that I like to discuss each of the tutorials before they are actually filmed, so that you guys can let me know if the topic is something that will be of interest. This approach also gives you a chance to ask specific questions, which I can then address for you when it comes time to film.
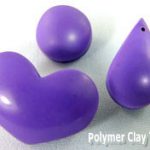
So today, for the Category 4 (Bead Shapes) segment of Volume-023 (April’2010 Videos), I would like you to have a look at today’s photo above. I call them Puffy Beads.
They are cute little hollow beads that can be made into any shape that you have a shape cutter for. I’ve actually talked about them once before in this post: Clouds and Raindrop Earrings
silverleaf
It’s so cool that polymer clay is versatile enough that we can use it to recreate so many different things. I love the earrings Cindy, I would totally wear something like that. You could make something similar with a snowflake… they remind me of the little symbols you see on the weather reports.
My Hollow Puff shapes and designs are MUCH quicker and easier to make than similar beads I’ve seen taught elsewhere. No big messes to worry about either…
susan d
I’ve tried using some of the dissolvable packing peanuts because I thought that would be great for making puffed hearts. But after baking the insides (peanuts) sort of oozed out into a big mess. I can’t seem to get it to work.
So what does everyone think? Should I include these Puffy Bead Shapes in the April-2010, Volume-023, video tutorial lineup? Leave your votes, notes and questions in the comments section below.
Sponsored Ads & Special Promotions
Want to chat about today’s post? That’s what the comment section below is for. Scroll Down… We’d love to hear from you!
Or... if you would like to request a topic for a future post, here is the link to do that… PcT Suggestion Box
Hi Cindy..I tried out a puffy pendant based on your tutorial..the top of the pendant is puffy an neat..but what happens is the back has gone concave..slightly..I did not drill a hole fearing this kind of problem could happen..is it because of the thickness of the clay? Or is it a baking problem..i used a baking tray with cornstarch..and covered with aluminium foil..and the entire oven ws insulated in ceramic tiles…
Did anyone else face similar problem..please advice..
Hi Suguna, I would try baking your piece on a piece of office paper on top of a tile, instead of on the cornstarch. That should help the back stay flatter. As well, maybe let your piece cool down in the oven instead of shocking it by cooling too quickly. It could be that the air inside has compressed too quickly when it cooled and the clay caved in a little. Test these theories on a couple of smaller pieces and see if it makes any difference. Good luck!
Thank Cindy! I got it fixed finally after a month of trial!
Hi cindy ..I have subscribed to your blog recently..I would love to purchase your old tutorials ..
Baking tips one
Puffy beads and the one with peeking puffed beads
Please let me know how do I purchase? And the cost ?
Also I would like to know if u need to purchase all the tutorial series in a volume or can I mix n match..
Thanks
Hi Suguna, Thanks for the compliments! As for tutorials to buy, what I suggest would be an excellent start, would be to buy the Beginner’s Course. It has everything you need to have a good solid foundation in working with polymer clay including baking. There are 39 videos in the course for only $37.
For the Puffy Bead Tutorial, that is in Volume-023 which also includes the Faux Jade Tutorial, Hammered Metal Bezels Tutorial and the Johnny Jump Up Cane (Pansy) Tutorial. Each Volume is only $9.95 and videos within each Volume can not be mixed and matched.
In regards to a Peeking Puffy Bead, I take it that you are referring to the post you saw with the cutout version of the puffy bead. Unfortunately I do not have a tutorial on that bead. That was an adaptation that one of our students did on her own, after watching the Puffy Bead Tutorial.
If you are looking for any other tutorial, just type your keywords into the search box at the top of the page and you should be able to find what you need. Hope you enjoy the tutorials! Thanks for commenting!
Hi,
Thanks Cindy. I have already picked baking…sanding etc..so i think i will buy your volumes that i need directly. I am looking at all the archives and picking up the ones suitable for me.
Hope to subscribe soon !! Thanks for posting wonderful information !
Sounds great Suguna! Glad to have you here!
NEW PHOTOS ADDED:
Hello to Everyone,
A couple of new Spotlight project pictures that relate to the topic of this page (Faux Unakite), have just been added in another post. They were submitted by Cherie-S. The link by my name will take you to where you can see them, along with a write up. Hopefully the information will inspire you to achieve great things with your own polymer clay projects.
@Cherie: …can’t wait to see your finished jewelry photos. What you should do is email them to me and submit an update article so I can post another (follow up) Spotlight feature for you. I’m sure there are many readers here who are anxious to see how your unakite project turned out.
Googled ‘Drusy’- they’re awesome. Would love a tut on them.
@Cherie: Can’t wait to see your Faux-whatever pics! (I can’t remember what you ended up deciding to make. I just remember everyone gave different ideas & tips on how to go about it…) Also, good luck on the muse contest. I, at least, understand about you not wanting to be in doo-doo… :D
sure did and will gladly send the finalized phots in when the project is done–has to be after the contest is closed or I will be in big doo doo for exposing the muse! lol-thanks again to all who helped me-I am very happy with the results
Hi Cherie – Yes I did receive the pictures you emailed to me. Did you get my reply email to you?
Hi guys, Well, I sent some pix to Cindy so it’s up to her whether she wants to let everyone see the “beads” I made–they are not perfectly square and that’s the way I intended them to look–I thought the colors came out pretty good for a first try–thanks to all who helped me
Forgot to say, Cindy has already put the gremlins in that remarkable mind of hers to work on the drusy project (see above) so it’s On Her List. XX M.
I love Leopardskin & Kambaba Jasper, well, also Picasso Jasper (and poppy, rainforest, ocean, dalmation, etc…) Lapiz lazuli is cool, but there are already tut’s for that all over the place. Someone mentioned Snowflake Obsidian, which is also cool (I love to wear this, easy match to my clothes!) And I’ve always been attracted to the look of Serpentine, esp. green/yellow…
Actually, a lot of gemstones could be made the same way with PC, just with different colors. A strand of real gemstones like unakite or jasper has several different patterns, colors, & striations in it. We could have tuts to learn the different patterns instead of just a certain gemstone, then we could learn how to change them up by adding different striations/markings.
After that, we’d be able to “create-a-gem” of our own! For example, Unakite and Sodalite look almost identical in their patterns, but the colors are totally different. That would make it a 2-fer tute! Does that make sense? The Leopardskin & Kambaba Jaspers I mentioned could work the same way; they have the same pattern to them, just different colors. ~just my 2 cents…
@Phaedrakat: That’s a great idea! That way we’d have a “toolkit” to make almost any kind of faux stone just by changing the colours or the size of the grated bits of clay or the type of inclusion.
Endless possibilities!
And while we’re talking about stones, a town about 20 miles away from me is famous for a type of semi-precious stone called Blue John. It’s only mined in two places in the world, and both are in Castleton. It’s a special type of fluorite with blue-purple and yellow colour and it’s really pretty, might be too transparent to recreate in PC though.
@Silverleaf: How intriguing. I found the Blue John website -beautiful stones, lovely banding patterns- and I wondered what will happen when it’s all mined out? Sad to think of that. There’s just that one mine in Derbyshire, so “rare” is an appropriate adjective for it – and then some. Silverleaf, did you see that stemmed goblet made from Blue John? Seems to be just the one craftsman working at the site. That “toolkit” idea of Phaedrakat’s, to adapt techniques is terrific. I don’t think Cindy ever sleeps as it is, but with her ever-growing list of show-us-how-to faux stones, well .. just sayin’.
@Silverleaf: That’s the first I’ve heard of Blue John, how very interesting! It’s lovely, and its locale makes it kinda like “your very own” semi-precious stone! If you haven’t done so already, get your hands on some; that way if/when they can no longer mine it, you’ll have a few stones of your own. (I didn’t see the prices, though, maybe this isn’t so easy to do??) That’s cool having something so rare mined practically in your own backyard!
Thanks for understanding what I was trying to say about the gemstone “toolkit.” I’m guessing that Cindy wants to hear all of our ideas about Faux Gems or whatever kind of tuts we want to learn. She films them for us, so naturally, she wants us to be interested in them. Nothing is “set in stone” yet. (sorry for the pun) And she can always move things around on her list as the demands change. But she needs to know our preferences; if we don’t let her know, then she has to come up with something (which we will end up loving too, of course!) But if we tell her in advance, give lots of feedback and ideas, then we save her a step! She doesn’t have to try to figure it out herself; she can tally the “votes” and decide if she can actually create a video tutorial on the “thing” we’re asking about. So, everyone should give their ideas on which faux gems you’re interested in!
Cindy will always be creative and come up will cool stuff to show us that we will want to learn (IMO). I’m just trying to make the point that “necessity is the mother of invention.” Meaning that if we ask to learn how to do something, then that might help Cindy focus her creativity. She can put her creative mind to work on that technique, as well as all the other cool stuff she’s got going on it there. (And yep, I still don’t know how she does it all!)
@Mary: Apparently they only mine 100kg a year, but I guess one day it will run out… won’t that be a shame? The goblet is fantastic! I’ve been to one of the mines, Treak Cliff Cavern – you can’t go in the actual mine itself but you can see the Blue John still left in the cavern. It’s quite a tourist attraction because the cave itself’s very beautiful, and they sell jewellery and other pieces made from Blue John
@Phaedrakat: That’s a good idea, getting some Blue John for myself. I’ve been meaning to visit Castleton again soon anyway – I’m pretty sure they sell little imperfect chunks of rock as well as the worked pieces so if the worst comes to the worst I can just get one of those!
And I totally vote for any kind of faux stone tutorial! I love semi-precious stones but I’m also interested in beach pebbles and other “non-precious” stones as well (like the ones Tina Holden does so well).
@Silverleaf: Me,too — I love the beach pebbles, as well. (Tina H’s are very pretty.) I love the faux stone bracelets, very “natural”-looking jewelry. I had to go back to get a look at the awesome goblet you guys talked about, I didn’t see it the first time (clicked on a different site, not sure how!) I did see a picture of the Blue John in the cavern, though. How pretty that must look in person. And what a fun “field trip” if you decide to go! Hopefully, you’ll get a nice piece of Blue John stone for a reasonable price. And I hope that with the resticted amount they mine, it will last for a long, long time!
@Kat: Well maybe I’ll take my camera along soon – last time I went was in 1997, before digital cameras! I was17 then, which really makes me feel old… ;)
@Silverleaf: Naw, you’re just a baby. It’s those new-fangled cameras, you know? Because I refuse to accept the fact that I’m old (I still feel young inside – well, at least in my head!) Oh, brother, I’m fooling no one. My body feels even older than I actually am! I noticed that the mining site had pricing for teachers & school tours — did you do something like that when you were in school?
@Phaedrakat: Can’t say I feel 30 in my head, even if my body feel older at times too! We did go on a school trip – we had an exchange visit with a school in France, and when they came over to see us we organised some outings for them. I remember we went to York for the day too, and to Eyam (which is a little village famous because the Plague was there, and they isolated the entire village even though they knew most people there would die, because they didn’t want to infect the surrounding area).
I just recently fell in love with drusy stones and have been trying to figure out how to make faux drusy stones out of polymer. I love the way they look like the crystal color is bursting out of the stone. I would love a tutorial on that, along with the other faux stones. I really love your tutorials and look forward to your newsletter every week. Thanks so much!
@BLong: BLong, hello. What a challenge! Drusy stones:had a peek on Google and see drusy is like that sparkly stuff inside a geode, thousands of tiny crystals. Beautiful colours, B&W too, nice long Greek words -chrysocolla, psilomelane. Jewellery made from it seems to show the crystals ground back somewhat. Cindy, just when you thought it was safe to go snooze in the garden … As if!
First of all let me just say how delighted I am to see you all sharing tips and helping each other out here at the blog! I’m learning new stuff every day from you guys! Thanks!
As well, I like the idea of adding faux unakite and other cool stones to the list of tutorials. There are really an unlimited number of stones we could end up making together. I’ve been tossing around some ideas in my head for making faux drusy gems (Google drusy and you’ll see how awesome they are). I am starting off with the basic fauxs, like turquoise, bone, opal and jade, but once we get through those we can move on to whatever we like, so keep those ideas and requests coming… You never know where we’ll end up!
ok, I need help with something else, am I correct that if you miss a weeks recipes-(I am a member) that you will not be able to get access to the bonus members recipe after that week is over??? I can’t get to the one from Creme Fraische from 20-4A and it really upsets me that I missed it–
@cherie: Cherie – You will find that recipe if you go to the members recipe site: beadvideos.com/category/recipe/. There you will find all the A recipes from the videos you have purchased.
first here is a link to check it out: thebeadersmuse.com/journal/category/beading-contests
it is sponsored by artbeads.com and there are very few kits left–the site can explain it all to you and there are links to past muse contests with pictures of the entries-winners and all entries. It’s a lot of fun, you can do any type of jewelry you like, so using the polymer clay is also an option here–the biggest rule and main rule is that you have to use the “muse” that they send you–and you can’t disclose the muse until the contest is over-otherwise you can add your own beads or just use the ones they send or don’t use any they send, except the muse of course-this is my first time entering and I am having fun with it, even tho I don’t like this times muse very well, but it’s growing on me–still looking forward to getting it done and submitting my entry
@ Cindy Lietz – that’s OK about my name (Marsh)! My mother calls me Marsh and just a few of my really good friends! I loved it coming from you too! :)
@cherie – that a great idea!
@Everyone – I just love this site!!! I don’t always have time to try everything I read about here, but I always learn something and you all are just the best!!
I guess I don’t get the grey streaks from the machine because I do clean it with alcohol strips to get that off if its’ been sitting…so generally all I have on the clay is other tidbits of clay left over on the rollers—that 1 oz. will last a long time to pick up that kind of left overs..
I am anxious to finish the piece I am working on..is anyone else in “The Muse” contest?? That is what the beads I am attempting to make are for.
@cherie: What is ‘The Muse’ contest?
@carolyn: I did a search; it looks like “Use the Muse” is the 4th installment of a beading contest where you have to purchase a ‘kit’ that contains beads and a “muse,” one mystery item from the kit that you have to use in your creation. You can use as many or as few beads from the kit as you like, as well as things from your own stash. But you have to use ‘the muse’. Sounds kinda fun! You can find it at thebeadersmuse (dot com.)
@Cherie: That IS the contest you’re talking about, right? Also, I was wondering if you’ve entered in the past?
I don’t get stray colours unless I’m using a softer clay like Premo. That doesn’t happen often so mine’s always grey. Perhaps I’ll use it for a “shades of grey” monochromatic bead set some time.
No kidding, the light-colored clay I’ve used to run thru the PM to catch stray colors or dark streaks don’t look pretty enough for beads. Then again, I haven’t been busy enough with lots of colors. When I get more caught up, my scrap piece will be pretty enough for beads – I’ll make it a goal!
@Cherie, that is an amazingly good idea! I love that you use the clay for beads later. I’m definitely going to remember to do this.
thank you, every once in a while I come up with one! lol
@cherie… What a cool idea, I love it!
I do have one little tip to pass on: when using the pasta machine, I don’t always have or take the time to clean it between colors, sooo….I keep one half package-(1 oz) of white on hand to run thru the machine before running a different color thru it–it will pick up most of any residue still on the rollers or hanging underneath where you may not see it. When the white sheet gets enough pieces and parts of other colors and appears to be a pretty cool looking bead, I make a bead out it and start a new “cleaner” sheet-works for me–thanks guys–chat later
@cherie: Super cool tip! Does this work to get the alcohol ink off the rollers also?
@carolyn: It did on the one occasion I had alcohol ink on mine. I do roughly the same thing, but mainly to get rid of the grey/black streaks that my pasta machine makes when you first use sections of the rollers that haven’t been used for some time, while making sure I won’t discolour whatever I feed through it next. The results of using clay for *that* kind of cleaning aren’t really suitable for making beads, however… unless you really, really like grey. ;)
When I get them done, I will most definitely send pix to Cindy and hopefully she will let you all see what I attempted to do–and once more thanks a million for all the help and support from super fellow “polygimists”–(hope you get the pun! lol)
@cherie: Funny…lol. I love how everyone jumped right in to offer advice. It’s what I love about this site. It would make a great “member spotlight”, so make sure you send Cindy some pictures. Can’t wait to see how they turn out!
“…the members here rock!!” >>> @cherie, I couldn’t agree with you MORE!!! The “teamwork” (as Mary put it) is phenomenal!
@everyone – Please do keep on sharing. When someone needs help with something, your input is ALWAYS welcome and appreciated here at this friendly and supportive polymer clay community.
and yes, that was about as close to the color of the stone as I guess I’ll find–my “real” beads are small squares but very similar in color-maybe a little more salmon and less reddish-but the idea is the same.
Thank you all one more time, what a great place to be a part of! you guys have no idea how wonderful it is to be able to get answers so fast from so many…I purchased an item on Eb…a week or so ago, asked the seller what her technique was and the only answer I got was …years of working with polymer clay–how deflating and disappointing..the members here rock!!
@cherie: OMG! How rude that seller was! It’s one thing to not want to share your technique so you can sell it, but you don’t have to be mean about it — especially to a customer!
@cherie: Yes, we’d love to see your results!
Some people just don’t want to tell you their secrets in case you copy their work and take away their sales! I’m the sort that will tell anyone who asks exactly how I make things – I was in my local bead shop a couple of months ago showing the owner some of my pendants which she’d asked me to bring in, when a customer asked me how I’d made a particular one (based on Cindy’s Crackled Gold Leaf and Alcohol Ink technique). I gave her a rough idea how it was done, and as soon as she left the shop owner told me off for revealing my secrets! She says I should never say “Oh it’s easy, you just have to…” because then that person will go away and make their own version rather than buying one from me.
I can sort of see where she’s coming from, but I still share. I figure if someone’s going to make their own pieces they’ll do it anyway, and I like to explain exactly how much work went into my jewellery.
thank you all for all the wonderful help and ideas-will work on all of them to see which gives me the best results for what I am trying to achieve–again, I thank all of you and I too would love to see what Cindy comes up with for this one–
@cherie: Please let us know the results. Maybe if you email a photo to Cindy she could post it here. I rather like the idea of grating … or finely chopping then globbing and rolling. I may have to try that myself. But do let us know how things turn out for you … and what worked best. We are all here to learn together!