How To Clean Your Polymer Clay Extruder
Video #537: Tips for cleaning both the Makins Professional Polymer Clay Extruder and the Walnut Hollow Extruder.
More...

IN THIS POST: — extruders — maintenance — cleaning — makins — walnut hollow — extruder — polymer clay extruder — (Topics marked with an asterisk* are discussed in the Comments Section below).
Topics Covered In This Video:
- Maintenance and care of your polymer clay extruders to keep them working smoothly.
- From a cleaning perspective, both the Makins and Walnut Hollow extruder brands are very similar.
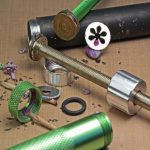
- Unscrew end cap to clean out left over clay.
- A toothpick works well for removing clay from threads in the cap and on the barrel.
- Unscrew the other end cap and pull out the plunger.
- Scrape off clay stuck to rubber ring on plunger.
- Both tool brands have extra rubber o-rings, should they ever need to be replaced.
- Wipe off plunger end and barrel with baby wipe or rubbing alcohol.
- Vaseline (Petroleum Jelly) can be used to lubricate rubber o-ring.
- Cut Lube or WD-40 works great to lubricate the metal threads of the crank shaft.
00:00:03 –> 00:00:07 Hi guys, its Cindy Lietz, your Polymer Clay Tutor, and today’s Studio Tip I’m gonna
00:00:07 –> 00:00:12 show you how to clean and maintain your Polymer clay extruders.
00:00:12 –> 00:00:20 Now, I’ve got two different brands of Polymer clay extruders here, I’ve got the Makins
00:00:20 –> 00:00:28 Professional Clay Extruder and then I’ve also got the Walnut Hollow Extruder, and they’re
00:00:28 –> 00:00:34 very similar designs but they’re a little bit different as far as…well, they’re
00:00:34 –> 00:00:37 about the same when you clean them, I’m just gonna show you how they look when you
00:00:37 –> 00:00:38 take them apart.
00:00:38 –> 00:00:45 Anyways, both of these are dirty, they still have clay in them and things, the ends screw
00:00:45 –> 00:00:51 off like that, and here I’ve even got the little die sticking at the end here, pop that
00:00:51 –> 00:00:58 off, and then there’s usually some clay sticking at the end here, this’s just the
00:00:58 –> 00:01:06 way…there’s a little bit of a space left between the plunger and the die, so there’s
00:01:06 –> 00:01:12 always a little bit of wasted clay here, and you can scrape that off, put it in your scrap
00:01:12 –> 00:01:14 pile.
00:01:14 –> 00:01:19 And then you can use something like a little toothpick or something, and scrape around
00:01:19 –> 00:01:23 the edges like this, and that’s generally all you’re really gonna need to do…but
00:01:23 –> 00:01:28 I will show you how to take it apart if you need some further cleaning, you can wipe it
00:01:28 –> 00:01:30 off here.
00:01:30 –> 00:01:36 But the way these are designed…and I’ll unscrew it at the other end as well, they…both
00:01:36 –> 00:01:43 of them…both of these extruders have a…on the plunger around the outside edge…oh and
00:01:43 –> 00:01:49 here’s some nice gunk, I haven’t cleaned this one out in the back for a while, but
00:01:49 –> 00:01:58 if you pull it all the way out, you’ll see that there is a little…well, maybe you won’t
00:01:58 –> 00:02:01 see too well ‘cause this is kinda dirty, I haven’t cleaned it in a while…right
00:02:01 –> 00:02:10 along this edge is a little rubber washer, and what this does is it scrapes…and you
00:02:10 –> 00:02:18 can see it better if I just show you one of these…it’s a little rubber ring like this,
00:02:18 –> 00:02:23 and it’s right around the outside edge here, and this pushes down the center of the barrel
00:02:23 –> 00:02:26 and actually keeps the barrel very clean.
00:02:26 –> 00:02:34 It’s pretty much a self-cleaning…the way this ring runs down, so the barrel itself
00:02:34 –> 00:02:37 doesn’t need much cleaning, but it’s all this other stuff that does.
00:02:37 –> 00:02:46 This part here, you can scrape off the clay, and if you ever break that ring, both of these
00:02:46 –> 00:02:52 machines put an extra one in there, I think there’s 1 extra in the Makins, and 2 or
00:02:52 –> 00:02:59 3 extra in the other one, in the Walnut Hollow, and you can just clean that all off, if you
00:02:59 –> 00:03:04 need rubbing alcohol or anything like that, you can use that or a baby wipe, and just
00:03:04 –> 00:03:08 keep cleaning at it…I’m not going to keep going ‘cause you don’t need to sit here
00:03:08 –> 00:03:15 and watch me clean, but, if it’s getting kinda dried out or anything, what you can
00:03:15 –> 00:03:27 do is you can also put a little of petroleum jelly on there, and you can rub a little bit
00:03:27 –> 00:03:33 on…after you’ve cleaned it all, you can rub it on here and it’ll help it slide through
00:03:33 –> 00:03:37 the barrel nicely and then you can screw it all back together…now look how dirty this
00:03:37 –> 00:03:39 one was, ooh, wow.
00:03:39 –> 00:03:44 Now this one is a little newer, so it…I haven’t had a chance to get it that dirty,
00:03:44 –> 00:03:53 but it works the same sorta way, you unscrew the ends…this one I found, tends to get
00:03:53 –> 00:03:59 a lot more stuck in the lid, maybe it’s just a little looser, but, both of these…
00:03:59 –> 00:04:05 if you get any clay stuck in these areas here, you can just use like a toothpick or something
00:04:05 –> 00:04:11 like that and just kinda scrape out those little…all the little threads, and right
00:04:11 –> 00:04:18 in the base here…and there’s quite a bit of gunk…Polymer clay that sneaks in around
00:04:18 –> 00:04:23 the corners of the dies and that kind of stuff, so you can scrape that all out, wipe it down
00:04:23 –> 00:04:31 if you need to, and the same thing goes with the end here, this one has, you know, clay
00:04:31 –> 00:04:39 stuck in the end and all in around this corner, this one has a bit more of a lip on it, I
00:04:39 –> 00:04:46 noticed the Walnut Hollow has a bit of a lip in here that clay gets stuck into, but it
00:04:46 –> 00:04:55 also unscrews the same sort of way and you can just pull it out and clean it all up.
00:04:55 –> 00:05:02 Now…see it’s the same sort of idea, the little rubber washer’s here at the end,
00:05:02 –> 00:05:07 and you can scrape it out and wipe it down with, like a toothpick and all that stuff,
00:05:07 –> 00:05:10 okay, so that’s one of the regular maintenance.
00:05:10 –> 00:05:18 Sometimes, when you’re using your…pretend I cleaned this, sometimes when you’re using
00:05:18 –> 00:05:28 your machine here, the threads can get kind of…so that they don’t move super smoothly,
00:05:28 –> 00:05:35 one little tip is to take something like…this is called Cut Lube, it’s basically a wax
00:05:35 –> 00:05:41 that is used for… when you’re using a Dremel or drill bits and that kind of thing,
00:05:41 –> 00:05:50 it keeps the metal moving…it just sort of lubricates the metal, that’s what that does,
00:05:50 –> 00:05:56 but what you can do is you can add a little bit of this to the threads too, if you want,
00:05:56 –> 00:06:00 and then when you’re opening and closing it, it just sorta lubricates the threads,
00:06:00 –> 00:06:07 ‘cause you’ve got metal against metal, and it can kinda grind away a bit if it’s
00:06:07 –> 00:06:08 used a lot.
00:06:08 –> 00:06:12 So, I hope that was helpful for you, it looks like I’ve got a little bit more cleaning
00:06:12 –> 00:06:19 up to do here and get both of these machines all ready to pack back up and put away, alright?
00:06:19 –> 00:06:22 If you liked this video, let me know, and if you’ve got any tips or…
00:06:22 –> 00:06:28 I mean, if you’ve got anything you would like to learn more about, make sure to let
00:06:28 –> 00:06:30 me know in the comments section below, alright?
00:06:30 –> 00:06:32 So we’ll see you next time and bye for now.
Our goal is to translate these videos into as many languages as possible. If you are interested in helping with this initiative, then please do contact us and we will figure out a way to make it worth your while :)
Resource Links:
- Related Video: Makins vs. Walnut Hollow Polymer Clay Extruders
- Related Video: Makins Professional Ultimate Clay Extruder
- Related Article: Extruder Cleaning and Maintenance Tips Plus Project Ideas
Resources marked with a double ** asterisk are affiliate links. If you click on them and decide to buy something, we may receive some compensation. This does not affect the price you pay in any way. What it does do, however, is helps us to continue providing free videos for you, here at the PcT website. Using our links to purchase your tools and supplies, is always greatly appreciated.
Sponsored Ads & Special Promotions
Shareable Images


To share this full blog post anywhere on the web that allows links in comments, here's a shortened url to copy and paste...
>> https://mypct.ca/v537 <<
Want to chat about today’s post? That’s what the comment section below is for. Scroll Down… We’d love to hear from you!
Or... if you would like to request a topic for a future post, here is the link to do that… PcT Suggestion Box
I’ve found a dental tool is helpful when cleaning out the top where there are lots of small grooves. For the dentist, their tools lose the sharpness they need and they willingly give them away.
Thank you again,Cindy for another helpful video. I had to exchange my Walnut Hollow extruder ( after not a lot of use) because the threading gave out and there was nothing I could do to make it move again! Just received my new one from Amazon and will now buy the wax to keep it’s threads healthy! I love seeing you wear the jewelry you have made when you do videos. The one you wore today renewed my hope that I’ll someday be able to recreate it for my best friend who adores the seashore! You have helped me so much!!
Thank you Julia! I am so happy that you are learning from the tutorials! When you make the Shoreline Tutorial, do make sure to post some pics on the PcT Facebook Page!
Whoa, Dixie. Glad you did nt get a bruise that would be hard to explain. I have had the Makins about 6 years and never had a problem. I have never taken it apart to clean it other than taking the last glob of clay off the plunger. I love my extruder and use it a lot.
Anna
LOL, Anna I actually did bruise my cheek. I’m such an idiot.
You’re not an idiot Dixie Ann! Don’t you say that about my friend! :)
Same goes for me Anna!
Happy clean up Cindy! One job I really don’t care to do but am persnickety about doing because switching from one clay color to the next especially in the lighter colors really makes a difference and prevents contamination. Learned that one early on. My first extruder was a regular Makins and the squealy noise it make just about drove me nuts. I didn’t know about lubricating then and by luck ran across an article on a product called CoolSlip which is used in the extruders with Metal Clay since it is so sticky. I figured it would work with Polymer Clay too so I tryed it and it works like a charm. Just one spray into the barrel and that’s all it takes. NO more squealing noise. Of course now I know there are other products that will work just as well. Also Maria, I know what you mean about yanking on the plunger, as the first time I did that, I hit myself in the face but it didn’t break! LOL
Cool! About the CoolSlip, not the plunger hitting your face!! LOL Geez, you guys are intense with the tools. I guess I am overly gentle with tools… broke lots of stuff when I was a kid, and have gone the other way to compensate. As far as the colors contaminating from one batch to another, I only have that problem with the clay stuck in the ends and the threads, never with the barrel. so it is surprising to me to hear that you and others are having problems with that.
I have heard a lot of complaints from the French clayers on the Makin one. I have the older model and it seems great so far.
I wondered if you know the Lucy clay extruders. My French friends seem to like it or them depending on the one they have . It seems very expensive in Canadian money though.
Have you tried one of them?
Allways a pleasure to discover with you!
Hi Hermine, no I have not tried the Lucy Clay Extruder yet. You are right about it being expensive. From the quick checking I did, it looks like the Lucy Clay Extruder is around the $90 and the Makins or Walnut Hollow ones are more like $20-$25. Although the quality of the Lucy one is supposed to be very high and worth the price, there are also supposed to be some quirks about the design of the tool that can be a real pain. Like you can’t go backwards with the plunger… if you extrude small batches, you have to take the plunger out and start from the beginning every time and stuff like that. I would love to do a review, but the company will have to send me one, because I just can’t seeing spending the price, when I have two ones that work well, for a lot cheaper. I do really love her designs for the disks though and I think they may work with the Makins and Walnut Hollow machines, so it might be worth getting some of those.
Hi Cindy,
One thing I wanted to warn everyone about in regards to the Makings Machine (I have no experience with the Walnut Hollow one) is to be careful when pulling out the plunger from the barrel. I broke my first one by yanking it out too forcefully and broke the little pin/nail that attaches the disk to the plunger rod. I had to get a replacement. Lubricating the plunger is certainly an excellent idea.
Maria
Thanks for letting us know about that Maria! I am guessing that there may have been a weakness at the point already… it should not have been able to break, even if you were pulling on it too hard. It should be stronger than that. Was it an older machine or a new one? And did they replace it for you quickly and easily? Just wondering. I hadn’t heard of that issue with them yet.
Hi Cindy:
I did have it for a while, but did not use it much. I remember pulling a bit too hard on it in an eager attempt at cleaning and the rubber ring became twisted. I went ahead and purchased a new one as I had had the other machine for quite a while already and did not want to demand a free replacement from them.
Maria