How To Mix Polymer Clay Tutor Color Recipes
Video #427: If measuring color parts and fractions is confusing for you, this lesson will help.
More...

IN THIS POST: — color mixing — color recipes — (Topics marked with an asterisk* are discussed in the Comments Section below).
Topics Covered In This Video:
- If you have been a member of the Polymer Clay Tutor for any time, then you will know that I mix up color mixing recipes based on photographs. To date, I have made about 65 color palettes, each with 4 colors per palette. That comes to more than 520 individual color recipes. Wow… that’s a lot of colors!
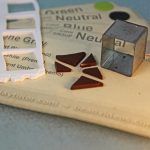
- In this video, I show the recipe cards in a palette and how to mix up one of the recipes.
- Using a pasta machine and a square cookie cutter will make the mixing much easier. I didn’t mention it in the video, but once you have mixed your recipe, it is a good idea to bake a small circle of the clay, and glue that sample onto your recipe card for future reference.
00:00:03 –> 00:00:08 Hi guys, its Cindy Lietz, your Polymer Clay Tutor, and today’s Mini Tute, I’m going to
00:00:08 –> 00:00:12 show you how to mix my color recipes.
00:00:12 –> 00:00:20 Now, if you have been a member of Polymer Clay Tutor for any time, you will know that
00:00:20 –> 00:00:26 I mix up color recipes based on photographs, and I have to… up to date, I have mixed
00:00:26 –> 00:00:33 up hundreds and hundreds of recipes, I think that I am around… there’s about 65 color
00:00:33 –> 00:00:37 palettes, I got a big box here of all the different colors that I’ve been mixing over
00:00:37 –> 00:00:43 the years, and I think there’s about 520 recipes.
00:00:43 –> 00:00:46 The way the recipes are set up…and I work with Premo!
00:00:46 –> 00:00:54 Clay, the way the recipes are set up is they’re in a color palette of four colors, and there
00:00:54 –> 00:00:56 is an A series and a B series.
00:00:56 –> 00:01:05 The A series recipes go to the members only, to the paid tutorial members, and then the
00:01:05 –> 00:01:13 B recipes go to anyone who was on the guest list or our newsletter.
00:01:13 –> 00:01:20 So if you’re not getting any of the recipes, you’re gonna wanna make sure to go to www.PolymerClayTutor.comand
00:01:20 –> 00:01:25 go sign up for our newsletter so that you can get the B recipes, which is great.
00:01:25 –> 00:01:31 Now like I said, they’re set up in a palette, now this is a palette of recipe cards from
00:01:31 –> 00:01:38 the Alpine Lichen Palette, and it’s a real pretty picture that we took up in the Whistler
00:01:38 –> 00:01:43 Area in the mountains, and there’s all these pretty colors in it, like this Green, this
00:01:43 –> 00:01:46 Black, this Blue and this Stone color.
00:01:46 –> 00:01:54 Now the recipes are laid out on each card, and with the type of clay and the amount of
00:01:54 –> 00:02:02 clay in it, now, what you need to do is when you get your color recipe ready to mix up…and
00:02:02 –> 00:02:07 we’ll do this one here ‘cause it’s a pretty simple one, not too many different colors
00:02:07 –> 00:02:13 but it also has some fractions in it which gets some people mixed up, so what you need
00:02:13 –> 00:02:17 to do is look at the colors that you’re gonna be using in the palette… or in the recipe,
00:02:17 –> 00:02:22 so it’s Black, White and Burnt Umber, and these are all Premo!
00:02:22 –> 00:02:25 Clays, and I’ve laid them out here.
00:02:25 –> 00:02:31 Now I’ve rolled them out at the same thickness, now this is really important that you roll
00:02:31 –> 00:02:37 out every color that you’re gonna be mixing at the same thickness on your pasta machine,
00:02:37 –> 00:02:41 if you don’t have a pasta machine, you could roll it out by hand, but it’s important that
00:02:41 –> 00:02:46 all of your thicknesses are exactly the same thickness.
00:02:46 –> 00:02:50 So I’ve done that for my Black, White and Burnt Umber, then what you’re gonna need
00:02:50 –> 00:02:57 is a square cookie cutter, now it doesn’t really matter the size, if you have a small
00:02:57 –> 00:03:02 square cutter then you’re gonna get small amounts of clay, and if you have a large one,
00:03:02 –> 00:03:04 you’re gonna get larger amounts.
00:03:04 –> 00:03:09 So sometimes I just grab the size that seems to be the right amount, when I’m color mixing
00:03:09 –> 00:03:17 just my samples, I usually use this tiny one, but if I’m going to make a batch of clay for
00:03:17 –> 00:03:22 a project or something, I would use the larger one, right now, I’m going to use a relatively
00:03:22 –> 00:03:24 small one.
00:03:24 –> 00:03:31 It doesn’t matter as well what size it is, as long as you’re using the same cutter throughout
00:03:31 –> 00:03:37 the whole recipe, ‘cause we want the parts to be equal every time.
00:03:37 –> 00:03:43 So to make this recipe, it says 1 quarter part Black, so what I’m gonna do is I’m gonna
00:03:43 –> 00:03:55 cut out 1 square of the Black, and then we need a quarter of it, so what I’m gonna do…
00:03:55 –> 00:03:59 and this is why you want a square cutter and not some other shape, another shape would
00:03:59 –> 00:04:06 work except for it’s hard to divide into fractions, so a square is the best ‘cause you can easily
00:04:06 –> 00:04:16 split it into fractions by just going from corner to corner, and like that, so now I
00:04:16 –> 00:04:23 have quarters, and we need one quarter part Black, so I’m gonna put that right here ready
00:04:23 –> 00:04:25 to be mixed up.
00:04:25 –> 00:04:41 Then we need 5 parts White, so I’m gonna cut out 5 parts White, and put those in the pile.
00:04:41 –> 00:04:51 And now we also need one eighth part Raw…or Burnt Umber, so…where’d my cutter go,
00:04:51 –> 00:04:58 there it is, so we’re gonna cut out 1 square again, and this time we’re gonna cut it first
00:04:58 –> 00:05:10 into quarters, like this, and then it’s easy with the square, you can then visually cut
00:05:10 –> 00:05:18 it from straight up and down…this guy is jumping out of the way, but I’ll just cut
00:05:18 –> 00:05:24 straight up and down here and then I’ll have…1 of these smaller sections now is an eighth,
00:05:24 –> 00:05:29 okay, so we’re just gonna add that to the pile and then start mixing it together.
00:05:29 –> 00:05:35 Now, you can do it all by hand if you wanted to, or you can run it through your pasta machine,
00:05:35 –> 00:05:43 which makes it easier, and you just keep blending it until you’ve got your color right thoroughly
00:05:43 –> 00:05:48 mixed, and then that’s all it takes to get your color recipe, okay?
00:05:48 –> 00:05:54 So sometimes, there are several colors in a recipe, sometimes there are only a few,
00:05:54 –> 00:06:00 it really depends on what it takes to get the right color for me to get the recipe ready
00:06:00 –> 00:06:06 for you, so it’s a lot like cooking, if you’ve got the right tools and the right amounts,
00:06:06 –> 00:06:09 you’re gonna end up with the right results.
00:06:09 –> 00:06:13 So I hope that was helpful for you, I’m almost done, see, it’s a little streaky, but we’re
00:06:13 –> 00:06:19 getting there to a nice stone color, and if it was, make sure to press that like button
00:06:19 –> 00:06:22 that would be great.
00:06:22 –> 00:06:27 And my question for you…oh actually, I don’t have a question today, what I have is a request,
00:06:27 –> 00:06:34 why don’t you head on over to www.PolymerClayTutor.com and make sure to sign up on the newsletter,
00:06:34 –> 00:06:40 it’s also called the guest list to make sure that you’re getting your free B series color
00:06:40 –> 00:06:42 recipes.
00:06:42 –> 00:06:49 And don’t forget to subscribe here to our YouTube Channel, so that you can get… we
00:06:49 –> 00:06:53 have new videos every week and you’re not gonna want to miss them.
00:06:53 –> 00:06:55 So we’ll see you next time and bye for now.
Our goal is to translate these videos into as many languages as possible. If you are interested in helping with this initiative, then please do contact us and we will figure out a way to make it worth your while :)
Resource Links:
- Related Video: Understanding Polymer Clay Color by Making Mud
- Related Video: Polymer Clay Color Mixing Color Saturation
- Related Video: Color Plus 1 Polymer Clay Color Mixing Trick
- Related Article: Tweaking Polymer Clay Recipes Leads To An Endless Supply of Colors
- Amazon: Ateco Geometric Shape Cutter (Set of 24) **
- Amazon: Marcato Atlas Pasta Machine **
Resources marked with a double ** asterisk are affiliate links. If you click on them and decide to buy something, we may receive some compensation. This does not affect the price you pay in any way. What it does do, however, is helps us to continue providing free videos for you, here at the PcT website. Using our links to purchase your tools and supplies, is always greatly appreciated.
Sponsored Ads & Special Promotions
Shareable Images


To share this full blog post anywhere on the web that allows links in comments, here's a shortened url to copy and paste...
>> https://mypct.ca/v427 <<
Want to chat about today’s post? That’s what the comment section below is for. Scroll Down… We’d love to hear from you!
Or... if you would like to request a topic for a future post, here is the link to do that… PcT Suggestion Box
Cindy,
I have been downloading the B series colors for the last 6 months or so and have recently joined the polymer clay tutor classes so will start getting the A series too. I have the pictures downloaded to my computer, but when I try printing them out it comes out wonky. How do you recommend printing the recipe cards and how do you recommend storing and organizing them so they are actually a usable tool in our polymer clay activities.
Thanks for the great tutorials.
Beth Sullivan
Hi Beth we are currently working on a new format for the color recipes that will be much more printer friendly. I would just store them on your computer and wait until the new ones are ready before going to the effort of printing these old ones out.
I would love it if you would provide a way to print 4 blank recipe cards on a sheet of letter size paper. I love to mix my own recipes and could then just fill in the blanks.
Hi Eloise – In several other posts we’ve provided a link that allows you to download a blank recipe card. Using your Word or Paint program, you can then arrange four of the individual recipe cards onto a single page and print them out.
Hi again Cindy, I watched your PcT on how to mix colors, it was good but my question is more to do with translucent clay and colored translucent clay mixing them together with regular clay. Using just clay and measuring it I understand from your receive cards, it is when you want to make a pickle or tomato color (like green in a pickle) I have seen people say use translucent clay with green what would be the amount of regular green and add how much translucent green or just plain translucent. The question is more about amounts you need of translucent clay be it plain translucent or white translucent (in this case maybe green translucent). Is there some type of recipe like you use to get a translucent color. I am just guessing but I would start with 1 part green, 3 parts plain translucent. Then the next question is green translucent what would you use that for. It could be very costly even using the tiny square, to figure out how to get a green translucent for a pickle or tomato recipe. I hope this makes since. It would be a very interesting class for students to understand your recipe cards which are perfect. This is something I have been trying to figure out.
Thank you so much for your PcT videos on you tube.
Hi Sandy, I understand better now. I know that you are an accountant and that you would prefer to have exact measurements, but I’m afraid that would be a little tricky. It is a little like asking an water color artist, the exact amount of water to add to white to get the perfect cloud…. the answer is, “well that depends.”
If I was teaching you how to make a pickle, I would give you the recipe I used to get a pickle that looked like mine. But every pickle could be a little different, and you may need to experiment until you arrive at the perfect pickle recipe for you.
I would start with the translucent clay first though and then add teeny tiny amounts of color till you get close to what you think you want. Then bake up a little sample of the color and see how it looks. Does it need more color? Or is the color too opaque and needs more translucent?
Your starting point of 1 part color and 2 parts Trans might be a little opaque for what you’re trying to get. Something more along the lines of 1 part color and 10 or 20 parts Trans could be closer, but like I said, you’ll need to play with that.
If I ever have a tutorial that includes miniature fruits and vegetables, I promise I’ll give you something more precise than that.
Have fun! Let us know if you figure it out…
Hi Cindy,
Thank you so much for the information. I will give it a try and see what happens, I will look for you pickle recipe. I have already joined your newsletter, I now have to remember how to be a paid member. Here in California we have been having a heat wave and it just fries your brain, and of course my computer is in the hottest room in my house.
I some how found the place in Brazil to buy the cutter blade but it did not recognize a Calif. Zip code???
I will keep trying. I am always the one who will get cut.
Buy for now.
Sandy Dellinges
Hi Cindy,
Just popped in here to say I am still around but recovering from op so am staying at my daughter’s house in France. Will be back home in the UK in July, so will look forward to catching up with you all. …….cheers xx………
Nice to hear from you Elaine! Sorry that you have had to have some surgery. Hopefully it has made you feel better and that you are on the mend. Have a lovely time and a quick recovery in France. We’ll be here when you get back! Hugs and Kisses to you across the pond!
Hello again Cindy,
It has taken me a week to figure out how to ask this question. There is polymer (Premo). There is polymer translucent clay, and colored translucent clay. What are the measuring parts amounts when working with regular clay, translucent clay, white translucent clay, or color translucent clay. I can figure out that the more translucent clay you use the (lighter) it would get but what about the measurement amounts (I did accounting before so numbers are important). What if you use a colored translucent do you still use the same regular color ? I hope this makes since to you.
Sandy Dellinges
Hi Sandy, I really don’t understand your question. Are you trying to replace a translucent clay for a solid clay in a recipe or something?
Hi Cindy, could you please tell me if there is any difference (other than brand of course), between Premo Orange 5033 and Sculpy III Just Orange color-wise and if I can substitute the Sculpey color and still end up with the color recipes you have for Chevy Bel Air Palette?
Also, if I don’t have Cadmium Red can I sub another red like Pomegranate?
Hi Christine, that is a very good question! Actually when it comes to mixing exact colors in a color recipe, you can not substitute any other color no matter the brand and expect to get the same result. You might get a very similar color, but never the same.
This is because of the formulations of the colors are never identical, even if they look the same, especially from brand to brand. One brand might use a more saturated formula, or use different pigments to arrive at a similar color.
Color recipes are similar to cooking recipes that way. You might use two different brands of Paprika and end up with a similar but different flavor or one that doesn’t work at all.
So what I’m saying is that if you try and substitute any of the colors in one of my color recipes, you most likely will not get the result you expect.
This very problem happened to one of our long time members a while back. She ran out of Zinc Yellow and replaced it with Cadmium Yellow, thinking Yellow is Yellow and it wouldn’t make much difference at all. But the two Yellows have very different properties and instead of getting a nice green color that the recipe made, she ended up getting a odd taupe color.
If you are not picky about getting the identical colors to mine in this palette, you could test out the other Orange and see how it turns out… but I can’t guarantee you’ll get a nice color from it… but I can guarantee it won’t be a perfect match! :)
Just found you on Youtube – just getting into polymer clay – love your colour mixing tips and have joined your mailing list. Many many thanks, and I look forward to receiving some of your free colour mixes – thanks again.
Ann
Thank you thank you thank you for all of your knowledge. I just spent the last three hours watching your videos and filling up a notebook. Many more hours of watching left.
Hi everyone,
loooove those recipes.
if i want to make my life simpler (certainly if there are a lot of fractions), i recalculate the recipe so that i only have whole numbers and no more fractions anymore. For instance, if the smallest fraction is 1/8, i multiply everything by 8, if 1/16 everything by 16. This may give me large numbers, but afterward, all ineed to do is count the parts going into the mixture.
And depending on the project, i decide on the cutter-size. All i need to do know is count and no more dividing. That way i can also use a very small cutter. And much easier on my brain since i tend to do the color-mixing late at night. So relaxing.
hope this helps
greetz,
Elke
Thankyou for your reply Cindy..unfortunately,I did not know that the only way of getting them was through email and I have deleted my emails (newsletters) so I must not have read them properly,anyway thankyou so much for taking the time to reply. Kindest Regards..
Hi Karen
Nice to hear from you. At this time, the complimentary B-recipes are only available to those who remain subscribed to our weekly email newsletter.
And please note that the links for the B-recipes do expire two or three weeks after they are posted in each of the newsletters… so you must download the cards to your computer when the emails arrive in your inbox each Friday.
Also note that the B-recipes cycle through the newsletter twice. This gives you a second chance to collect ones that you may have missed on the first go round.
All the best.
Hi, I am a newsletter guest and was wondering if you had a certain website that has all the B colour recipes as I have not been financial enough to purchase the members section and I would love to get some ideas from the B section.Thankyou Karenlee…
Thank you girls!
Thanks a million for the color recipes. Without them, I would be experimenting myself more colors All day long. Your recipes help to know what the color looks like an ease my curiosity. :D
Without watching this tutorial, I would have normally made by ‘parts’ by cutting a box and then dividing it into equal (?) squares but without a ruler, it would not possibly have been as exact as going from corner to corner. Saw that hint and went “duh!”. Thank you again. marilyn
Cindy, you have made color receipes so easy to mix and use. Thanks for all the great colors you have put together over the years.
I love those colour recipies. Thank you !