Krafty Lady Art Moulds for Polymer Clay
Video #465: Flexible silicone molds make it easy to pop out your piece with no distortion.
IN THIS POST: — shape –molds — moulds — kraft lady art moulds — silicone molds — after midnight art stamps — polymer clay molds — utee mold — resin mold — sonita arizona — linda hanson — heat safe silicone molds — art retreat – non-stick mold — (Topics marked with an asterisk* are discussed in the Comments Section below).

Topics Covered In This Video:
- Linda Hanson, Sonita, Arizona.
- After Midnight Art Stamps.
- Unique blue colored silicone appearance.
- Heat safe molds suitable for polymer clay, resin, Melt Art, UTEE, hot glue, plaster.
- In mold baking of both liquid and solid polymer clay.
- Detailed and intricate designs.
- Non-stick silicone, no need for mold release.
- Using scrap piece of translucent clay to remove any lint or clay residue.
- Warming up clay to soften it.
- How to get your clay into all nooks and cranny’s of the mold.
- Using clay blade to cut away excess clay from the back.
- Removing lips of clay that come over the edges of the mold.
- Flexible silicon molds make it easy to pop out the piece without distortion.
- Using molded polymer clay pieces for beads, scrapbooks, journal covers, home decor, sculptures, dolls, jewelry, etc. etc.
00:00:03 –> 00:00:07 Hi guys, its Cindy Lietz, your Polymer Clay Tutor, and today’s Product Demo, we’re
00:00:07 –> 00:00:13 talking about the Krafty Lady Art Moulds from After Midnight Art Stamps.
00:00:13 –> 00:00:21 Now one of our members, Linda Hanson, owns an incredible art ranch in Sonoita, Arizona
00:00:21 –> 00:00:28 called: After Midnight Art Ranch, and she has actually invited us up there to go and
00:00:28 –> 00:00:32 visit her ranch some time when we do our Road Trips, and we’re gonna have to take her
00:00:32 –> 00:00:35 up on that, I’m dying to see her place.
00:00:35 –> 00:00:43 But she sent me some of the moulds that she carries at her retreat, now these are silicone
00:00:43 –> 00:00:46 moulds and they’re a neat blue color, so you can almost always tell which ones are
00:00:46 –> 00:00:54 hers, and they are made actually in Australia, but what I love about these moulds is a few
00:00:54 –> 00:00:59 things, first of all, they’re silicone, and they’re high temperature, so if you
00:00:59 –> 00:01:06 wanted to actually bake your pieces in the oven when you’ve put…you’ve molded them,
00:01:06 –> 00:01:09 you could bake them right in the mould.
00:01:09 –> 00:01:19 So you could use liquid clays, as well as Polymer clay, resin, any of those melt-art
00:01:19 –> 00:01:24 type products with the UT and all kinds of neat things… plaster and stuff.
00:01:24 –> 00:01:30 But, what I love about them is the detail, now, I’ve got a few different stamps here,
00:01:30 –> 00:01:37 I’ve got…or moulds here, this is like an antique button one, it has lots of different
00:01:37 –> 00:01:39 button moulds on it.
00:01:39 –> 00:01:45 And here are some of the ones that I have molded from it, here, I took and put a couple
00:01:45 –> 00:01:51 of the button moulds on a barrel bead which has a sorta…real antique look to it, and
00:01:51 –> 00:01:56 here are a few of the other ones, and what’s really great about these moulds is all the
00:01:56 –> 00:02:04 fine, fine detail that are on them, hopefully you can see that, but there’s tiny little
00:02:04 –> 00:02:09 patterns and fine lines that are in these moulds that are just stunning.
00:02:09 –> 00:02:11 There’s also…
00:02:11 –> 00:02:18 I’ve also got a tribal mask one here, and I’ve got…here’s a journal cover that
00:02:18 –> 00:02:23 I’ve made using one of the moulds from the tribal mask, I’ve also… in the background
00:02:23 –> 00:02:34 here, used this fern mould, and it has a real… a very realistic texture to it, and so it
00:02:34 –> 00:02:39 just turns out stunning as a background for this journal cover.
00:02:39 –> 00:02:46 I’ve also got one here of a large leaf, and I used the Faux Jasper technique to make
00:02:46 –> 00:02:49 this pendant on this mould here.
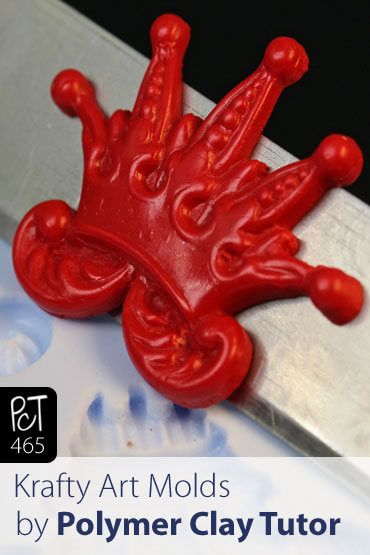
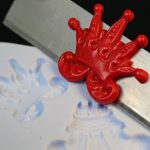
00:02:49 –> 00:02:54 And then there’s a bunch of crowns that are awesome, I’ve got a few of the moulds
00:02:54 –> 00:03:00 here, but here’s the mould I wanted to show you, now, there are a couple of things to
00:03:00 –> 00:03:07 do when you’re using these moulds… to keep in mind, something as detailed as this
00:03:07 –> 00:03:14 crown with all these little spires that come off of it, the best way that you’re gonna
00:03:14 –> 00:03:21 mould this is to use a little bit softer clay…I’m just gonna warm this up a bit, now I can see
00:03:21 –> 00:03:25 there’s a little bit of dust and lint on there, so I’m gonna also use my scrap piece
00:03:25 –> 00:03:31 of Translucent clay, which I have laying around the surface on my work table, and I’m just
00:03:31 –> 00:03:36 gonna clean up any little lint or anything that might be in the mould, ‘cause you don’t
00:03:36 –> 00:03:42 want that sticking to your piece, then I’ve got a piece of clay here that I’m just warming
00:03:42 –> 00:03:43 up.
00:03:43 –> 00:03:49 Now on the tiny little details, what I recommend you do is take kind of like a little snake
00:03:49 –> 00:04:00 of clay and push those right into the mould part first, I’m just gonna press that in,
00:04:00 –> 00:04:06 that way you know you’re getting into all the little spots, so I’m gonna work those
00:04:06 –> 00:04:17 into those areas, and this one has a lot of neat little carving type details on it, and
00:04:17 –> 00:04:21 that’s…this is where a really soft clay would work quite nicely.
00:04:21 –> 00:04:25 If your clay is a little too firm, what you could do is…well first of all you could
00:04:25 –> 00:04:31 warm it up, that really helps, and then you can…you could add a little bit of clay softener
00:04:31 –> 00:04:34 or baby oil or something like that to the clay if you want.
00:04:34 –> 00:04:40 I’m just pressing this into each of the areas of the mould…we are going to work
00:04:40 –> 00:04:48 this all together so that there aren’t any lines here, but I’m just making sure that
00:04:48 –> 00:04:54 every part of this mould has got a good bit of clay in it.
00:04:54 –> 00:04:59 Now, you can see all the lines from all the separate pieces that we have added there,
00:04:59 –> 00:05:05 so that’s not any good, so we’re gonna work on this pressing it in, and just kinda
00:05:05 –> 00:05:11 incorporate all that clay and get them to bond together, so that you’re not seeing
00:05:11 –> 00:05:13 any lines anymore.
00:05:13 –> 00:05:21 These moulds are quite flexible, so you can really press into them, and once you’ve
00:05:21 –> 00:05:26 really worked that in and you don’t have any lines or anything on the backside, chances
00:05:26 –> 00:05:32 are pretty good that you’re not gonna have any lines or anything on the other side either.
00:05:32 –> 00:05:37 Now what we’re gonna do is we’re just gonna take a blade and very carefully, ‘cause
00:05:37 –> 00:05:45 you don’t wanna cut into your silicone here, you just want to slice off the excess clay,
00:05:45 –> 00:05:52 so I’m just gonna slowly and gently cut this off.
00:05:52 –> 00:05:56 Now the nice thing about this silicone is that it’s very nonstick, so I didn’t need
00:05:56 –> 00:06:01 to use any mould releases or anything in there before we started.
00:06:01 –> 00:06:13 Just gonna cut a little off this way, and then, it’s not a nice look to have any clay
00:06:13 –> 00:06:17 kind of coming over the edges, so what you do on any of these silicone moulds is you
00:06:17 –> 00:06:24 kinda work from the outside in, and just make sure that you’ve pressed in…there’s
00:06:24 –> 00:06:32 no clay hanging over the edges of the molds, you go around all the edges, making sure there’s
00:06:32 –> 00:06:41 no extra clay hanging over the lips there….maybe I have a little too much here, then I’m
00:06:41 –> 00:06:44 gonna smooth this out really nicely.
00:06:44 –> 00:06:48 Now I could work at it for quite a bit, I could even use my roller if I wanted to, just
00:06:48 –> 00:06:53 to make sure this back is nice and smooth, if you have a texture…if both sides are
00:06:53 –> 00:06:57 gonna show, and you have a texture plate you’d wanna press into there, you could do that
00:06:57 –> 00:06:59 as well.
00:06:59 –> 00:07:02 But now that this is pretty smooth…I’d work at it a little tiny bit longer, what
00:07:02 –> 00:07:08 I’m gonna do next is I’m just gonna pop it out of the mould, and you get to see…I’m
00:07:08 –> 00:07:21 gonna kinda stretch it back, and work it right out of the mould like this…oh, I think I
00:07:21 –> 00:07:31 broke it there, let me just work that a little bit together again, I’m gonna pop that right
00:07:31 –> 00:07:39 out, now isn’t that beautiful, we’ve got this perfect, highly detailed little mould,
00:07:39 –> 00:07:45 and the nice thing about the way these moulds are poured…or finished, the surface of it
00:07:45 –> 00:07:47 is really nice and smooth.
00:07:47 –> 00:07:53 And so you don’t have to worry about sanding it or anything afterwards, you can just wax
00:07:53 –> 00:07:59 it with the Ren wax and buff it, or you can use a Gilders Paste like I did on this one
00:07:59 –> 00:08:04 here to sit in the details and really give it a beautiful finish.
00:08:04 –> 00:08:11 There’s all kinds of uses for these types of moulds, you can make this as a crown for
00:08:11 –> 00:08:18 a doll or something like that, you can use it on journal covers, jewelry pieces, you
00:08:18 –> 00:08:22 can even use it for scrapbooking and all kinds of great projects.
00:08:22 –> 00:08:28 So I hope you enjoyed this tutorial, and if you did, click that like button.
00:08:28 –> 00:08:39 Don’t forget to check out Linda’s great stamps at www.amstamps.com and she’s got
00:08:39 –> 00:08:44 a huge selection of rubber stamps and moulds and all kinds of great stuff.
00:08:44 –> 00:08:50 And my question for you today is, what are your favorite moulds…what are your favorite
00:08:50 –> 00:08:54 uses for using Polymer clay moulds and silicone moulds?
00:08:54 –> 00:08:58 I’d love to hear your comments in the comment section below.
00:08:58 –> 00:09:02 And don’t forget to subscribe to our channel, we have new videos that come out every week
00:09:02 –> 00:09:05 and you’re not gonna wanna miss a thing.
00:09:05 –> 00:09:07 So we’ll see you next time and bye for now.
Our goal is to translate these videos into as many languages as possible. If you are interested in helping with this initiative, then please do contact us and we will figure out a way to make it worth your while :)
Resource Links:
- After Midnight Stamps: Krafty Lady Art Moulds
Resources marked with a double ** asterisk are affiliate links. If you click on them and decide to buy something, we may receive some compensation. This does not affect the price you pay in any way. What it does do, however, is helps us to continue providing free videos for you, here at the PcT website. Using our links to purchase your tools and supplies, is always greatly appreciated.
Sponsored Ads & Special Promotions
Shareable Images


To share this full blog post anywhere on the web that allows links in comments, here's a shortened url to copy and paste...
>> https://mypct.ca/v465 <<
Want to chat about today’s post? That’s what the comment section below is for. Scroll Down… We’d love to hear from you!
Or... if you would like to request a topic for a future post, here is the link to do that… PcT Suggestion Box
Great! I wasn’t sure the two pieces would bond solid enough. Thank you for the info and responding so quickly!
Hi Faith, when I want to side drill a hole I usually add another layer of PC rolled out to the thickest setting on my pasta machine’. I pop the mold out and place it on this piece of clay and take my craft knife and cut around the design. I then take a round toothpick or something small and round to smooth out the edges. The 2 pieces will bond together when you bake them or you can add a thin layer of bake and bond, or polypaste between the layers if you prefer. To get a good even hole I use a bead rack pin and run it through the side first carefully twisting and turning it while eyeballing it through the mold. After I bake it, I use a small pin vise and drill out the hole for nothing thicker than 20 gauge wire, elastic or cord. If you don’t want that thick of a back piece, you can experiment with different thickness’es of clay you feel will work for you. Hope this helps.
How do I make mold impressions deep enough to drill a hole (left to right). I make bracelets from chinaberry beads and have started incorporating a polymer charm into the design. My problem is, the molds don’t seem to be deep enough for me to drill a hole. Right now I’m limited to ovals and squares. I’d love to start using other designs but can’t figure out a way to beef up the image to drill a hole. I’ve looked at the AM Stamps designs and they don’t seem deep enough please help.
p.s. Your video course #1 got me started. You’re a very good instructor. Thorough, organized, concise and clear (your Canadian accent is cool).
Thank you Faith for your kind comments! Looks like Dixie Ann did a great job in answering your question!
Very helpful tutorial! Thanks. I picked up some hints and was able to correct what I was doing wrong! I’ve used some of these molds and they’re beautiful!
I have purchased several of these molds and they are one of the best I have ever used for getting great detail. I have my Kraft Lady list and as I purchase the ones needed, I cross it off my list. Thanks for the video Cindy, it reminded me I needed to order a couple more molds!
Cindy! I Love using molds for pendants and embellishments to larger pieces. On the ones with all the tiny, fine extensions (like your crown mold) which can break when you unmold the piece, I find that putting the mold into the fridge about 10 minutes will make the clay firm enough to let you pop out all the beautiful detail without distortion or tearing. This works with even the finest details such as the ones intended for use with air-dry clay where the clay stays in the mold overnight. The same results can be obtained with raw polymer by “chilling out” for a few minutes! Thanks so much for your great tutorials…love them all.
You had me at “You don’t need to sand these.” Seriously, what stunning results.
My favorite use of craft molds is making face shards, which can be used for so many different projects from jewelry to art dolls.
Was looking for just the right lock and key mold and found it at amstamps.com thanks to your video.
Hi Cindy, What a fabulous video featuring our Krafty Lady Art Moulds. If I didn’t have them I would rush out and buy them. Ha Ha Ha. Many thanks again. Kristine the Krafty Lady in Melbourne, Australia
Hi Kristine, How nice to hear from you! Glad to hear you liked the video. It was a pleasure, since I really do love the molds that you guys make. Linda Hanson is a great lady, and I am happy to spread the word about her After Midnight Art Ranch and your excellent moulds she uses there. Let us know when you have new products you want us to share with our loyal and creative community!?
I like all info on molds. I never know what to do with them.Just don’t seem to have any affinity to them I love making them but the using is something else.
Good to know that there are some that you can bake with the clay. Best way to get the fine details.
I notice you pay attention to the small details that make a creation go one step further to really shine and make it look like a masterpiece. Thank you for a those ideas.
Help! My oven spiked and in spite of putting a “tent” over my work, it did burn a little. This is to be a Christmas gift. Is it possible to remove the burn by sanding?
Hi Dorothy, sorry to hear that happened to you. :( Like on real skin, burns on polymer are usually more than skin deep and won’t come out with sanding. You could try and disguise the burn with an antiquing medium, acrylic paint, Gilder’s Paste or something along those lines. You may be surprised how cool it can end up looking.
BTW there is lots of info on this blog that should help you with temp spikes in your oven. Just type Spiking or Baking into the search box at the top of the page and you should find help. Usually all it takes is lining your oven with tiles to keep the temp more even.
Good luck! Let us know how it goes!
Thank you so much for your reply!! I painted it with acrylic paint. I will send you a photo later.
Gorgeous molds!!! The leaf mold looks really deep. Thanks for the tip on using soft clay. Love the journal cover. Hummm, I wonder if Cindy has an upcoming journal cover tut?
Hmmm I wonder?… :)