Vol-066 Laser Cut Wood Ornaments PcT Tutorial (Intro)
Video #445: Polymer clay covered wooden Christmas decorations & home decor items.
More...

** This post is an introduction to one of our paid tutorials.
By now you are probably starting to understand that polymer clay is an extremely versatile art medium, that can be used in many different ways. It can be made to look like pretty much any material… and can also be applied to surfaces that won’t melt at the relatively low temperatures used for baking polymer clay.
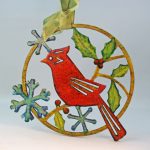
One material that combines nicely with polymer clay… is wood. When you learn how to do this properly, there are so many possibilities to discover and play around with.
With the advancements in technologies, wood product shapes can now be precision cut using computer controlled laser machines. This means, you can now purchase highly detailed and intricate wood frames, ornaments and decor items at a very low price.
Now, anyone with a design idea and a laser cutting machine can crank out thousands of these cool wood pieces. Which results in lots of cool pieces of wood we can add our polymer clay ‘signature’ to.
So… naturally I had to show you how to do this Polymer Clay and Laser Cut Wood Ornament Tutorial… with several different surface techniques to get you started. If you go into any Michael’s or Hobby Lobby store, you will see that there are 100’s of different wooden shapes that you can put your own spin on. Soon your head will be spinning with new and creative ideas.
“
I love Cindy's Tuts. I have them all the way back to the beginning of Polymer Clay Tutor (2008). I am often overly critical of my work... but I LOVE how this Polymer Covered Wood Ornaments project turned out!!! My wood butterfly ornament is gorgeous, but next time I will pick a wood ornament with fewer holes…LOL.
Anna S
“
This is the first tutorial I have purchased from you… and what a little beauty it is! Thanks, Cindy. I have three million (well, almost!) Prismacolour pencils and I’ve now learned a new use for them. Thanks for the inspiration :-)
Chrissie F
“
Just what I was waiting for! Earlier this year, my husband made a small wood jewelry box for me, from some nice maple wood. He left it sanded but not decorated in any way. So I was wondering how I could put polymer decoration on it. Now I know how. Thanks Cindy!
Anna G
Transcript coming soon...
Transcript coming soon...
Our goal is to translate these videos into as many languages as possible. If you are interested in helping with this initiative, then please do contact us and we will figure out a way to make it worth your while :)
Shareable Images


Want to chat about today’s post? That’s what the comment section below is for. Scroll Down… We’d love to hear from you!
Or... if you would like to request a topic for a future post, here is the link to do that… PcT Suggestion Box
I love Cindy’s Tuts. I don’t remember when I joined but it was pretty close to the beginning of Polymer Clay Tutor (2008). Many times I do not get around to making the Tut of the Month, but will go back later and work on a project.
The great thing about subscribing to Cindy’s tutorial series is they never expire. I just finished a project using two of the previous tutorials, Journal Covers and this Polymer Covered Wood Ornaments series. I am really bad about loving the process, but being critical of my work. I LOVE how this project turned out !!! The wood butterfly ornament is gorgeous but next time I will pick a wood ornament with fewer holes… LOL.
Now I am on to micro mosaic pins and finishing the viking chain enamel bracelet.
My first paid tutorial and what a little beauty it is! Thanks, Cindy.
A question – when using coloured pencils have you tried blending the colours with a colourless blender? I use them on paper and wondered if they might work on wood. I have three million (well, almost!) Prismacolour pencils and I’ve now learned a new use for them.
Thanks for the inspiration :-)
Chrissie
Welcome to our clay family Chrissie! Glad you are enjoying what you have learned so far. In regards to using a colorless blender… I have no idea, since I haven’t tried them myself. I would imagine they would work the same on the wood as they do on paper, but I can’t be positive about that. Do they leave the penciled area dry after using or is there a residue left behind that might react with the clay? This would be a good thing to test on the side first, just in case it causes a problem. But it sounds cool. I should take a look for those in my Michaels and try it out myself! If you do end up testing it, do come back and let us know how it goes!
No worries, Cindy. I’ll let you know how it works out. As far as I know there’s no residue left by the Prismacolour colourless blenders – haven’t tried any other brands.
Thanks again Cindy! Love this series. Just in time for me too; our Guild is doing Christmas ornaments at our next meeting. Ummm… I’m thinking I’d love to try your micro mosaic technique on these wooden pieces.
Thank you, and please keep the great videos coming! You have inspired me to do great things.
Been with Cindy for 5 years now, she still comes up with the best tutorials!
Very nice Cindy. I too have some wooden frames and ornaments that have been hanging around my house just waiting for this technique, lol. Question – I know we can’t use oil based paints with the polymer, but the oil based pencils won’t have an adverse reaction with the clay?
You can use oil based paints with polymer clay but you need to use it on raw clay and heat set it. If you try and use it on baked clay, the oils in the paint will eat at the oils in the polymer and cause it to go sticky.
About the pencils, I don’t think there is actually oil in the Prismacolor Pencils, I just said they have an oily smooth texture to them. I would have to look further into them to know if they indeed have oil in them. Prismacolors have been used with polymer clay for a long time so we know they are compatible.
Oh, gottcha. I have some really nice oil paints and I’ve been bummed that I couldn’t use them in my clay projects…or so I thought. I’m excited to know that I can use them on the raw clay – yea! Also, I just made the abalone shell cane and it came out sooooo beautifully. I created some pendants and earrings. I’ll have to post them later. :o)
Wonderful tutorial and so inspiring, like everyone else my head is just spinning with possibilities! Btw I have found that in removing stickers if you hit them with a heat gun or in my case as I don’t have one, the blow dryer, they peel right up without lifting any fibres or leaving any residue behind. I have used this technique when cleaning jars that have tacky labels, so much faster and cleaner than soaking and scrubbing.
That’s an awesome trick Cheyrl! I will have to try that sometime!
Wow, that’s a really cool tip, I’m going to try it. Thanks for sharing.
I watched all the videos and can’t wait to get started. I always have a lot of wooden ornaments and other wood projects around for the grandkids to paint on. Just wait till they find out they can use the colored pencils then put translucent over it. Only one thing they like more than coloring and painting and that is Polymer Clay. I need to go through all my wood items so I can pick out my favorites before the kids get to them. This is going to be so much fun working with these. I am so excited about this new tutorial.
Thanks for another great group of tutorial.
Enjoy your November weekend.
Sending lots of Uuuuuuggs
Well thank you guys for you sweet comments! I would love to see pictures of your projects. Don’t forget to post them at the Student Projects Photo Gallery so we can all see what you’ve done. Since the options are so endless, I’d be very surprised if there were two that were remotely the same! Have fun with the tutorial!
There is definitely something of the psychic in you Cindy. I’ve recently bought a wooden bracelet blank and was wondering what I should do before applying polymer clay. This is so brilliant, thank you very much!
Cindy,
I think you read our minds. I was looking for some new ideas for Christmas and this tut is great .
I covered some small wooden needle cases for a woman who is in a quilting group. She just loved them. But, I learned the hard way that you should bake the wood before covering. Otherwise, there is a possibility that the wood will expand and break the clay. Thanks for all your insights. They are wonderful !
I know I don’t contribute much to the comments section, but I truly love all the tutorials. Just this year, i started doing craft fairs . I am very introverted so was is a big deal for me. I’ve used your faux rust, abalone, etc. tutorials to cover various items and people just love them. The pens are a hit too. I cover the pens with all of your great canes, etc.
Thank you from the bottom of my heart. You are truly a gifted woman and I appreciate you sharing your gifts with me :)
Viv
Never have I seen this application! I can see using the techniques all year long ! Isn’t that great? During the hot summer, when things are really quiet -play with your clay and laser cut forms! So mannnny possibilities -my mind is spinning -in a good way. Thank you Cindy ( and family) for all your hard work. We are so lucky to have you as our Polymer Clay Tutor!!!!!!!!!!!
Perfect timing Cindy! I was just in Michael’s yesterday looking at all the wood letters and words … and wondering how I was going to do something with them.
Just what I was waiting for! My husband made a small wood jewelry box earlier this year from some nice maple wood, left it sanded but not decorated in any way. So I was wondering how I could put polymer decoration on it. Now I can learn! I will study this tutorial very, very carefully and try to force myself to follow directions ;)
Thanks, Cindy!
Anna
Only watched the first couple of videos. A Cindy quote: “There is no use doing a clunky job.” Well, that’s the truth!
Just so impressed with this lamination technique, and love that DREAM piece, done with a Teardrop blend using the new black glitter Premo.
There a just tons of wooden things that could be used in this approach, and that Kato PolyPaste hold fast, I’ve used it for years.
You could use the PolyPaste to apply a lamination to a regularly finished wooden piece as well, would just sand down the one spot, cut some scratches into the wood so the PolyPaste has a surface to grab into, then voila. Watch pre-finishes in the oven, they might bubble or darken, but the small finished wooden boxes I’ve used have done an hour at 275 degrees, no problems.
K, now back to the videos………
About 5 years ago while doing a craft show I wandered round the other stalls while my pal looked after my stall.
I found a guy selling laser-cut wooden tree ornaments. Never seen them before so bought a few. Never got round to using them but seeing what Cindy is showing us, I have searched in all my craft stash and eventually found them again so really glad that Cindy has come up with this tutorial.
Thanks Cindy.
Now off to the shops to get some easy cook meals so I will have more time to play with clay with Cindy……………………………cheers xx……………………
Wow~ those are beautiful Cindy! p.s… Happy Halloween! xoxox ~~ :0)
Cindy, I am so excited about this tute series. Cannot wait for Friday.
Perfect timing Cindy
With the recent birth of my 2nd nephew I was just talking w/ my mom about needing to come up with a Christmas ornament for both
This will do Very Nicely thank you Cindy:)