Vol-035-1 Lilac Blossom Flower Bead Shape PcT Tutorial (Intro)
Video #198: “So many bead shapes, so little time. I love them all! But I do really love sculpted flower beads.” ~Iamani-P
More...

** This post is an introduction to one of our paid tutorials.
Yep… Spring flowers are definitely in the air. Last week’s video tutorial showed you how to make a pretty little Grape Hyancinth Cane. And this week, the focus is on Sculpted Lilac Beads.
I have been waiting for Spring to finally roll around, before sharing this unique Lilac bead project. You can easily create them in several different shades, using either your own color recipes, or the ones I provide.
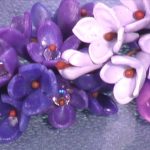
These polymer clay flower beads can be made to mimic the various stages of blossom development… from a newly forming bud… all the way to a fully open bloom. You can even use inks to add very realistic looking striations of natural color.
“I love the lilac colour.” ~Silverleaf
Lilac Beads look lovely strung like any other polymer clay flower bead. But they look especially wonderful all clustered together in groups, just like on the lush head of a real Lilac flower.
“Cindy, Every lesson from you is so beautiful that I’m happy with each and every one of them. I would like to learn how to make more sculpted flowers. I love your sculpted roses and your calla lily beads, tried them and they turned out great. Now I’m working on some sculpted orchids and I can’t stop myself from thinking, “Oh, if Cindy had a tutorial on that…” ~Squash
Just below, Squash referenced two of the flower bead tutorials which are currently available in the members library:
“
Hi Cindy, Just watched a couple of videos and I have to say, Wow! I love how you put your own spin on everything. I've seen loads of lilac bead tutorials, but no one uses the combination of ball tool and points to get the perfect shape, like you do. And the alcohol ink coloring is just genius. Thanks!
Krithika P
“
This is so great. Lilac is one of my favorite flowers. It's very difficult to grow successful lilacs where I am, and this way I can make my own and have them year round. Thanks Cindy.
Barbara C
“
This is so beautiful and just in time to be made for my spring jewelry sale! Thank you!
Maria C
Transcript coming soon...
Transcript coming soon...
Our goal is to translate these videos into as many languages as possible. If you are interested in helping with this initiative, then please do contact us and we will figure out a way to make it worth your while :)
Shareable Images


Want to chat about today’s post? That’s what the comment section below is for. Scroll Down… We’d love to hear from you!
Or... if you would like to request a topic for a future post, here is the link to do that… PcT Suggestion Box
Carolyn K: I used your idea of putting paint on some of the copper headpins I’d made and really like how they look. Glad you passed that idea along.
Cindy: You mentioned a tute on faux enameled headpins – I’m looking forward to seeing that.
BOZZI BLADE ALERT
Has anyone purchased these? If so, how? You likee?
I’ve posted a pic of the necklace I made for my mum over at the Facebook Gallery page of you want to see it. The pic isn’t brilliant because I was in a rush and my camera battery had just enough power to take three shots before it died!
@Carolyn K.: Nice to see you back! I love your idea to cover headpins with paint. I am currently working on a tutorial with something similar, making ‘faux enameled headpins’ using liquid clay and such. Your idea is a neat one too!
@Silverleaf: Awesome job! I love how you put your own silverleaf spin on it by using the Ladybug Color Palette. Really neat! Thanks for posting it up on Facebook so that everyone can see it there. Also, thank you so much for posting it on Polyform’s Facebook Fan Page and mentioning where you learned the technique. It is good for them to know all the cool things you guys are making with their excellent products!
@Cindy Lietz from Ladybug Color Palette: No problem Cindy. ;) I like to share resources with other clayers and if more people head on over here it’s to everyone’s benefit, right? You get new subscribers, they get awesome tutorials and advice and we extend our little community and hopefully share their experiences and tips as well.
I was amused to be asked if I mixed up the colour myself on the Polyform page. It makes it obvious to me that the admin doesn’t work with Premo because I think anyone with half an eye could tell that it’s not one of the package colours!
I will absolutely try this with purple colours when I get some clay time, it’s a great bead shape.
@Silverleaf: Your right about them only having half an eye! I still think, they think, their customers use their products straight out of the package. That is what makes working with clay so fun. The color mixing! And our Cindy makes that sooooo easy!
Still no new colors in Michaels, but they should be coming soon! I can’t wait too see what colors Cindy will design for us using the new pearl accents!
@Catalina: Yeah, that’s one of the reasons why they’ve brought out so many new colours I guess. But lots of people are too scared to mix anyway, I wish they could see how easy it is. And like many skills, the best way to learn is to experiment a little and see how colours combine. I consider myself pretty good at colour mixing and can usually “see” what I need to use to get a particular shade, but I’ve found that I’ve learned a lot from mixing up Cindy’s recipes, much more than I thought I would.
I’m feeling a new pearl colours mixing session coming on soon myself! Yeah I’m smug that I’ve had the new colours for AGES, it makes me feel better since I’m usually the one complaining that I can’t get all the cool stuff easily in the UK. ;)
Hi All, I haven’t added comments in a long time. Just made a pile of beautiful lilac buds and flowers. I do my best creating when I am about to get out of bed. Thought about how to make the centers pop on the flowers. I took a head pin and dipped it into a dark yellow craft paint like American. Stuck each pin in some styrofoam to dry. Then pushed the pins through the center, clipped the pin at about 3/8″ and made a loop. Quite striking and realistic. Try it you will like it!
@Carolyn K.: Great to see, I mean “read” you again, Carolyn! Thanks for the idea…I’ll bet it looks fabulous! I’ll have to give it a try… :D
@ Silverleaf: Nice job on your mom’s beautiful necklace, Anna!
You know, I was just thinking about the ball-tipped tools: Why couldn’t you just make balls of different sizes in polymer clay, find old needles or small knitting needles or skewers, poke a hole partially through, bake, and then glue the ball onto the proper-sized aforementioned needle, knitting needle, etc? I am thinking we could get even more creative and even make polymer clay tiny scoop-type tools, too (in almost the shape of the lilac petals Cindy showed us). I am a gal on a tight budget and I will try this and see how it works. Even for short-term satisfaction, if can’t afford to go buy the tool set right away. Can even make a PC handle for smaller implements like needles, of course.
Cindy you send me on emotional journeys for polymer clay, too funny.
Sister married around Memorial Day and did the whole deal in Newport RI. Early on, we determined a cost savings would be overuse of said objects and did. LOL.
Can still smell them.
If you don’t have the detailing tool, I found that you can use one of those coffee stirring plastic wand type stirrers (like my techno talk, ha, ha, ha)…anyhow, I save these little gems when I run across them and they work great for this. My .02 cents :)
@Laura R.: Hi! I’m so glad you you told us, in your “techno talk” what those things are called!! I always wondered what you call them! :)
What fun little beads! Very pretty flowers, and those tiny baby buds are adorable! I’m definitely going to be making some of these beads. Dangly earrings will be a must (of course!) and I’ll have to make some using other colors, too.
Love the lariat necklace, Cindy…it is “simply” beautiful! The bling ring’s a really cute idea, too. Thanks for another cool technique to add to our bag-o-tricks — you’re really loadin’ us up with knowledge, Ms. Tutor! Thanks for all you do…
OK – I’m trying to make these beads. They just don’t look like Cindy’s. The edges are ragged and tear easily. Without revealing all of Cindy’s secrets about how they are made, I will phrase this question this way: should I be using cornstarch to prevent the “rollerball” technique from sticking to the petals? Also are they left unfinished? that is no use of Future, etc? I guess that’s just a personal choice – future may make them too “plasticky”.
Also, I guess ragged petal edges can make them look more natural ,too…
@Maria: My first thought would be that maybe your clay wasn’t conditioned enough if the edges were ragged… I had no problems with my well-conditioned Premo. While I didn’t use cornstarch for the sculpting bit I did give the outsides of the petals a rub with cornstarch to remove any obvious fingerprints (I noticed a couple of very light prints after baking but with the mica shift effect it wasn’t at all obvious so I didn’t worry – it’ll be one of those things that bugs me, being a perfectionist, but that other people don’t even see). I didn’t apply a finish either, just rubbed gently with a piece of fleece to remove the residual cornstarch.
What clay are you using by the way?
@Silverleaf: Your gift sounds beautiful Anna! Hopefully we will get to see pictures of it.
@Natalie Herbin: Glad you liked the tutorial! Using the ball end of a knitting needle is a great substitute for the detailing tool. As far as the other end, you could use something with a cone shape like a large knitting needle, paint brush handle or even a pen lid. The colors of Adirondack Ink I use the most is the set with Butterscotch, Wild Plum and Stream. Almost any set with a red, yellow and blue will work, depending on the types of colors you like.
@squash: You are very welcome! It is always fun to try and make tutorials of things people want. I will keep your nuts and seeds idea in mind. Your garden sounds lovely. Enjoy it!
@Maria: Silverleaf is right, the clay needs to be soft and well conditioned to avoid cracks. If the clay is not soft enough, cornstarch won’t make any difference. Try adding a little translucent to your clay. It tends to be on the soft side and may just do the trick!
@Silverleaf: Thanks for helping out Maria! That is exactly the problem. The one thing about any fingerprints you do get on the sides of the beads, they don’t tend to show at all when they are clustered together. Especially in a design like the Bling Ring. But I know what you mean… any little fingerprint bugs me too!
@Silverleaf: Thanks for helping, Silverleaf. BTW – I love your site – you have made so many beautiful things! I actually used Premo – brand new packages I bought at Dick Blick’s, which had the new Premo colors. (Love the 18K gold). I believe I conditioned the clay pretty well and also used the paper leaching technique to remove some of the plasticizers. But maybe it was still so fresh that it was more tacky than older clay, thus causing the styling tool to stick. I am finding that practice makes better petals.
Hello, dear Cindy! Thank you for taking my request into account. These little flowers are beautiful and seem so easy to make – with the right tools, of course. I love the fact that they are so dynamic when you put together a bunch of them. They are indeed a good addition to the bling rings.
We just planted a big lilac bush in the garden and seeing your tutorial made me think : what a happy coincidence! We also planted many many rose bushes – you already covered that area wonderfully,- also a willow, a plum tree, a fig bush, a nut tree and many other plants and trees. It’s the first time we’ll have a garden and we’re pretty excited. Now I wonder: do you think that walnut beads would make a nice tutorial in the future? I saw many artist, especially in the States, that use real nuts and seeds in their necklaces – I don’t know how they do it, if they cover the nuts with gloss or not… Well I suppose one can’t string a real walnut on a necklace and they are quite big for a bead.
Anyway, have a very nice and inspired week and thank you for the beautiful lilac beads!
Cindy
I just got a chance to watch the Lilac flower video..that was my mothers favorite flower and color. Your tuts make making this flower so easy ..can’t wait to make them. I’m afraid to use a torch..my work area is not safe ..can I use small beads that I make instead. I am going to use my mother’s old metal knitting needle that has a ball on the top for part of it..but what can I use for the other without buying more tools right now….
Also, what basic Adironack inks should I buy ..there are at least 4 different pks of 3..and I want to keep my expenses down since I am not selling any thing right now..
Got to figure out how to mark my stuff.
Well I decided to use this technique to make a necklace for my mum for Mother’s Day (tomorrow here in the UK). Since my mum prefers bright colours I thought lilac might be a bit soft for her, and so I went for red and orange colours instead – hopefully it won’t look weird in the “wrong” colours!
I actually started with one of Cindy’s colours, 011-1b Ladybird, and made a 3-way Maggie Maggio style colour scale with Ladybird in the middle, darkened with some alizarin one end and lightened with 1:1 gold+cad yellow at the other. Lined up the beads look like a subtle Skinner blend, and I made the beads more open as they got lighter too. Once they’re finished I’ll wire them to a bit of chain keeping them in the right order – I think I’ll end up with something a bit like Cindy’s lariat necklace, maybe adding a few leaf beads too.
I found that using the smallest Style and Detail tool first helped a lot, before using the medium tool. The bead’s less likely to crack that way…
@Silverleaf: Oh I hope you’ll post a picture for us to see. I’m sure it’ll look very pretty your work always is so well done.
@Jeanne C.: I got a few shots before my camera battery died, they probably aren’t very good but if so I’ll take some more when I next see my mum.
She really liked it by the way, says she’s going to show it off to her work colleagues next week when they go out for a meal. It did turn out really nice – not my usual style but fun anyway.
I had noticed the new blade you were using this morning and tried looking for it on line. A company called clayalley.com has Bozzi clay but not the blades. I’ll check out the site info you provided. I wonder what the clay is like, will you be testing it out? I like the idea of not cutting myself since I did that 3 weeks ago :( I wonder how that works.
@Jeanne C.: Yes I have been testing the clay. It has wonderful colors and is quite flexible when baked. Some of the samples I have are similar in feel to Sculpey III and some feel more like Premo. Others have compared it to being more like Fimo Soft. I guess it depends on the age of the packages. I made the Bright Pink and Lavender Shaded Rose Canes with it in the tutorial (see link by my name), so it works fine for making canes. I want to play with it a little more, so I can do a proper review, but just have been so busy lately.
Sorry to hear you cut yourself. Hope not too badly. :-(
Hi Cindy, Love the lilacs. I was just wondering what you used for the centers, if they are purchased or something you made.
Thanks
Billie
Thank you guys! I hope to see lots of pretty lilac jewelry from you all!
@Bonnie Kreger: Good eye! That Bozzi Blade comes from a company in Brazil that I have been testing some products for. The blade is unique in the way that it cuts like it is super sharp, but you can’t cut yourself with it. It is weird, you could probably saw away at you arm all day and not even leave a mark. But it still cuts lovely through a cane or a bead as you could see in the video. It would be the perfect blade for kids to use. Or people like me who tend to pick the blade up by the wrong side! I hope to do a proper review on the product soon. You can find them at portalbozzi.com.br/
@Billie Shields: Those centers are actually some torched copper headpins I made myself. I wrote a post awhile back with some videos on how to do it yourself if you are interested. I can also make some for you, if working with a flame scares you. The link to the post with more info is beside my name, just above.
Cindy, those are really neat, too bad we can’t add a lilac smell to them. LOL
I noticed you were using a blade that says Bozzi on it. I looked it on the internet but couldn’t find it. Is that something new, does it cut good and where can we get them?
Thanks for a great tut.
Fantastic tute. Wow ….love the idea at the end with the added color. that could be used on lots of things, also. Thanks!!!
I just watched the lilac tut and loved it. So pretty yet so easy. I can hardly wait to start. Thank you Cindy for such great tutorials. You make it fun to learn.
YEP Another out of this world tute. The colors are just so perfect. I love it all. One big BIG problem. I am getting further and further behind but it sure will be fun catching up. Thank you both for giving us these wonderful tutes 4 fridays a Month, Love every moment of them. You make a wonderful
team.
Have a great weekend.
Many Uuuuggggggs, Peggy
Hi Cindy and all
love this tut.
Can see myself making lovely ear rings with it.
Love the idea of the paint on them too.
Another good video Cindy
Thanks.
XXX
Elizabeth K.
I have a friend who would dearly love these flowers in some form….hummmm, what to make, what to make? She is a purple fan, besides, so how could I go wrong? I love the idea of tiny flowers in dangly earrings. Cindy, you make these look so easy and I am sure they are, coming from that fertile mind of yours! Thank you!
Had trouble with computer earlier but that just might be the best thing that happened to me all day. Now I can’t drive my husband nuts all day waiting for another fantastic tute. If I close my eyes I can smell the lilacs, the most beautiful sweet smell spring brings us. Thanks to my delay I can probably watch the tute yet before I go back to bed again. Woo Hoo, You guys are on a roll that can’t be broken. Maybe you should go to Vegas, would you still do the tutes for all of us if you won big in Vegas. Be Honest. I think you would, it’s in your blood. Well I’m going to go check on the tute talk to you later.
BIG THANKS AND MANY Uuuuuuggggggs, Peggy
Oh, yeah! This will be a favorite of mine, I’m sure!! This is going to be fun to do!
Oh Cindy! How did you know these are one of my favourite flowers? I absolutely LOVE the smell of them and the look of them! I can hardly wait until they make an appearance here in Alberta! Thank you my friend!
Oh yeah, and the larger open flowers remind me of crocuses, so I guess you could adapt the technique to make those very easily. Or hand them upside down, as snowdrops.
These are really pretty Cindy, and I do indeed love lilac and most other purple colours. You must have read my mind, I was just thinking recently about using slices of a simple flower cane to make sculptural beads. Guess this will help me with the sculptural part of that!
Oh and yay for another colour recipe as well… I made up a batch of pearl colour chips for my magnetic board yesterday (yeah I know, I’m obsessed with it at the moment, lol) and it reminded me of how lovely mica clays look, even when they’re not sanded.
I’m looking forward to this one… :)
@Silverleaf: You and me love purple! And yes, the magnetic board is sooo cool!
Aaaaah, what fun this is going to be. Just lovely, Cindy.
So pretty! I love that there are always design ideas for those of us who are challenged in this area–yes, I mean me.
BTW I went to my Hobby Lobby yesterday and was delighted to find a new enlarged Premo display with all the new colors.
These are great, Cindy! These beautiful lilac flowers would look great on dangly earrings!
This is going to be a wonderful tutorial. We had many Lilac bushes in our yard in Vermont. They are so pretty and very fragrant, I had the light and dark purple as well as the white. It’ll be nice to make them into a bouquet for my table here in Tucson!! I love the pendant. :)
This is so beautiful and just in time to be made for my spring jewelry sale!
I just love the colors. They’re my daughters favorite color too. so many possibilities here, can’t wait for tomorrow! clusters on earrings, bracelets…
What a cute tute ! Love the movement in you samples. Anything purple catches my eye. Spring has sprung with all the wonderful flower tutes. Don’t you just love Spring ? Can’t wait til Friday -happy dance
Don’t laugh but I’m seriously thinking of making some and hanging them on the lilac bushes out front. Darn deer absolutely love lilac buds. It would be nice to have some color once in a while!
LOVE these!
While I’m not into flowers myself, I can definitely see the appeal of these. The various colours look lovely with the copper ball headpins too.
Wonderful!!!!!! If they’re made small enough the could be clustered on ear wires, OH the possibilities.
Don’t know how you do it but this is going to be another great Friday. My favorite day cause you always find something great to show us……thanks!a
Oh, these are very pretty indeed. Would make any number of lovely spring items to wear from necklaces and pendants to braclets and rings, as you show here. Thanks, Cindy!
This is so great. Lilac is one of my favorite flowers. It’s very difficult to grow successful lilac were I am and this way I can make my own and have them year round. Thanks Cindy, I can hardly wait for tomorrow.