Making Homemade Alcohol Inks Using Rit Dye
Video #385: An alternative to buying commercially made Adirondack Inks.
More...

IN THIS POST: — inks — dyes — rubbing alcohol — alcohol ink — (Topics marked with an asterisk* are discussed in the Comments Section below).
Topics Covered In This Video:
- One of the most shared articles from our site onto Pinterest, is an old article called, Alcohol Ink Techniques and Recipes for Polymer Clay Artists. It contains lots of information about making alcohol inks using fabric dyes.
- Commercial alcohol inks, such as the Adirondack line from Ranger, have been used with polymer clay for a long time.
- A couple of examples of my previous PcT tutorials that use the Adirondack Inks, include the Glow in the Dark Jelly Roll Cane (the earrings I show in the video), and the Red Clover Flower Beads, but there are many more.
- Some people find commercial alcohol inks to be expensive and want to learn to make their own.
- Homemade alcohol ink is very cheap when you look at the amount you can make with each box of dye.
- Homemade Alcohol Ink Recipe Ingredients:
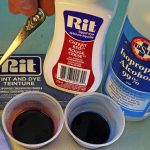
1 part Rit Dye (powdered or liquid. I used 1/2 teaspoon for my 1 part)
6 parts 99% Isopropyl Alcohol (Rubbing Alcohol)
2 parts Water (for liquid dye only) - Stir until mixed (the powdered dye will still have salts in the bottom, and the liquid dye will still have some clumps of unmixed dye.)
- Use a clean unused coffee filter to filter out solids if desired.
- Use your homemade alcohol inks like you would use any other commercially made alcohol inks.
- Homemade alcohol inks aren’t as concentrated as commercial brands.
- Colors are not as vibrant in/on polymer clay as they are on paper.
- Color is stable when baked in polymer clay.
- Although the homemade version is much cheaper by volume, it will cost you about the same on a per color basis if you only use small quantities.
- I prefer the commercial brands of alcohol inks such as Ranger’s Adirondack Alcohol Ink, because… the colors are more concentrated and vibrant on polymer clay… there are more colors… making homemade inks yourself, is a messy job… and since the bottles last forever, I don’t mind if they are a little more expensive than the homemade version.
- The homemade alcohol ink may be a good choice for schools or guilds because the price is much cheaper by volume.
Do you think you will be making your own homemade alcohol inks? Or will you just stick with the commercial brands?
I look forward to hearing from you.
00:00:03 –> 00:00:07 Hi guys, its Cindy Lietz, your Polymer Clay Tutor, and today in the PCT Test Lab, we are
00:00:08 –> 00:00:11 talking about homemade alcohol ink.
00:00:11 –> 00:00:17 Now the reason I’m doing this video was way back in May of 2008, I wrote an article about
00:00:17 –> 00:00:26 using fabric dye and rubbing alcohol to make your own Homemade Alcohol Ink, and that post
00:00:26 –> 00:00:31 has been so popular, it’s actually the most pinned post that we have on our site onto
00:00:31 –> 00:00:36 Pinterest, so, since everybody loves it so much, I thought I better do a video on it.
00:00:36 –> 00:00:41 If you wanna read that article, you can go to my blog and read all about that, ‘cause
00:00:41 –> 00:00:45 I do talk about some other products that I used besides just the Rit that I’m gonna be
00:00:45 –> 00:00:46 showing you today.
00:00:46 –> 00:00:54 Now we’re gonna be making the homemade alcohol ink with Rit Fabric Dye in both powdered and
00:00:54 –> 00:00:59 liquid form, they each act a little differently, so I’ll show you that.
00:00:59 –> 00:01:04 And I’m going to also be using some Isopropyl Alcohol also known as rubbing alcohol.
00:01:04 –> 00:01:09 And we’re using the 99%, I haven’t tested it with the other percent, so you could test
00:01:09 –> 00:01:12 that and see how that works for you.
00:01:12 –> 00:01:17 Now rubbing…or alcohol ink works beautifully with Polymer Clay, we’ve been doing it for
00:01:17 –> 00:01:24 a long time, in fact, I have a couple of tutorials where I use the Adirondack Ink with Polymer
00:01:24 –> 00:01:33 Clay, and like my earrings here, I’ve made those with the Adirondack Ink as well as this
00:01:33 –> 00:01:41 Red Clover Flower Bead is using the Adirondack Ink, and it’s so vibrant and beautiful, and
00:01:41 –> 00:01:44 it works really well with Polymer Clay.
00:01:44 –> 00:01:49 But making your own… some people find that the commercially made alcohol ink is quite
00:01:49 –> 00:01:53 expensive, so you can make it for yourself for a lot cheaper.
00:01:53 –> 00:02:02 Now powdered dye is about $3 or $4 bucks for a box of the powdered Rit and… here in Canada
00:02:02 –> 00:02:06 anyways, I don’t know what it’s like anywhere else, and then it’s about $5 or $6 for the
00:02:06 –> 00:02:12 liquid, and then maybe about a dollar for the alcohol ink, you could make gallons and
00:02:12 –> 00:02:18 gallons and gallons of the homemade alcohol ink for about the same price as the commercially
00:02:18 –> 00:02:23 made, I’ll talk about the benefits in a second, to either one.
00:02:23 –> 00:02:24 Hi guys, its Cindy Lietz, your Polymer Clay Tutor, and today in the PCT Test Lab, we are
00:02:24 –> 00:02:25 talking about homemade alcohol ink. Now the reason I’m doing this video was way back in
00:02:25 –> 00:02:26 May of 2008, I wrote an article about using fabric dye and rubbing alcohol to make your
00:02:26 –> 00:02:27 own Homemade Alcohol Ink, and that post has been so popular, it’s actually the most pinned
00:02:27 –> 00:02:28 post that we have on our site onto Pinterest, so, since everybody loves it so much, I thought
00:02:28 –> 00:02:29 I better do a video on it. If you wanna read that article, you can go to my blog and read
00:02:29 –> 00:02:30 all about that, ‘cause I do talk about some other products that I used besides just the
00:02:30 –> 00:02:31 Rit that I’m gonna be showing you today. Now we’re gonna be making the homemade alcohol
00:02:31 –> 00:02:32 ink with Rit Fabric Dye in both powdered and liquid form, they each act a little differently,
00:02:32 –> 00:02:33 so I’ll show you that. And I’m going to also be using some Isopropyl Alcohol also known
00:02:33 –> 00:02:34 as rubbing alcohol. And we’re using the 99%, I haven’t tested it with the other percent,
00:02:34 –> 00:02:35 so you could test that and see how that works for you. Now rubbing…or alcohol ink works
00:02:35 –> 00:02:36 beautifully with Polymer Clay, we’ve been doing it for a long time, in fact, I have
00:02:36 –> 00:02:37 a couple of tutorials where I use the Adirondack Ink with Polymer Clay, and like my earrings
00:02:37 –> 00:02:38 here, I’ve made those with the Adirondack Ink as well as this Red Clover Flower Bead
00:02:38 –> 00:02:39 is using the Adirondack Ink, and it’s so vibrant and beautiful, and it works really well with
00:02:39 –> 00:02:40 Polymer Clay. But making your own… some people find that the commercially made alcohol
00:02:40 –> 00:02:41 ink is quite expensive, so you can make it for yourself for a lot cheaper. Now powdered
00:02:41 –> 00:02:42 dye is about $3 or $4 bucks for a box of the powdered Rit and… here in Canada anyways,
00:02:42 –> 00:02:43 I don’t know what it’s like anywhere else, and then it’s about $5 or $6 for the liquid,
00:02:43 –> 00:02:44 and then maybe about a dollar for the alcohol ink, you could make gallons and gallons and
00:02:44 –> 00:02:45 gallons of the homemade alcohol ink for about the same price as the commercially made, I’ll
00:02:45 –> 00:02:46 talk about the benefits in a second, to either one. Now to mix them into a dye, I’ve got
00:02:46 –> 00:02:47 the powdered here and I’ve used 1 part, which is…this is about a ½ a teaspoon of the
00:02:47 –> 00:02:48 powder, I put it into a container here, and I did the same thing with the liquid, this
00:02:48 –> 00:02:49 is Cherry Red, it’s kind of a dark sludgy thing, and this is more like salt in here,
00:02:49 –> 00:02:54 and it’s Royal Blue. I’m going to be mixing 6 parts of the rubbing alcohol into each one
00:02:54 –> 00:03:04 and let it sit there for a minute, 2, 3, 4, 5, 6, now, an interesting happens, with the
00:03:04 –> 00:03:11 powder… it starts to mix in and as you start to mix it in, you can see, it gets darker
00:03:11 –> 00:03:16 and darker, but see all that salt that sits on the bottom, I believe it actually is salt,
00:03:16 –> 00:03:23 though I haven’t been confirmed from the manufacturers on that, but considering in dyeing processes
00:03:23 –> 00:03:28 you often use salt, so that’s what I’m guessing it is. That salt will sit there and would
00:03:28 –> 00:03:34 take days and days to mix in, you can filter that out if you want to, you don’t have to,
00:03:34 –> 00:03:38 it will usually just sit on the bottom, you can filter it out with a Coffee filter if
00:03:38 –> 00:03:45 you like. Now the weird thing that happens with the liquid, and I was very surprised
00:03:45 –> 00:03:51 by that, is it just won’t mix at all, it does this weird coagulated thing, when I try to
00:03:51 –> 00:03:57 stir it together, you get a bit of a Pink thing on the… Pink liquid on the top, but
00:03:57 –> 00:04:03 it really isn’t mixing in at all, and I was surprised that the liquid would be worse,
00:04:03 –> 00:04:09 I just expected it to mix instantly. So I’ve got a little bit of plain water here, and
00:04:09 –> 00:04:14 I’m just gonna add 2 parts of the water to it, I just figured this out because I figured
00:04:14 –> 00:04:21 well if water works in it when you mix it for clothing and things, maybe it’ll work
00:04:21 –> 00:04:29 here. So once I mixed it in…the water in, I got the dye and it works, now, I still found
00:04:29 –> 00:04:36 that over time… this has been sitting for about 10 days, it’s nice and concentrated,
00:04:36 –> 00:04:43 but there is still some kind of sludge in the bottom, and I don’t know if that would
00:04:43 –> 00:04:47 ever come out, I mean after 10 days, you’d think it would come out but it didn’t, so
00:04:47 –> 00:04:53 what you’d have to do is filter that as well if you wanted to with a coffee filter and
00:04:53 –> 00:05:00 just use it that way. Now these inks do work really well, here I’ve got some examples here…oh
00:05:00 –> 00:05:05 it gets everywhere so you just have to be careful with it, on paper, the colors are
00:05:05 –> 00:05:11 really vibrant, you can see that they work beautifully. In Polymer Clay though, I find
00:05:11 –> 00:05:16 that they’re a little on the weak side, now I took a little ball of White clay and mixed
00:05:16 –> 00:05:21 in some of the Blue ink, I cut it in half and baked one half, ‘cause I wanted to see
00:05:21 –> 00:05:25 what it looked like…so this is raw, this is baked, I wanted to see if there was any
00:05:25 –> 00:05:30 color shifting in it when it was baked, and as you can see, it’s pretty, pretty close,
00:05:30 –> 00:05:37 so there is no loss of color there once it’s baked. But it is not near as vibrant as the
00:05:37 –> 00:05:46 actual dye here goes, and the liquid at least the Cherry Red was worse, here’s the raw,
00:05:46 –> 00:05:54 here’s the baked, and it just… I couldn’t get it dark enough, or very dark at all with
00:05:54 –> 00:05:59 the dye before the clay was just gonna get too sticky. So I really actually prefer the
00:05:59 –> 00:06:04 Adirondack Inks, I don’t know if they are just more concentrated, they may have some
00:06:04 –> 00:06:11 secret ingredients there, I don’t know. They are more expensive, if you’re talking about
00:06:11 –> 00:06:17 bulk, but you know, color per color, it cost me about the same to make some color, you
00:06:17 –> 00:06:23 know with this being $6 and this costing me about $4, you know volume wise, it’s a lot
00:06:23 –> 00:06:28 cheaper obviously to make your own, but for me it’s just more worth it to use the commercial
00:06:28 –> 00:06:32 brand because it’s concentrated, and it’s easier to deal with, and I can get tons of
00:06:32 –> 00:06:36 colors. But if you’re a school or a guild or something, you may prefer to make your
00:06:36 –> 00:06:43 own. So I hope that was helpful for you, make sure to click that Like button if you liked
00:06:43 –> 00:06:50 it and you learned anything from it. And my question for you today is would you like to
00:06:50 –> 00:06:55 make your own homemade alcohol ink or would you just like to use the commercial brand?
00:06:55 –> 00:06:59 Leave those answers in the comment section below, that would be great. And don’t forget
00:06:59 –> 00:07:05 to subscribe, we have new videos coming out all the time and you don’t wanna miss it.
00:07:05 –> 00:07:07 So we will see you next time and bye for now.
Our goal is to translate these videos into as many languages as possible. If you are interested in helping with this initiative, then please do contact us and we will figure out a way to make it worth your while :)
Resource Links:
- Related Article: Alcohol Ink Techniques and Recipes
- Related Article: Glow in the Dark Jelly Roll Cane
- Related Video: Red Clover Flower Beads
- Related Video: Using Alcohol Ink With Polymer Clay
- Related Video: Using Pinata Alcohol Inks For Tinting Premo Clay
- Related Video: Using Alcohol Inks To Tint Liquid Polymer Clay
- Related Article: 5 Ways to Use Alcohol Ink with Polymer Clay
- Related Video: Alcohol Ink Effects on Crackled Gold Leaf Tutorial Intro
Resources marked with a double ** asterisk are affiliate links. If you click on them and decide to buy something, we may receive some compensation. This does not affect the price you pay in any way. What it does do, however, is helps us to continue providing free videos for you, here at the PcT website. Using our links to purchase your tools and supplies, is always greatly appreciated.
Sponsored Ads & Special Promotions
Shareable Images


To share this full blog post anywhere on the web that allows links in comments, here's a shortened url to copy and paste...
>> https://mypct.ca/v385 <<
Want to chat about today’s post? That’s what the comment section below is for. Scroll Down… We’d love to hear from you!
Or... if you would like to request a topic for a future post, here is the link to do that… PcT Suggestion Box
Omgosh thank you so much! I was looking for this for dying a weave I bought. I am thinking of using computer ink. But this let me know that it can be done! Thank you so very much! I am going to soak for a few hours. Yay! Super excited!
Cindy,
Last Friday I received some oil based inks that are used in the printing industry. My question is how can I thin it out enough that I can use it in a spray bottle? The ink is so thick that it is almost putty consistency. I am not kidding, thicker than molasses in December.
The man is converting his printing business from presses to digital so he is getting rid of his oil based inks for free and I just had to have some. LOL I have some amazing colors in metallic Silver, Gold, Copper just to name a few… They are huge cans too. I will never have to buy those colors again for the rest of my life if I can only figure out what to mix them with.
BTW, he asked me to see if anyone else would like some too as he needs to empty all his shelves from all the inks he has now. I mean Pantone colors galore. Nice vibrant colors.
Hi Celine, that sounds like quite the haul! You are going to have to test it to see if it will be compatible with polymer clay, but I would try it without thinning it down first. It might be a cool paint to use to tint white clay or to spread across the surface. Mineral spirits might thin it down, if you still wanted to try that, but as with any product… you will need to test it to be sure. Let us know how it goes!
I have ordered several colors myself and cannot wait to try it. When I used powdered food coloring, the alcohol ink was beautiful. When I watch them do the luster dust on the cake flowers, it makes a beautiful color.
I have not had a chance to try it yet as Spring is catching up with me and the cattle pastures and the flower beds are screaming out my name. It is not letting me play with the clay. Am I a jewelry maker or a farmer? Ha-ha!! Reminds me of seeing a sign that says, “Donut and Bait shop. :^)
I would love to see you do a test on it in your lab as I have found that alcohol ink will change the clay if you continue to paint the raw clay over a few times. It has a tendency to crack, which might be good for some techniques. But at the same time, I don’t want to make my piece weak.
I will be watching for your test with the luster dust. Thanks Cindy!!!
Suzanne
Suzanne, special thanks for the share on powdered food dye, you just stopped me from throwing some old stuff out. You can never throw anything away when it comes to polymer clay, lol.
I’ll bet the colors are amazing as a little goes a long way, cannot wait to experiement.
I think I might have some luster dust in my cake making stuff. I should do a test lab on that. Thanks for there suggestion Suzanne!
I have ordered some Luster Dust to see how it colors polymer clay. They use it for cake decorating,and it is beautiful as it is mixed with vodka. It is surprising to me that not one article has been written on the use of Luster Dust and Polymer clay. It is not a food substance, but is considered non toxic, so most people eat the colored icing that they use it on.
I would love to know if anyone has ever used Luster Dust for this purpose and how did it turn out. Does it bake well after using it on raw clay? Such beautiful colors too.
yes i will be trying this i make 7 to 8 real card every other week when i am up to it i am always looking at something differ to share with ppl who just need careing kind word i dont sale anything i made but i love to give to others i am on disably so i always looking for way to save my money and still bringhten someone els life so ty so much for showing us how to do this thank ou so very much may you all have lots blessing in 2015 pleases share a card with them in nueshome or there fighting cancer or there just alone and need a careing kind words our crfts and card makeing can brighten someone lifes and great reson to craft s and card made .
Great tip Cindy!! the wood I’n planning to use this for is kinda soft, this meaning it will absorb the ink fast and it might be difficult to even the whole area in the same tone, so my question is what can I use to prepare the wood so that it won`t absorb it too fast, thusly achieving an even tone?? Please HELP
Hi Frank, years ago we used to make picture frames and used a pre-treat product for that same issue when using liquid stains on wood. I think it may have been called a wood conditioner or something. A Google search should bring up something for you. Good luck!
Do you know if there is a recipe color chart for mixing your own custom alcohol inks using Ritz dyes to come up with the similar name brand colors that are available? I thought I ran across one on Pinterest at one time and I apparently forgot to pin it on my board. Thanks for any help you can provide me.
Hi Sheila, No I do not know of any color mixing charts for custom color mixes for Rit Dyes. If I do run across one, I will let everyone know. Thanks for asking!
Thank you Dixie Ann….I will definitely do that.
I wanted to do some really bright and summer colors and my yellow was real watery. Not at all pretty….
I will let you know how they turn out.
My next project is to try and use metallic markers and see if they show metallic. I also have some acrylic paints that I would like to experiment with. I hope it keeps the mica swirl in the ink.
We’ll see….I will check back in soon!
Deb, I would be very much interested to see how you come out with the metallics. The adirondack metallics are nice but they still separate in the bottle and you really have to shake them up good before trying to use them. I would recommend putting in one steel shot ball in your squeeze bottle so you also have the ability to shake up the sharpie metallics well. Just a suggestion Doll. Thanks
With the metallics, you could probably add some suitably-coloured extra mica powder (e.g. PearlEx) to make sure the metallic effect is retained.
That might even work for turning non-metallic inks, whether commercial or home-made, into metallic versions. I haven’t tried that yet, however! (I’ve just used the Adirondack metallics that Dixie Ann mentioned.)
Awesome Dixie Ann! I started using my sharpie inks on the faux techniques we make and it really does great. Like you said about using less ink for deeper colors….I am going to try that on the yellows, they don’t seem to be as bright as I want. Also the Bic brand markers will work just as well. I know some stores have Bic cheaper.
Have a great day!
That is awesome to hear that Bic works as well Debi! One more brand to add to the list!
Deb, use less alcohol on the lighter colors. I used only 1 oz. per pen and let it set overnight before using it. The colors are much deeper and more vibrant if you do. :)
Thank You so much for such valuable information as I really can not afford any inks right now but I do however have about 40 different colors in Sharpies. LOL
All I need now are spray bottles and a big jug of alcohol. I would use the ink much more than the Sharpies as I have had them for a long time and I do need the alcohol spray inks for projects that I am working on more than the markers.
The information is much appreciated. I am so glad I stumbled on this video and then the blog.
I was really intrigued with Deb S. using Sharpie Brand markers to make alcohol inks so over the holiday weekend I decided to try it with the help of a video I found on YouTube. I am happy to say it does a very nice job of making inks.
I took the marker apart like Deb explained above but from there was confused as to how to take rest of the marker apart. The video showed how to do this and it was fairly simple. Once you pull out the nub with a needlenose pliers, you simply twist and pull the pen apart using another pair of pliers. There is a long plastic tube full of fiberglass that is soaked with the ink. You cut the soft plastic tube in about 4 sections so they fit in a baby food jar and put the 4 sections and the nub into the jar and add 2 ounces of 91% or better alcohol. That’s it. Let it set for at least 1 hour and then you squeeze the remaining ink from the pieces and nub and using a small funnel pour it into a 2 oz. squeeze bottle. I was surprised at how bright and vibrant the colors were. It was hard to tell the marker colors from the Adirondack Ink colors. I plan on testing it next on raw and baked premo clay to see how the colors hold up and how well it will crackle run through the pasta machine. The Adirondack inks cost $10 per 3 pack at Michaels for a total of 1.5 oz. as each bottle is only 1/2 oz. The Sharpie Inks
can be made for just the price of a sharpie about .97 cents. 2 oz. of alcohol
about 12.5 cents and a plastic squeeze bottle also about $.50 so your total cost would run roughly about $1.75 for a full 2 oz. of ink the first time you made up one color. After that it would only cost about $1.25 for the same color since you already have the squeeze bottle. I did a dark color and a light color to test the color depth. The first one was a little messy since I didn’t quite know what to do. However, the second pen I took part and mixed up with very little mess at all. I kept a small dish of clean alcohol nearby so that I could clean up each utensil right away as I used them and was very happy with the ease of making the second pen color. You can also make a smaller batch of 1 oz. per color simply by cutting your alcohol
which really deepens the colors. I just thought it would be fun to try this
and if you can’t get the higher priced inks, this might be a good substitute.
Anyway I will check back in and let you know how it reacts with the clay.
Have a great Memorial Day weekend everyone.
Thank you so much Dixie Ann for reporting back with your experiments and costs! That is extremely helpful information! I have used Sharpie markers on polymer clay but have not yet summoned up the courage to cut my precious markers apart to make alcohol ink with them. I think this idea will work for many of our members in other countries where it isn’t as easy to find the Adirondack inks. I am guessing that most good quality alcohol based permanent markers would work no matter the brand, but once again… It’s best to test!
Thanks again for sharing what you learned. It makes this site such a valuable resource for all those that come here!
Wow, this was great Dixie Ann – thank you.
During some more googling on storage cabinets, because you can never have too many, rofl…..
This has to be the plastic storage drawer system dream, can you image being able to spin the unit to find the drawer you need? I would die.
Plastic ESD Storage Cabinet Systems
“Conductive Cases, Cabinets, Storage Boxes and Storage Bins are the industry standard for the protection and safe handling of static sensitive components. We offer a wide variety of sizes and styles that maybe configured to meet most industrial needs. We also offer custom design and manufacturing service to meet customer’s specific requirements. Each Conductive System component is constructed of light weight strong, carbon filled polymer. Static charges are safely dissipated protecting sensitive components and circuit boards.
Conductive cabinets provide static-safe storage and are rustproof and dent proof. Conductive copolymer plastic shells and drawers have a surface resistivity of 103 – 106 ohm/sq. and comply with MIL-B-81 705B. Come complete with a grounding cord that, when connected to ground, will bleed off any static charge at a controlled rate. Ground cord may not be used if cabinet is placed on a grounded conductive surface.”
Wow!
Interesting video. I will continue to use the commercial brands. I wonder if you mixed hot water with the rit and dissolved it and then added alcohol, if it would it be more vibrant. Not going to the trouble to find out though.
Thanks
because the homemade inks aren’t very vibrant I would rather spend the money and buy them commercially. Vibrancy is what attracts me to ink.
Hi Cindy,
Where did you get those really nice plastic storage drawer units that you have in front of you at your work table?
Please, Please tell me.
Randall
Hi Cheryl and Randall! There are 40 drawer units similar to Cindy’s, available from Harbor Freight. They are $17.99 each but you can find these units at a lot of online and local stores.
For more ideas and information here, just go to the search box and pop in “storage” for a bunch of links.
Thank you so much Joceyln.
I am on my way over to Harbor Freight as
I speak.
I’ll let you know how I make out.
Cheers, Randall
I got my plastic boxes through K-mart. They only had one in the store store , I ordered the rest from the K-mart website and got a couple that were shorter with drawers of a variety of sizes. Shipping is free if you have it delivered to their store. Sometimes the site has free shipping if your order over a certain amount of money. I have not seen them at our local Harbor Freight.
I was so happy to see this as the free video! You have saved me the trouble of experimenting. Thank you! I think I’ll stick to the store bought inks. If it were to mix well from the start, maybe I would consider making my own, but if I have to filter it etc, no thanks. (looks a bit messy too) You didn’t ruin your lab jacket did you Cindy?
May I ask a completely unrelated question (an assumed yes, so I’ll continue….) Your studio is in your trailer, right? How do you prevent the drawers from opening while you are enroute? ….the things we think of when watching your videos!
Hi Christine, the studio you see in the videos is actually in my home, though I do take many of my clay supplies with me in the trailer when we go on Roadtrips. A while back we did shoot a video of the storage unit I have in the trailer if you want to check it out. Here’s the link: Securing Craft Storage Bins
Oh and no I didn’t ruin my lab coat. I just got some of the dye on my desk. Nothing that a little rubbing alcohol couldn’t remove though, so no worries. Thanks for your comment!
I have been trolling the site looking for the tut you did about storage because I can not remember the name of the mechanics boxes with all the little drawers you have for your clay nor where you bought them. They definitely need to go on my wish list. I need to clear the clutter on my work surface and the tops would make a great place to put my books and other lg things. I love using negative space and in a small room up is the way to go with stackable boxes,shelves and hooks. Right now I have bookshelves in my table with canvas baskets to hold most things I don’t use all the time draped with a pretty cloth. I clean the pretty jars my candles come in to store small things and they are all the same so they line up very nicely on the open shelves and three wooden hat racks set one above the other with the pegs offset to hang my finished product and strung beads. small baskets from the dollar store hold everything else. It is an example of rampant ocd, Anyway everything has a place and looks neat but those boxes would further enhance the ability to organize everything and I would be able to see what I wanted at a glance without having to dig through baskets for it.Since I sew, do loom beading, paint, do mosaics and the polymer clay I need to keep everything separated and organized.
Well ……Happy claying,
Cheyrl
Cheyrl (and Randall) – Those boxes are from Canadian Tire (a large chain store here in Canada), under the Mastercraft brand name. I’ll be showing another video of them soon, so stay tuned for that. The video you’re referring to is the Studio Tour I did a while back.
I forgot to mention that the inks made from the markers work just fine on unbaked polymer clay like the faux techniques. Also some of the colors look like mud green when they sit in the alcohol, but the true color comes out when you use them.
I forgot to ask you also how much alcohol do you use in your little jars for each color. Do you add any water? Have you experienced any kind of a shelf life with them?
Dixie Ann,
I think you found the same video I did for the idea of the inks. The video mentioned using them for a lot of scrapbooking projects and I thought Hey! Why not try it. I made them just like you did. Let the nub and the cotton tubes sit for about an hour, in 2 ozs of alcohol. Then put the ink into the squeeze bottles. No water added. Let me know how your testing goes too ok?
Hi Deb, I finished testing the Bic Markers and found them to be just ho-hum. The colors were not near as vibrant as the Sharpie markers. I actually had to add a sharpie marker to the Bic marker to enhance and deepen the color. I used the same amount of 91% alcohol. I think the Bic markers are much more difficult to take apart also. There must be a difference in the ink that they use even though both are permanent. I will definitely use the Bic markers on other projects as they appear to work well on “painting” quilt designs on embossed metal but am pretty much sold on using the sharpies for making alcohol inks. This is a wonderful way for others to get inks if they don’t have access to buying Adirondack or other brand name inks and is extremely cost effective. I am so glad you mentioned this technique on the blog. It’s terrific gals like you who like sharing new ideas. Thanks so much.
I’m grateful that you are doing so much work for us Dixie Ann. I really agree on the bic markers, I let them sit and they are mixed really well….the ink has the full color and doesn’t separate. The darker colors are doing well and I’ve mixed them with my purchased inks. No problems their either. So I guess it will be up to the personal taste of the artist, and it’s a cheap way for some of us to get several colors of ink. Thanks~~~
I made most of my alcohol inks using both Bic markers and Sharpie brand markers. They turned out great. Some of the lighter colors are not as intense like yellows and peach but after sitting awhile they start to intensify. I use a baby food jar or a small plastic bowl that is disposable to use as my ink starter. You just pop off the end cap, pull out the nib and then run an blade through the tube of stuffing stuff in the tube of the dye. Put in the highest strength rubbing alcohol you can find. Cut the tube into pieces, and drop in the nib and all the tube pieces. Let it sit for about and hour and you have alcohol inks in a million colors!
Hi Deb, I am very curious about using your markers to make alcohol inks. It is an interesting concept. Have you used them on polymer clay? Raw or Baked? How do the colors turn out after they have intensified sitting in their jars? Do they fade or anything after several months or have any kind of reaction to the clay? We would really be interested in hearing how they work out for you. Thanks so much.
Also, I haven’t have them for a long time. Only a couple of months. So far so good, they didn’t loose their color. I have used them on baked and raw clay. I like how they turned out. I did some blending on the baked clay and covered it with tls and baked it again. It looks great! I will keep using them and report in when I do and let you guys know how it works.
Very useful tip, thanks Cindy. Would be good I think for backgrounds, as colour is muted, but for everything else I’ll stick to the professional Adirondack inks.
Marion
Sue, you might want to try more sophisticated dye stuff.
Live in whites in summer, and in silk underwear in winter thanks to these kind folks who have every type of fabric/clothing blank imaginable.
Also check their jewelry and hair products, lots of applicability to poly clay adornment.
This sounded so quick I just had to try it!
I didn’t have any open packets of powdered fabric dye so I thought I’d try a liquid dye as the bottle packaging makes it easy to just take a spoonful.
The liquid dye I tried was the Rit brand that Cindy mentioned. The bottle is the same shape as in Cindy’s video but the label is different, possibly due to it being an Australian version, but also possibly indicating a different type of dye. In any case, the product I tried was called an “all purpose dye”, which usually means it contains several types of dye so that at least one of them will work on whatever fabric you use it on.
It was much thinner straight out of the bottle than the dye in Cindy’s video; much runnier than pouring cream, for instance (and I did shake it REALLY thoroughly first). Interestingly, when I added the 99% isopropyl alcohol, the two liquids didn’t mix at all. The dye stayed at the bottom of the container and the alcohol ink sat on top, and even furious stirring didn’t mix them: it was like oil and water, but with even LESS of a tendency to temporarily mingle. The most that happened after a lot of vigorous stirring was that the isopropyl alcohol picked up a pale yellowish colour… and the dye was supposed to be teal!
It wasn’t until I added water as Cindy described that the real dye colour (teal) was apparent throughout the liquid. However, I thought it looked very weak, with nothing like the intensity of even pale colours of commercial alcohol inks.
When I applied it to a sheet of translucent polymer clay I could also see that the dye wasn’t properly mixed into the liquid: it still looked grainy even though everything was liquid, so I guess I had something like an emulsion with tiny droplets of semi-diluted liquid dye suspended in the isopropyl alcohol.
Since it looked so weak I applied a lot more than I would have for a commercial alcohol ink. While it was drying I noticed that the liquid dye separated out, with the small dye droplets clumping together and forming dark blobs of colour surrounded by pale backgrounds.
Once this “ink” was dry I mixed it into the clay by folding and passing through the pasta machine multiple times. It didn’t mix in as fully as Adirondack alcohol ink does, with there still being some tiny darker spots that wouldn’t go away no matter how many times I folded and fed the clay through the machine. Pinata alcohol ink does the same thing (which is actually a neat effect at times) so it’s not *just* the home-made-ness that caused this.
I then baked a sample. Because I’d used translucent clay the sample appeared darker when cured as the white-looking raw translucent became clearish (I used Pardo), but it stayed true to the original colour (hadn’t yellowed, etc.).
And after that, I just *had* to try it with a powdered dye after all! LOL
The powdered dye I used was from Dylon in a turquoise colour called Bahama Blue. This is an intense, vibrant colour when used on fabric, although it’s a totally uninspiring pale blue-grey in dry powder form.
After measuring my powdered dye out and adding alcohol ink, it still looked totally insipid: I had runny sludge in the same pale blue-grey of the dye’s powdered form. A whole lot of stirring didn’t make any difference. So I thought I’d add a bit of water to see what would happen, and that started bringing out the true dye colour, at least a little bit.
It was still pretty weak, and I remember that when using this dye on fabric you need to dissolve it in really hot water first, so I tried heating my little container of mixture in a hot water bath. What happened then is that the powdered dye dissolved in the small amount of water I’d added to the mixture and separated out, forming a “dye slick” at the bottom of my container much like how the liquid dye started out! The bulk of the liquid, i.e. the isopropyl alcohol actually became a lot paler when this happened.
As with the liquid dye, this concentrated dissolved powdered dye wouldn’t mix with the isopropyl alcohol. So this time I added a bit of boiling water, and then a bit more, until everything appeared to mix thoroughly. However the result again was much weaker than a commercial alcohol ink would have been, and I think the overall proportion of water would be too high for it to evaporate quickly (it’s nice not to have to wait too long for normal alcohol inks to try).
So I wouldn’t consider either experiment a success, although the liquid dye was less unsuccessful. I do have another type of powdered dye on hand that I haven’t tried yet, but I only have it in a neutral grey which wouldn’t be much of a test for colour intensity. There were various other types of dyes available (mostly in school uniform colours) when I last went shopping for them, and some of those might work better than what I just happened to have around.
I’m curious about how this would work with other solvents. My first inclination would be to try it with acetone because it too evaporates quickly which might give similar application characteristics to regular alcohol ink, but I don’t have any on hand at present (I’ll try to remember to buy some on the weekend).
It would also be interesting to try powdered food dye — not that that would be an improvement in terms of cost or ease of access compared to commercial alcohol ink, at least in Australia — but I don’t have any of that at the moment either.
Sue it was so awesome to see that you had put on your Mad Scientist hat so quickly and got to testing this yourself! As far as the ‘type’ of dyes they are, the Liquid Product says “All Purpose Concentrated” dye, and the Powder says “Tint and Dye Multi-purpose Concentrated Formula” so I take it they may have a variety of dyes in them. After further inspection I did read on the packages that they do contain salt.
Your results and conclusions were pretty much the same as mine, which was nice to hear. I too would rather stick with the commercial alcohol inks, rather than make my own, though it was a fun thing to revisit since it was such a long time ago that I had originally tried it and the liquid dye had unexpected results.
Thanks as always for your participation!! :)
Delighted to see this do it yourself video again. Still have some left from the first version! I did get some sludge, but, Dad gave me some of Grandpa’s old dairy teat syringes, and I found I could suction up the good stuff to rebottle, OR, directly insert ink directly into the work using the syringe. Cannot wait to try this more with something like the fake chrysanthemum cane Dixie shared with us recently.
Pretty amazing that of all the information picked up on at Pinterest, that this is the most popular. Think it speaks well to Cindy’s teaching methods.
Storage bottles galore: Specialty Bottle Company
Also note the ubiquitous protective coffee collar on the coffee. Wouldn’t it be cool to have a rubber backed poly clay collar to use? Slips on and off, rinses clean, and would provide more protection from heat.
Also loved that clover flower bead – book charm!
.
Specialty Bottle Company is a great place indeed we have purchased both glass with the eye dropper and plastic bottles with flip top dripper for an item we sell on ebay. They don’t require a minimum order and they ship very fast. I didn’t try to make any of my own inks the first time it was talked about but I may this time when I have the kids this summer. They love Cindy’s experiments and even more trying them out. I think I might have to sneak a couple bottles from our stash. hehe. You are amazing as usual Cindy and love the video Doug. Thank you once again.
Ah, leave it to Sue our mad scientist to play with this. You go girl! Personally I would never waste my time on making my own inks. I found it is just a waste of money and time besides making a mess. I only use what is specified for polymer clay. I learned this years ago when I tried to fill my own ink jet cartridges. Egad what a mess I created and I never did get them filled properly.
It’s ok to mess around and experiment but I like leaving that to you Cindy, you do such a superb job and I really enjoy those videos.
Excellent info as always, Cindy!
What type(s) of dye were the two products you used? (The type(s) of fabric were they intended for is probably a good initial indicator.) There are differences in the chemical/dyeing action as well as other characteristics, and I’m curious as to whether that’s part of the “sludge factor” or not, and also in the colour intensity. (When I bought dyes last year I noticed that many brands offered their most popular colours in multiple dye types. With packaging that was almost identical too, so I nearly got caught out!)
I wouldn’t normally make my own alcohol inks: last year I tried custom dyeing some clothing and discovered that fabric dye is rather expensive here, and that unless you want “school uniform colours” the colours you want are unlikely to be in stock anyway even if they exist. I also already have a heap of Adirondack and Pinata commercial alcohol inks so don’t have a need for the home-made variety.
However, I do have all the ingredients needed to try this on hand, so I might give it a go just for curiosity’s sake! ;D