Making Small Test Blends With Your Polymer Clay Colors
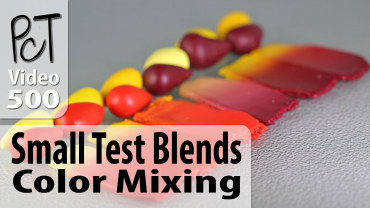
Video #500: Really getting to know your polymer colors so that you can see how some shades can bully the other ones.
More...
IN THIS POST: — teardrop blends — color — blends — skinner blends — color mixing — ombre — graduated blends — gradation — gradients — gradient blend — lietz blend — (Topics marked with an asterisk* are discussed in the Comments Section below).
Topics Covered In This Video:
- How to make small test color blends with polymer clay.
- Using the Teardrop Method for making mini skinner blends so you don’t have to use up too much of your clay.
- Making small test blends will let you see how a color will behave when mixed with another one.
- Most reds are dominant, which means they will bully weaker colors.
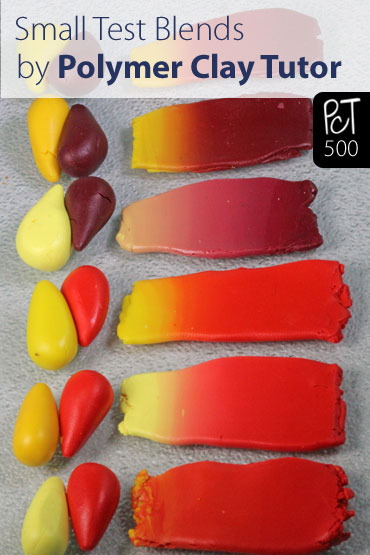
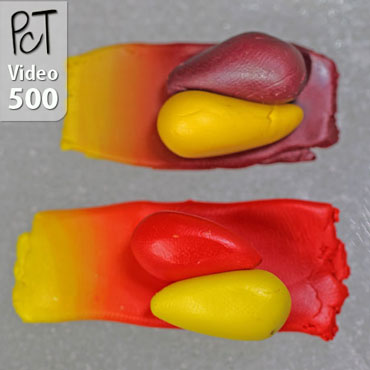
- Test Blend #1: Premo Cadmium Yellow & Alizarin Crimson.
- Test Blend #2: Premo Zinc Yellow & Alizarin Crimson.
- Test Blend #3: Premo Sunshine Yellow and Alizarin Crimson.
- Test Blend #4: Premo Cadmium Yellow & Cadmium Red.
- Test Blend #5: Premo Zinc Yellow & Cadmium Red.
- Test Blend #6: Premo Sunshine Yellow & Cadmium Red.
- See how some color saturation comes into play when making color blends.
- See how some colors mix muddy while others have more pleasing clean transition.
- Get a feel for how much white is added to the different polymer clay colors.
- Watch the video and then grab a couple of colors to do some mini teardrop test blends of your own.
00:00:03 –> 00:00:08 Hi guys, its Cindy Lietz, your Polymer Clay Tutor, and in today’s Studio Tip, I’m
00:00:08 –> 00:00:13 going to talk a little bit about doing some test blends.
00:00:13 –> 00:00:17 Now a little while ago, I showed you how to make a Teardrop blend…and if you haven’t
00:00:17 –> 00:00:22 seen that, you’ll wanna go watch that video, but one of the neat things about the Teardrop
00:00:22 –> 00:00:27 blend is that you can do it in very small amounts, which means that you can use it as
00:00:27 –> 00:00:31 a way of testing to see how your colors are gonna mix together.
00:00:31 –> 00:00:39 Now I’ve got some samples here of some little tiny mini-blends that I’ve done, now, you
00:00:39 –> 00:00:46 can see that I’ve used very small amounts of clay and in equal parts, I’ve done these
00:00:46 –> 00:00:54 little test blends in 2 different color sets, first set, I’ve used… as my Red color,
00:00:54 –> 00:01:02 I’ve used Alizarin crimson, and in this second set, I’ve used Cadmium Red as my
00:01:02 –> 00:01:11 Red color, then I’ve mixed the reds with 3 different Yellows.
00:01:11 –> 00:01:17 In the first batch here, I did Alizarin Crimson with Cadmium Yellow, and here is the blend
00:01:17 –> 00:01:26 that I got here, this next blend was done using Zinc Yellow and Alizarin Crimson, and
00:01:26 –> 00:01:30 this blend here was using Sunshine Yellow and Alizarin Crimson.
00:01:30 –> 00:01:40 The second set of colors I did was in Cadmium Yellow and Cadmium Red, Zinc Yellow and Cadmium
00:01:40 –> 00:01:43 Red and Sunshine Yellow and Cadmium Red.
00:01:43 –> 00:01:48 The reason why I’m showing you this is that there’s a few things you can learn by doing
00:01:48 –> 00:01:53 these test blends, first of all it gives you a pretty darn good idea how the color’s
00:01:53 –> 00:02:01 gonna blend, say you wanted to make a nice Skinner blend or cane with it, it also gives
00:02:01 –> 00:02:06 you a good idea… the saturation levels and how the colors are gonna behave with the different
00:02:06 –> 00:02:07 shades.
00:02:07 –> 00:02:13 So, you can see here, when I’ve mixed the Alizarin Crimson with the Cadmium Yellow,
00:02:13 –> 00:02:19 you get a kind of a typical blend that you would expect, there’s kind of a Yellow…or
00:02:19 –> 00:02:23 Orange in the middle here, and then it shifts over.
00:02:23 –> 00:02:30 But as…if you’re mixing an almost similar color with the Zinc Yellow, the color in the
00:02:30 –> 00:02:34 middle is more on the Brown side.
00:02:34 –> 00:02:41 And with the Sunshine Yellow, it actually is more on the Pink side, and the Sunshine
00:02:41 –> 00:02:45 Yellow almost becomes kind of an Ecru color.
00:02:45 –> 00:02:52 And you can also see the saturation levels, so you can see that Alizarin Crimson is a
00:02:52 –> 00:02:58 really, really strong color and is extremely dominant, and actually most of the reds are.
00:02:58 –> 00:03:02 These Yellows are kinda weak colors so you barely get any Yellow at the tips here of
00:03:02 –> 00:03:07 all of these different blends, and you mostly have Reds showing up all the way across, even
00:03:07 –> 00:03:12 though they were 50/50 mixes, so that means that these Reds are quite dominant and they’re
00:03:12 –> 00:03:15 bullying the Yellows.
00:03:15 –> 00:03:21 The Sunshine Yellow…you can see here, ends up giving you kind of a pastel color in the
00:03:21 –> 00:03:28 middle, on both blends, which means that there’s a fair amount of White in that Sunshine Yellow.
00:03:28 –> 00:03:35 You can also see the way the different colors blend, like I said, in this case you get more
00:03:35 –> 00:03:40 sort of a muddy color, but over here, you get…when you use the Zinc Yellow with the
00:03:40 –> 00:03:45 Cadmium Red you get quite a pure color, so it’s quite neat.
00:03:45 –> 00:03:49 It’s a great way to test out your colors, you can do it in small amounts, so you’re
00:03:49 –> 00:03:56 not using up a lot of clay, and you can get a feel for how the colors are gonna mix together,
00:03:56 –> 00:04:01 how they’re gonna blend, which one is gonna be more of a bully, which one is gonna be
00:04:01 –> 00:04:06 weaker, and it’s really quite a great way to get to know your Polymer clay colors and
00:04:06 –> 00:04:08 how they’re going to behave.
00:04:08 –> 00:04:13 So I hope that was helpful for you, go ahead and grab a couple of colors and start doing
00:04:13 –> 00:04:18 some little mini test blends… little teardrop blends, with them and see how your colors
00:04:18 –> 00:04:22 turn out, I’d love to hear your stories, make sure to leave a comment in the comment
00:04:22 –> 00:04:26 section below, and if you like this video, let me know about that And we’ll see you
00:04:26 –> 00:04:29 in the next video, bye.
Our goal is to translate these videos into as many languages as possible. If you are interested in helping with this initiative, then please do contact us and we will figure out a way to make it worth your while :)
Resource Links:
- Related Video: Polymer Clay Color Mixing – Color Saturation
- Related Video: Color Plus 1 – Polymer Clay Color Mixing Trick
- Related Video: Lietz Teardrop Blend – Color Gradients Made Easy
- Related Video: Teardrop Blend (Easy Skinner Blend) No Pasta Machine
- Related Video: Polymer Clay Skinner Blend Instructions
- Related Video: Stepped Graduated Color Blend – Old School Gradients
Resources marked with a double ** asterisk are affiliate links. If you click on them and decide to buy something, we may receive some compensation. This does not affect the price you pay in any way. What it does do, however, is helps us to continue providing free videos for you, here at the PcT website. Using our links to purchase your tools and supplies, is always greatly appreciated.
Sponsored Ads & Special Promotions

Shareable Images


To share this full blog post anywhere on the web that allows links in comments, here's a shortened url to copy and paste...
>> https://mypct.ca/v500 <<

Want to chat about today’s post? That’s what the comment section below is for. Scroll Down… We’d love to hear from you!
Or... if you would like to request a topic for a future post, here is the link to do that… PcT Suggestion Box

Hi ^_^ I love your videos and I found a tutorial on tumblr that I can’t seem to figure out and I was wondering if maybe you could help me?… I understood the rest of the steps but I couldn’t figure out how they got from step 1 to step 2 :(
Hi Jordan, I just checked out the tutorial you are talking about and OMG no wonder you could not figure it out! Geez they left out a few of the most important steps. Problem is that is far too complicated to explain it here in this box.
Basically what they did was made a Skinner Blend using translucent orange and translucent yellow clay. Then they made a long strip and stacked and wrapped it in such a way to make a teardrop shape with the yellow in the center and the orange on the outside.
This is exactly the kind of technique I have used in several of my tutorials including the Variegated Rose Beads Tutorial.
It isn’t terribly hard to do, it just takes many steps… WAY more than just one step! This is why I hate so much of the information that is out there. People put something out there like this, thinking they are sharing something that is helpful to people. When they have missed so many steps that the only people who understand how to do it, are the people who already know how to do it… like me. It messes up the new people and creates confusion and discouragement.
I would never do that to you. I show you everything you need to know, and if for some reason I have accidentally missed something, you can ask me and I will tell you.
Thank you so much! :)
Thanks Cindy! I’m chiming in on how this illustration really made an impression on me. I had no idea that the different yellows would make such a difference. And yes – congratulations on this being number 500! I remember way back when………:0)
I call my place “The Doll’s House” because it is tiny and I make miniatures for dolls houses.
Last year my two daughters sent me away on holiday (to get me out of the way) while they did a major make-over on two of my rooms.
The bedroom is now a very pale aquamarine with white and gold touches, beautiful and restful instead of just plain boring beige and cream.
In the living room (where I do most of my work) they painted three walls a cream/caramel color but the feature wall was Raspberry Red. At first I hated it but thought ( I would re-paint when they had left). They explained they had been following the ancient art of FENG SHUI
According to the Chinese this means Wind and Water, or living in harmony with your surroundings. They, (my daughters, not the Chinese) moved my table near this wall under the window for maximum light. Red is considered a color of energy, wild imaginings and creativity. It is also supposed to bring good luck, so who am I to ignore what millions of very clever and artistic people practice, I am keeping my Raspberry Red Lucky wall in fact I now love it!
Watching your mini tute Cindy reminded me that years ago I couldn’t get hold of Cad Yellow so used another shade of yellow. The results was surprising and a little disappointing and in fact ended up mixing some gold into it and loved the end color, but that was BC. very hit n miss. So a big thanks cindy for all your wonderful color recipes and tips on blending. also congrats on your 500 mark…….cheers xx……..
I loved this story Elaine! I would love to visit you in your red raspberry lucky room! Sounds charming!
Gosh Cindy when you line those color blends up I can really see the difference in the blends. I will never assume again that one yellow can do the same job as 3 different yellows. It really does put a whole new spin on mixing the right blends. Thanks so much for the eye opener and congratulations on your 500th video. Like I said in the beginning you are a “one video wonder” one video at a time! (((hugs)))
Happy 500th video!
Looking forward to the next 500 plus videos!!!!!!!!!!
Mari
Me too Marianne! Thank you for being here and sharing your wonderful self with us. So glad to have you along for the ride!
your test really shows the power of the underlying colors of all the colors, warm reds vs cool reds and how they play with warm yellows vs cool yellows. great test for all of us to try.
Thanks Joanne! I will be teaching more about warm and cool colors in future videos, but you’re right, this test definitely shows the power of the underlying colors.
Wow 500 videos :) We, as a polymer clay community are very lucky that you and your husband Doug have decided to devote your time and energy into this field – I personally have learned so every much from you guys. Not just about how to make new types of beads or canes (which I love) but also the nuts and bolts side of my preferred medium. So congrats on this 500th mile stone a thank you for taking so many of us along for the ride. Thank you from the bottom of my heart, Sherry
I know it’s crazy isn’t it! After 500 videos you’d think I would have run out of stuff to say about polymer clay but we’re just getting started! Thank you so much Sherry for being such a wonderful asset to our PcT Clay Family! I love your input and support. What we are trying to do, would mean nothing without wonderful people like you!
Thank you for the mini test blends, the results are amazing, and show me how much color work remains to be learned. Look forward to future tutes along this subject line.
Thanks for saying that Jocelyn! I think color is one of those things that you can continue to learn about your whole lives. It is what makes our world a beautiful place and is truly fascinating! I will continue to add as much info about color as I can.