Makins vs. Walnut Hollow Polymer Clay Extruders
Video #519: The biggest difference between these two clay extruder brands is how the crank handle is designed and how it works.
More...

IN THIS POST: — polymer clay extruders — extruder dies — extruded clay — makins professional extruder — walnut hollow extruder — extruder vise — extruder adapters — gingham canes — extruded flower canes — landscape cane — pointillist cane technique — polymer clay micro mosaics — (Topics marked with an asterisk* are discussed in the Comments Section below).
Topics Covered In This Video:
- A comparison between the Makins Professional Polymer Clay Extruder and the Walnut Hollow Clay Extruder.
- I have owned the Makins Professional Extruder for several years now, and I just purchased my Walnut Hollow tool.
- These tools can be used to extrude polymer clay for all kinds of projects.
- Examples of tutorials I used an extruder are the Snowy Tree Pointillist Cane Tutorial, Gingham Cane Tutorial, Extruded Flower Cane Tutorial,
- Micro Mosaic Pins Tutorial (see resource links just below today’ video).
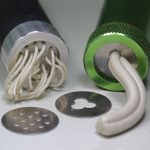
- Both of these extruder tool brands come in hard plastic cases.
- Both come with 20 stainless steel dies (these metal disks in both sets are identical as far as I can tell).
- The round dies are the same size for each brand and are interchangeable.
- The Makins barrel is longer and holds more clay than the Walnut Hollow Extruder.
- Both are made of aluminum, though I think the threads on the Walnut Hollow machine may be steel.
- The crank handles are quite different. The Walnut Hollow handle design is much nicer to grip with your whole hand, and therefore easier to use, especially if you are using a vise to hold the extruder.
However, you can back out the plunger from the Makins Extruder barrel much faster, because of how you can quickly spin the handle rod with just your finger. - The Walnut Hollow barrel has a nice rubber coating for easier gripping.
- The plunger end looks stronger on the Walnut Hollow Extruder than the one on the Makins.
- When using either of these brands, make sure that your clay is well conditioned and soft, place the die in the end of the extruder, and crank the handle slowly. Don’t force it.
- Dry clay will crackle on edges… which can be used to your advantage in my Jupiter Bead Tutorial (resource link included below).
- Extruders are the perfect tool for making fine threads for hair or filigree.
- Walnut Hollow makes a large die adapter that does fit on the Makins Extruder as well. This is an optional accessory.
- In the future, I will show you some other dies and extruder products in follow-up videos
00:00:03 –> 00:00:09 Hi guys, its Cindy Lietz, your Polymer Clay Tutor, and today’s PcT Product Demo, I’m
00:00:09 –> 00:00:12 talking about Polymer Clay Extruders.
00:00:12 –> 00:00:19 And I’m gonna show you the difference between Makins Professional Polymer Clay Extruder
00:00:19 –> 00:00:23 and the Walnut Hollow Clay Extruder set.
00:00:23 –> 00:00:27 Now, I don’t have the original packaging ‘cause I’ve had this Makins extruder for
00:00:27 –> 00:00:32 absolutely years, but this Walnut Hollow is a new one for me, and I’ll just show you
00:00:32 –> 00:00:36 the differences between them in one sec.
00:00:36 –> 00:00:40 If you’ve never used a Polymer clay extruder, these are the types of things that you can
00:00:40 –> 00:00:46 use them for…now this is an older tutorial of mine called the Snowy Tree Tutorial, and
00:00:46 –> 00:00:52 you can see the little extruded strands of Polymer clay that I used to build up this
00:00:52 –> 00:00:59 cane, and this is what it looks like reduced and made into a piece of jewelry.
00:00:59 –> 00:01:07 I’ve also used it to make this Gingham cane, and here’s some beads form that particular
00:01:07 –> 00:01:08 tutorial.
00:01:08 –> 00:01:16 I’ve also got some extruded Flower canes here, they’re super tiny so you might not
00:01:16 –> 00:01:17 able to see them super well.
00:01:17 –> 00:01:25 And then I’ve got some pins here where I did a Mosaic technique, and I used the extruder
00:01:25 –> 00:01:30 for that, and so it just shows you that there’s like tons of different, neat, cool things
00:01:30 –> 00:01:34 that you can do with an extruder if you didn’t know that.
00:01:34 –> 00:01:42 Now these extruders are extremely similar, with a couple of differences, both come…both
00:01:42 –> 00:01:49 of mine came in almost identical packaging, and the dies that are in the inside…and
00:01:49 –> 00:01:56 a die is this little stainless steel disc that has a hole in it, and there’s a whole
00:01:56 –> 00:02:02 bunch of different sizes and shapes of holes that they have in these discs, you put them
00:02:02 –> 00:02:07 through…at on the end of the tool, and then you squeeze out the clay, now the discs in
00:02:07 –> 00:02:14 both sets are identical, I matched them across from each other, and in fact I wouldn’t
00:02:14 –> 00:02:20 be terribly surprised if they weren’t made by the exact same company…the discs.
00:02:20 –> 00:02:28 You can see they’re the same size, and they’re the same style, and see here’s the identical
00:02:28 –> 00:02:33 ones from both sets, so in that respect they’re identical.
00:02:33 –> 00:02:41 Where they’re little bit different is the way the…well the barrels are a little bit
00:02:41 –> 00:02:46 different in size, the Makins one is a little bit longer and a little bit bigger so you
00:02:46 –> 00:02:52 can put more clay in it, they’re both made of aluminum from what I can tell, though I
00:02:52 –> 00:02:59 think the Makins (*Walnut Hollow) one, the threading system is actually steel, whereas
00:02:59 –> 00:03:03 the Makins one is aluminum.
00:03:03 –> 00:03:09 And the handles are different, you can see with the Makins one, the handle kinda slides
00:03:09 –> 00:03:16 out and you can turn it like that, and with the Makins…or the Walnut Hollow, it’s
00:03:16 –> 00:03:24 done by…it turns into a little crank, so in a lot of ways, this is easier…will be
00:03:24 –> 00:03:29 a lot easier, especially if you use a vise…I’m not gonna talk about the vise today, but I
00:03:29 –> 00:03:35 will in a future video, a vise that can hold these tools, which will be helpful.
00:03:35 –> 00:03:39 This one kinda has a rubber coating on it which is nice for gripping on to.
00:03:39 –> 00:03:50 The Walnut Hollow…the end part looks a little bit more sturdy…this…the plunger part,
00:03:50 –> 00:03:59 it’s built quite thick, whereas from what I can see on the Makins one, I’m worried
00:03:59 –> 00:04:05 that soon… after all this use, you can see there’s a little divot happening here, I
00:04:05 –> 00:04:10 think what’s happening is the rod is ending…is gonna end up pushing through there, and I
00:04:10 –> 00:04:15 have seen online where some people have broken this part, so this disc at the end doesn’t
00:04:15 –> 00:04:19 seem as strong as the Walnut Hollow one is.
00:04:19 –> 00:04:24 So that’s one downside, but I have used it for years, and it hasn’t broken through
00:04:24 –> 00:04:29 yet, but I’m quite gentle, I don’t force a lot of…I don’t force machinery, I’ve
00:04:29 –> 00:04:34 seen people just, you know, crank things through and bust stuff, so I don’t treat my tools
00:04:34 –> 00:04:36 like that, but some people do.
00:04:36 –> 00:04:41 Okay, so let me quickly show you how they work, I’ve got some soft clay… soft clay
00:04:41 –> 00:04:50 works best, and you just crank them back, the amount of thread that’s showing is how
00:04:50 –> 00:04:56 much room is in the barrel, basically, so if you’ve got a log of clay going in, you’re
00:04:56 –> 00:05:01 gonna want it to be turned back as least as long as the clay that you’ve got to put
00:05:01 –> 00:05:03 in there, otherwise it’s not gonna fit.
00:05:03 –> 00:05:11 Then you just pop your clay into the end, you take this screw-on part, put a disc on…doesn’t
00:05:11 –> 00:05:19 matter which one, we’ll just pop one on, screw on the end, and right then what you
00:05:19 –> 00:05:28 do is you just start twisting out the handle, and you start squeezing out the clay.
00:05:28 –> 00:05:33 Now the softer the clay is, the smoother it’ll come out, if you have really dry crackly clay,
00:05:33 –> 00:05:39 then it will crack on the way out…but we’ve actually also used that to our advantage in
00:05:39 –> 00:05:46 a tutorial called the Jupiter beads, so, you know, you can use this type of thing for all
00:05:46 –> 00:05:49 kinds of cool, cool projects.
00:05:49 –> 00:05:58 Now, the Walnut Hollow one works exactly the same way, only you crank it back, and we’ll
00:05:58 –> 00:06:06 pop in a different disc, I’ll just use the same clay, it’s nice and warm, and I’ll
00:06:06 –> 00:06:13 show you what’s really nice about these discs is that you can squeeze out things like
00:06:13 –> 00:06:18 really skinny little strands, so I’m gonna pop the disc into the Makins (*Walnut Hollow)
00:06:18 –> 00:06:25 one, you can see they’re identical sizes, so if you’ve got dies that fit in one machine,
00:06:25 –> 00:06:30 they’ll also fit in the other, though in this case they’re identical so it really
00:06:30 –> 00:06:36 doesn’t matter, but there are some aftermarket dies out there so that’s good to know.
00:06:36 –> 00:06:42 And see this coming out, all these little tiny hairs, now if you want to make hair for
00:06:42 –> 00:06:50 a little doll, or do fine little filigree strips or all kinds of stuff, you could never
00:06:50 –> 00:06:56 roll these out by hand as quickly and easily as that, so that’s what’s really cool
00:06:56 –> 00:07:01 about an extruder, it’s kind of like our old Play Dough days, remember?
00:07:01 –> 00:07:04 So you can use these little hairs for all kinds of cool things.
00:07:04 –> 00:07:15 Now Makins also makes a clay adapter, so it has these really super-giant dies like this,
00:07:15 –> 00:07:21 so if you see these in places like Michaels or wherever, you can buy this knowing that
00:07:21 –> 00:07:28 it will fit on either the Makins machine or the Walnut Hollow one, so if you’ve already
00:07:28 –> 00:07:31 got a Makins and you wanna buy that, you can.
00:07:31 –> 00:07:38 So, that’s just a quick review showing you kind of the mechanics of it all, and how they
00:07:38 –> 00:07:40 work, and the dies and everything.
00:07:40 –> 00:07:45 In future videos I’ll go a little bit more into some of the other dies that are out there
00:07:45 –> 00:07:47 and cool things you can do with it, alright?
00:07:47 –> 00:07:53 So I hope that was helpful for you, if it was, make sure to let me know in the comment
00:07:53 –> 00:07:55 section below.
00:07:55 –> 00:08:01 And if you’ve got a product you’d like me to demo for you, or you’ve got a question
00:08:01 –> 00:08:07 or a burning issue that you have, and you’d like me to help you solve it in a future video,
00:08:07 –> 00:08:10 make sure to put those in the comment section below.
00:08:10 –> 00:08:12 So we will see you next time and bye for now.
Our goal is to translate these videos into as many languages as possible. If you are interested in helping with this initiative, then please do contact us and we will figure out a way to make it worth your while :)
Resource Links:
- Related Video: Snowy Tree Pointillist Cane Tutorial
- Related Video: Extruded Flower Cane Tutorial
- Related Video: Gingham Cane Tutorial
- Related Video: Micro Mosaic Pins Tutorial
- Related Video: Jupiter Bead Tutorial
- Related Video: Makins Professional Ultimate Clay Extruder
- Related Article: Extruder Cleaning and Maintenance Tips Plus Project Ideas
- Amazon: Makins Extruder **
- Amazon: Walnut Hollow Extruder **
Sponsored Ads & Special Promotions
Shareable Images


To share this full blog post anywhere on the web that allows links in comments, here's a shortened url to copy and paste...
>> https://mypct.ca/v519 <<
Want to chat about today’s post? That’s what the comment section below is for. Scroll Down… We’d love to hear from you!
Or... if you would like to request a topic for a future post, here is the link to do that… PcT Suggestion Box
Hello Everyone, I have tried the Walnut Hollow extruder and a green one that I purchased from Wish… I had trouble using the walnut hollow extruder due to the fact that I have RA… The green works well for me and it easy for me to use and the operation is very smooth. I know that it is a knock off: however I have used other disk from walnut hollow and makin’s green and the work..
Thanks
Hi Cindy,
Thanks for the review on the walnut Hollow. Last night I was excited after having seen your tutorial on youtube re using the extractor for canes… I created only about 4 and continued with a few more today…. and my trusty Makins that I have had for about 12 years finally packed it in – ugh!…perfect timing – not!
Upon closer inspection of my Makins extruder…. when you thread off the top (if you needed to replace the rubber “O” ring)…. the shaft with the threaded long rod, it’s made in such a manner that it screws into that brass plunger (which the rubber O ring goes around), so it was no longer seated flush and had actually managed to unscrew itself!! I too have the same divet on the plunger on my makins one, must be how they go over time!
Do you know if the Walnut Hollow brand is of the same “internal” construction when it comes to how it is attached to the part that actually pushes out the clay (plunger part)? Do you actually get an “O” ring on the Walnut Hollow branded one?
Gosh, I hope that all makes sense ?? I’m not sure if you have completely pulled apart the Walnut Hollow one to clarify??
I’m in the market for a new extruder now, do you happen to know if Cynthia Tinapples Driver Adapter would work on the Walnut Hollow extruder? I’m weighing up my pro’s and cons between the Walnut or Lucy extruder.
Much Thanks, appreciate the reply when you can :-D
Hi Lylola, the Walnut Hollow extruder does have an O-Ring, similar to the Makins but the plunger is designed in a more sturdy manner. The problem is that the thread on the plunger are stronger than the threads on the nut that the plunger threads through… which basically means that the threads in the Walnut Hollow can be stripped quite easily. That is how I wrecked mine. If you can afford it, the best extruder on the market is the Lucy Clay XXL HD CzExtruder. (There is a link in the Ad section near the top of this blog where you can buy the Lucy Clay Tools if you’re interested.) I also have a video on it, if you want to use the search box and hunt it down. The LC extruder is extremely well built, super strong and can also be hooked up to a power drill to make extrusions super easy. It is well worth the cost in my opinion!
Thanks so much for the reply, I am still weighing up the pros and cons but I will check out your vid links for sure. Thanks for the feedback :-D
I have a walnut hollow will your discs fit in the walnut hollow?
Hi Robin, I actually don’t carry any disks myself but if you’re asking can you use the disks from the Makin’s in the Walnut Hollow, the answer is yes!
I have a brand new walnut hollow extender but I can’t get the clay to come out more than about 1/4 inch. My clay is pretty soft. Do you have an any idea why it won’t work?
Hi Karen, sorry to take so long to respond. It wounds like your threads may be damaged and that the handle won’t screw in any further. I would suggest taking it back to where you purchased into contacting the manufacturer to ask them if they can fix this for you. Good luck… let us know how it goes!
quiero saber como comprar para negocio saber precios y que venden
[GOOGLE TRANSLATION: “I want to know how to buy for business to know prices and selling”]
Hi Teresa, I am not sure if I can help you with this. We don’t sell the Makin’s Extruder. Maybe you could contact the manufacturer?
[GOOGLE TRANSLATION:
Hola Teresa, no estoy seguro de si te puedo ayudar con esto. No vendemos Extrusora del Makins. Tal vez usted podría ponerse en contacto con el fabricante?]
Article Published at Craft Test Dummies | Clay Extruder Comparison on Polymer Clay Tutor […] and LOVE it- but isn’t it great to know that Cindy Lietz has compared the two for us? You can see her whole post here, but all of the pertinent information is contained in the video […]
Dear Cindy – Thanks for your response. I don’t know what ‘threads’ you’re talking about vis-a-vis Cynthia Toops – I shouldn’t have confused the issue with mentioning mozaics – I meant I was having difficulty with anything I’m making once I’ve rolled out the conditioned clay, cut the shape I want then when removing it from my work surface with a knife it then distorts and if it’s particularly thin I have a real problem getting it back to the shape I originally wanted. I do understand what Cynthia does when doing her mozaics which was nice to learn as I’d worked that out myself, so I know I’m on the right path there! But this other really has me stumped! Thanks again for your time on this, Ruth Clements.
Hi Ruth it sounds like your clay is too soft and maybe too thin. Why don’t you try leaching it? Type leaching into the search box at the top of the page and you should be able to find the info you need. Let me know if that solves the problem.
Hi Ruth, Cynthia Toops bakes her polymer clay ‘threads’ first before cutting and placing in her mosaic. That is how she avoids distortion. Hope that helps!
Hi Cindy, I’m a beginner at polymer clay and have been experimenting for the past 6-8 months and thanks to your youTube tutorials have learned a lot. Due to budget constraints I can’t manage to purchase any tutorials at present so I thought I’d ask you for help. I’m doing okay learning caning and using my extruder but I have one very big problem. I would dearly like to make extremely thin pieces (if you’re aware of Cynthia Toops work that is what I’m aiming for). My problem is once I have the pieces cut out and go to move them by using my thin slicer to scoop up from my work surface they lose their shape as the clay is so soft. I’ve tried to leach out the clay a bit by placing on paper but that seems to dry it out too much. I can’t work out what I’m doing wrong. I’ve followed all the directions for conditioning the clay so I don’t think that’s the problem. One of my goals is doing small mozaics but I need to solve this shaping problem. Any advice you can give would be most appreciated. Thank you in advance, Ruth Clements, Cedar, B.C.
Ruth, if you need really thin clay, maybe a solution might be to pre-bake it, maybe 30 min, while it is still flat. Then as soon as it comes out of the oven and is warm, slice it into the shapes that you need for your work. Or if extruded shape, bake a strand as above and use a short razor blade to slice it into the thin slices while warm?
I put “slicing warm clay” into the search box and came up with a ton of information here on the website, some of which may be just the ticket for you. All best!
Thank you very much for showing us the comparison between extruders. I shall be looking around for Walnut Hollow dies now I know they’ll fit my Makins. One thing I’ve always wondered, whether it’s possible to get blank dies, so they could be turned into whatever shape you wanted when that shape is not included. For e.g. I haven’t found a very tiny square die; I’ve tried to make your beautiful gingham pattern but when I try reducing, it becomes distorted.I’d also like to make the ‘Dogstooth’ cane’ in a tiny version. If I had a much smaller square die this wouldn’t be a problem. Also, I’ve seen dies on a different extruder which produce a frame shape for pendants or miniature pictures. This seems such obvious omissions I don’t understand why neither of the extruder companies under discussion have included this, or make provision for it in a separate set of dies. A gap in the market, I think.
Any-way (as Ross would say! ) I think your tutorial is tops and once again you’ve really gone that extra mile, as you always do.
Thanks Cindy – Marion
I bought a Makins Extruder and used it yesterday for the first time. VERY upset with it. As I turned the screw at the back, and the clay started to come out, the end kept popping off. It was as if the screw threads were not intergrooving. Any suggestions before I return it?
Hi Marilyn, it sounds like you better take it back… it shouldn’t be doing that!
that is what I was afraid of…..
Me too, Marlene,
but never knew Makin made a clay adapter for larger dies, but I think, thanks to Cindy, I will look online, ( too far to go to my nearest craft shop here in the U K).
I accidentally cross- threaded my Makin clay gun so decided to buy the Walnut Hollow extruder. It is by far more sturdy and I like the handle better. I also bought the core adaptors but as yet have not used them. I could never stop the Makin from squeaking when I turned it but purchased it back in 2009 so it has done well as I am a little hard on my tools. Just had to buy another pasta machine as had lost the handle (still cannot find it) but when I do it will be nice to have two. One for white and translucent the other for everything else…………..cheers xx……………
Great video. I am glad I bought the walnut but also glad to know of the additional maken pieces fit the walnut hallow.
Thanks
Cindy,
Just wanted to say a big thank you for the extruder comparison. I hope to be replacing my ” thumb buster” from long ago, and now know exactly what I want! Also it was so nice to see your face (and crocus lariat) properly again. I have been watching ALL of your back issues (WONDERFUL) and I’ve really just been seeing your hands lately! You have already helped me so much and when I finally get going again it will be because of you! Thank you!
Julia
I have a Makins extruder but about a year ago I saw the extra set of discs from Walnut Hollow and bought it. The first one I tried was the butterfly which is the one for which I bought the set. The disc buckled in the Makins so I called Walnut Hollow. The woman I talked to was very gracious and explained they had been having trouble with them but thought they had the problem fixed. A couple of days later a new set arrived and I’ve had no trouble with it at all. Walnut Hollow is a good company to deal with.