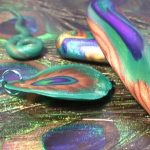
Vol-037-4 Peacock Feather Cane Part 2 PcT Tutorial (Intro)
Video #209: “Reclining on a velvet couch, eating bonbons and being fanned with peacock plumes (full story below).” ~Mary-U
More...

** This post is an introduction to one of our paid tutorials.
I definitely had to dig deep to find that delightfully vivid, peacock related quote… from Mary-U. Her words had Doug and I, really laughing out loud, so you guys might just get a chuckle as well. Besides, what are the chances that I’ll ever get the chance again, to talk about velvet, bonbons and peacocks all the same post… LOL?!
“Cindy, your apparently inexhaustible treasure trove of ideas continues to amaze me. Although it’s well known that you spend most of your day reclining on a velvet couch, eating bonbons and being fanned with peacock plumes by your willing slave Sir Doug, somehow you find the time to work these marvels for us. Thank you, thank you.” ~Mary-U
Now, in keeping with the Peacock Cane theme (See Vol-037-3 Part 1 Video), I found another interesting YouTube video that is worth watching. It’s not about polymer clay. But it is a wonderful story about community, public art & peacocks of course. Have a look...
“
When I saw this, I was thrilled. I've been a peacock fanatic since I was a kid too, an illustrated card and a zoo trip did it for me. I love learning more involved techniques and marvel at how you 'decipher' everything into simple, clear steps. You have such a rich library here that we can access if we need help.
Danette K
“
Absolutely stunning!!!!! ~Elizabeth-S
Elizabeth S
“
This was fantastic. Wow!!!!!
Andrea P
Transcript coming soon...
Transcript coming soon...
Our goal is to translate these videos into as many languages as possible. If you are interested in helping with this initiative, then please do contact us and we will figure out a way to make it worth your while :)
Shareable Images


Want to chat about today’s post? That’s what the comment section below is for. Scroll Down… We’d love to hear from you!
Or... if you would like to request a topic for a future post, here is the link to do that… PcT Suggestion Box
It is amazing to me that anyone can look at something like a peacock feather and know what to do to make it into a cane. My brain just can’t wrap around it. I have only done a few canes like a bullseye cane and most ofj them were a mess. I am going to make this cane. I don’t know what I’m going to do with it, maybe just look at it in awe for awhile, but even though at some point I will be able to make it, I could never figure it out in the first place. And I guess that’s why I pay you the big bucks! LOL Cindy, my hat is off to you.
Thanks for making me feel good today Peg! :)
Hi Cindy!!! I just wanted to say thank you so much for the your amazing peacock feather cane tutorial. I was very pleased with how it turned out!
Wonderful Marsha! Thanks for letting me (and everyone else) know :-)
Hi Cindy, I finally figured out how to make the long strip of the colors in the blend by holding the clay strip together as it is going through the machine. :) thanks to your instructions in another video.
Glad you figured it out Connie!
Hi Cindy, When making the peacock feather cane yesterday, I couldn’t seem to get the nice long strip of the blended colors like you have in your video. My sheet came out as wide as my pasta machine and the colors were only around 3 inches long. I tried to follow your directions as to the amount of clay, etc. What am I doing wrong?
I made one of these canes, but when I did the sanding/buffing after it was baked, all of the beautiful gold sparkle was gone. Is there a technique to keep that from happening?
I did make another, without sanding, and covered it resin which left all of the gold sparkle, but I would like to make something without resin and still have all of the sparkle. Is it possible?
Hi Chrissy, It sounds like when you are sanding you are removing the mica particles that have lain flat and look all shiny. If you prefer that look, then just try and get your piece as smooth as you can before baking by rolling a little with an acrylic roller or something, and then just leave without sanding or coating after it is baked. If you still want some shine but don’t want to use resin, use Sculpey Gloss Glaze, wax or one of the other finishes I recommend. There is no hard fast rule that your pieces need to be sanded or that they need a coating. They just need to look professionally finished, no matter how you want to go about it.
Thank you!
When Cindy finished this 2 part tutorial, I was ready to go. Had the “eye” done and was ready for the “feathers”. As soon as my cane was finished I put slices on a votive candle holder and was thrilled with the look and proudly set it on a table in my family room. Several people have since commented on it, and said I should add it to my website. So I did, thinking someone might want one.
I was wrong. Two days after I listed it, an event planner e-mailed me that she wanted 250 of them for an event in April! Guess what I will be doing for the next month and a half!!! THANK YOU CINDY!
CONGRATULATIONS Marlene! That is so cool! I am so proud to hear you have had so much success with the peacock cane. Who knows, maybe this contract will develop into a whole new business for you? Maybe other events as well? I am really happy for you!
Thank you Cindy, for the Congrats, and for all you have done for us. This success is as much yours as mine.
The true genius of this cane is that it gets you using most of the new premo colours simultaneously. Look…. I have to be honest I made a bit of a dog’s breakfast of this cane but the colours and ratio are so stunning I ended up with some beautiful pieces anyway!