Applying Pearl Ex Pigments Onto Polymer Clay
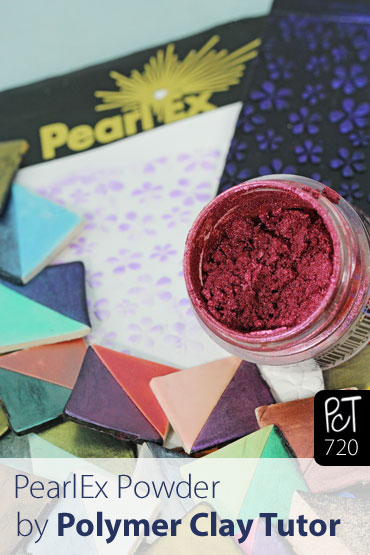
Video #720: These beautiful powders will take on different looks depending on the background color they are brushed onto.
More...

IN THIS POST: — pearlex — pigments — powdered pigment — mica powder — pearlex powders — powders — sparkle — glitters — (Topics marked with an asterick* are discussed in the Comments Section below).
In this video I am going to talk about how Jacquard Pearl Ex Powdered Pigments can be used as a surface treatment for Polymer Clay.
In a previous video I had showcased an acrylic organizer by Melody Susie, where the middle drawer was filled with Pearl Ex Powders. So I figured that now would be a good time to talk more bout those beautiful powders… specifically about how the different colors look on samples of both white and black polymer clay.
A viewer who saw how I stored the Pearl Ex containers in the previous video, had a great tip I’d like to pass along. She said to turn your Pearl Ex containers upside down so that the colors are more visible at a glance. Seeing all of my 24 jars of sparkly colored powders in the clear acrylic drawer looks very pretty and makes me happy.
I have only two of the sets of Pearl Ex Powdered Pigments made by Jacquard – Series 2 and Series 3. I’ve listed all of the colors from all of the Pearl Ex series, with links to where you can find them on Amazon, just below the video lower down on this page.
The square cutout clay samples that you’ll see in the video, were made by butting two sheets of polymer clay up next to each other, one white one black. Then, right where the two sheets met each other, I used a square cutter on the diagonal, to create the black and and white clay chips.
Each black and white polymer square was rubbed with one color of the Pearl Ex powder and baked… to show you how the same powder will look different on a light vs a dark surface.
Pearl Ex powders will bond very well to raw polymer clay and will be permanent when baked.
Although the baked on powders are quite durable and tough to scratch off, they should be protected if your piece is going to be used in a high abrasion situation (like beads on a bracelet). You can use finishes like PYMII, Renaissance Wax, Golden Varnish or any other polymer clay safe finish you may have on hand. Perhaps the Pearl Ex Vanish will be good too, but I haven’t tested it yet.
If the piece is not going to be exposed to high wear (like a sculpture) than the Pearl Ex powder doesn’t need to be sealed or protected at all.
Pearl Ex can be mixed into liquid polymer clays, solid polymer clay, varnishes, gel mediums, paints and more. I’ll show you more about that in future videos.
00:00:03 –> 00:00:08 Hi guys, it’s Cindy Lietz, your Polymer Clay Tutor and today’s PcT Product Demo, I’m gonna show
00:00:08 –> 00:00:13 you PearlEx Powdered Pigments on polymer clay.
00:00:13 –> 00:00:21 Now, just a video ago or so, I showed you an organizer that was filled with different
00:00:21 –> 00:00:28 products in one of the drawers filled with my PearlEx Powders and so I thought I would
00:00:28 –> 00:00:31 show you how to use PearlEx Powders on polymer clay.
00:00:31 –> 00:00:34 Now, here’s just a little tip from one of our viewers.
00:00:34 –> 00:00:39 She suggested I flip all the containers over because they were in here before this way
00:00:39 –> 00:00:43 and this way, I can see all of them and they look really pretty in there.
00:00:43 –> 00:00:51 Now, this is twenty four different– different colors and they are from the two different
00:00:51 –> 00:00:57 sets, the Series 2 set and the Series 3 set.
00:00:57 –> 00:01:03 This I got– the Series 2 set years ago and it’s–so you can tell by the packaging it’s
00:01:03 –> 00:01:07 a little bit older style and here’s the Series 3 one.
00:01:07 –> 00:01:12 This is the way they look now and all the little containers are in there and then they
00:01:12 –> 00:01:21 have quite a few–12 colors in each pack listed here and what I have done is I have made little
00:01:21 –> 00:01:29 color chips of each of the colors on to a black-and-white sample of polymer clay.
00:01:29 –> 00:01:38 Now, I’ll show you how to do that in a second but what I did first for the– to make the
00:01:38 –> 00:01:46 little color chips, I took a clean slice of white and black and butt them up next to each
00:01:46 –> 00:01:50 other and then just took a little square cutter and put it on the diagonal so that I would
00:01:50 –> 00:01:58 get a black and white sample like this.
00:01:58 –> 00:02:04 then I wrote the number the color I was adding on right beside it so I wouldn’t get them mixed up
00:02:04 –> 00:02:12 then I wrote the number the color I was adding on right beside it so I wouldn’t get them mixed up
00:02:12 –> 00:02:18 Then after they were baked, I put– I wrote on the back but the number was so I wouldn’t
00:02:18 –> 00:02:26 get mixed up with just an archival permanent pen and that’s how I actually made the samples
00:02:26 –> 00:02:32 but each of them– the reason why did it in black and white like this is because the colors,
00:02:32 –> 00:02:36 a lot of them were inference color so they’re much– they’re sparkly powders that will look
00:02:36 –> 00:02:42 So I’ve got each of the colors here and how they look and you can see that they are fairly rich pigments
00:02:42 –> 00:02:47 are a little bit more opaque and some are a little bit more translucent.
00:02:47 –> 00:02:54 So I’ve got each of the colors here and how they look and you can see that they are fairly
00:02:54 –> 00:02:56 See, this was quite dense you can barely tell that there was black and white underneath that one
00:02:56 –> 00:03:04 This color here is Aztec Gold and it looks really beautiful on both black and white this
00:03:04 –> 00:03:08 is Antique Copper, all of these colors look really beautiful.
00:03:08 –> 00:03:15 See, this was quite dense you can barely tell that there was black and white underneath that one
00:03:15 –> 00:03:20 This is Antique Silver and if you don’t put it on perfectly even you’ll get kind of a
00:03:20 –> 00:03:25 blotchy look to it because it’s a little on the translucent side.
00:03:25 –> 00:03:30 This color here is one of the interesting ones, it’s called duo green and yellow and
00:03:30 –> 00:03:34 hopefully the camera will pick up on it, but from certain angles and you can really see
00:03:34 –> 00:03:42 it on the white the color will look blue or greenish and then from another angle, it will
00:03:42 –> 00:03:45 look quite yellow so that’s quite cool.
00:03:45 –> 00:03:51 You don’t see the green on the black as well but on the white, you really do.
00:03:51 –> 00:03:54 This color here is called Bright Yellow.
00:03:54 –> 00:04:00 Alright, this next one is Spring Green and you can– you can really see the green sparkles in that
00:04:00 –> 00:04:06 This is Flamingo Pink, now, the flamingo pink when its on black, almost as a purpley look
00:04:06 –> 00:04:11 to it but it’s very flamingo-y on the white.
00:04:11 –> 00:04:14 Flamingo-y is a word, you know.
00:04:14 –> 00:04:22 Alright, this next one is Spring Green and you can– you can really see the green sparkles in that
00:04:22 –> 00:04:25 Hopefully, the camera’s picking this up properly.
00:04:25 –> 00:04:33 This color here is Turquoise, this one is True Blue.
00:04:33 –> 00:04:41 Now, these pigments sparkly powders are more suited for other type projects than just big
00:04:41 –> 00:04:46 flat surfaces but this will give you a good idea on how everything looks on both colors.
00:04:46 –> 00:04:51 This color here is Misty Lavender, really pretty one.
00:04:51 –> 00:04:57 This one here is Blue Russet.
00:04:57 –> 00:05:01 Now this is the only one in the series– the two series that I have that has such a large
00:05:01 –> 00:05:03 flakes to it.
00:05:03 –> 00:05:11 This one is called Sparkling Copper and to me it seems like the copper leaf like you
00:05:11 –> 00:05:16 know gold leaf and silver leaf, seems like the copper leaf just ground up into a relatively
00:05:16 –> 00:05:23 fine powder rather than this– the superfine mica particles that these other ones are.
00:05:23 –> 00:05:32 Now, this is Series 3, this one here is not very metallic it’s called Carbon Black and
00:05:32 –> 00:05:38 it is very much like charcoal, I guess, if you scraped it off charcoal, it would be a
00:05:38 –> 00:05:45 very great one to use in one of my Faux Raku techniques.
00:05:45 –> 00:05:49 This color here is called Pumpkin Orange.
00:05:49 –> 00:05:51 To me, it’s golden looking actually.
00:05:51 –> 00:06:02 I doesn’t seem super orange, Salmon Pink, this one really looks purple-y on the black
00:06:02 –> 00:06:09 I think the powders in it seemed to have like a pink and purple two tone kind of look to it
00:06:09 –> 00:06:13 Pink gold, now this is very interesting.
00:06:13 –> 00:06:20 If you look straight onto it, the pink is on the right side is very pink and it’s quite
00:06:20 –> 00:06:27 gold on the black but if you hold it at an angle you’ll see that the golden shimmer to
00:06:27 –> 00:06:32 it this was a very rose gold kinda look, you can get some very great effects of her super
00:06:32 –> 00:06:33 popular right now.
00:06:33 –> 00:06:41 This one here is called Reflex Violet, that’s a pretty one, looks a little smearing the
00:06:41 –> 00:06:44 way I added it on there but it’s very pretty.
00:06:44 –> 00:06:56 This one is Gray Lavender and I really love this color, it has a kind of an antique look to it
00:06:56 –> 00:07:05 This color here is quite interesting, it is called Mink and it’s kind of a russet kinda
00:07:05 –> 00:07:12 color with a greeny kind of shimmer to it.
00:07:12 –> 00:07:20 This color here is Sky Blue, it’s quite Turquoise-y and this one here I was surprised how much
00:07:20 –> 00:07:22 I really liked it.
00:07:22 –> 00:07:30 It is called Pearl White and it has a real pearly color you want to make Faux Pearls
00:07:30 –> 00:07:36 or any of the kind of Faux Shells and that kind of stuff.
00:07:36 –> 00:07:40 It will look great with that. This color here is Antique Bronze,
00:07:40 –> 00:07:47 it’s quite a dark one, it really masks both of the colors underneath.
00:07:47 –> 00:07:57 This one is Sunset Gold, it has kind of a green-y undertone to me anyways.
00:07:57 –> 00:08:03 And then this one is another one of those cool duo colors now this one is a green and
00:08:03 –> 00:08:09 purple duo and hopefully the camera will pick up but you can really see the purple on the
00:08:09 –> 00:08:16 black and really see the green on the white but at the right angle, you can see both of
00:08:16 –> 00:08:19 the colors is quite quite cool.
00:08:19 –> 00:08:22 So that is how all of those colors look.
00:08:22 –> 00:08:27 Now like I said that– it’s not really– because it’s kind of semi translucent is hard to get
00:08:27 –> 00:08:32 like a super even finish to it.
00:08:32 –> 00:08:37 It’s more suited to be kind of a surface thing rather than my covering the whole area and
00:08:37 –> 00:08:43 I’ve got a couple of projects here where I’ve used Pearl Ex Powders there–just to add a
00:08:43 –> 00:08:45 metallic shine.
00:08:45 –> 00:08:53 I’ve added it in around the center here and of this Cymbidium Orchid, it’s from one of
00:08:53 –> 00:08:59 my tutorials and this is just a smaller version of the same thing and you can really see the
00:08:59 –> 00:09:00 sparkle in there.
00:09:00 –> 00:09:04 It’s very very pretty on polymer clay.
00:09:04 –> 00:09:14 Now here’s a tutorial where I do a Faux Enamel technique and I’ve mixed some copper-y PearlEx
00:09:14 –> 00:09:20 Powder as well as some of the Blues in with some liquid polymer clay.
00:09:20 –> 00:09:26 You could either use Sculpey Translucent Liquid or I think actually seeing the sheen on there,
00:09:26 –> 00:09:35 I think I actually used Kato– Kato Liquid Polymer Clay, it’s a little shinier that’s
00:09:35 –> 00:09:38 why I think that’s the one I used on that one.
00:09:38 –> 00:09:41 You can see it has a very pretty effect.
00:09:41 –> 00:09:50 And I used some on this Dogwood Tutorial and I also used some, just fooling around just
00:09:50 –> 00:09:58 rubbing it on the top surface of the stamped Snowflake that I cut out, I was playing around with it
00:09:58 –> 00:10:02 I’ve got a couple of samples here just to show you how to use it quickly.
00:10:02 –> 00:10:07 Now, here are here some white clay here.
00:10:07 –> 00:10:08 Can you see it well here Doug?
00:10:08 –> 00:10:15 OK, good, I’ll just do it here then I’ll just grab one color here.
00:10:15 –> 00:10:24 This is what– Reflex Violet and I’ve got some black and white clay that I rolled one
00:10:24 –> 00:10:26 of my KOR Rollers on.
00:10:26 –> 00:10:31 We’ve got a video on that, if you want to check out those but I rolled out across some–a
00:10:31 –> 00:10:36 sheet of white clay and a sheet of black clay and I just want to show you how this one look
00:10:36 –> 00:10:43 and often, there’s some sitting in the lid there so that’s a great place to to work from
00:10:43 –> 00:10:46 and I’m just going to use like a makeup sponge.
00:10:46 –> 00:10:52 You could use your finger but sometimes it gets down too far into the background area
00:10:52 –> 00:10:59 but if you just dip them into– the makeup sponge into the lid, you can just control
00:10:59 –> 00:11:03 of the little better and you can just catch it on the top surfaces.
00:11:03 –> 00:11:11 Oh it’s so pretty and you could mix colors and do all sorts of neat things, we’ll try
00:11:11 –> 00:11:12 it here on the black.
00:11:12 –> 00:11:20 You’ll see the difference between how it looks on the black surface and on the white.
00:11:20 –> 00:11:23 Oh isn’t that so pretty?
00:11:23 –> 00:11:31 I think you’re gonna really love using PearlEx Powders because they bond right with the clay,
00:11:31 –> 00:11:35 you’ll find, like if I grab this, and stretch the scratch it, it would be hard to get it
00:11:35 –> 00:11:38 off but it could eventually rub off.
00:11:38 –> 00:11:44 So it really– whether you have to seal it or not really depends on the situation.
00:11:44 –> 00:11:49 If you had it on the outside, of beads that were on your bracelet and they were going
00:11:49 –> 00:11:54 to be rubbing off on time then you would want to protect them but if they’re on a sculpture
00:11:54 –> 00:12:00 then it’s not going to easily come off so you wouldn’t necessarily have to protect it.
00:12:00 –> 00:12:06 You could, now, pearl– Jacquard, the company that makes PearlEx has a product called PearlEx
00:12:06 –> 00:12:12 Varnish which is compatible with with the PearlEx obviously, and you can mix the PearlEx
00:12:12 –> 00:12:15 powder into it and make a little paint and all kinds of neat things.
00:12:15 –> 00:12:21 I haven’t tested it on polymer clay though I have a good feeling that it will work but
00:12:21 –> 00:12:28 that will be another video, a test video to see how this varnish does with polymer clay
00:12:28 –> 00:12:39 but I’ve used other things like PYM II, any of the clear liquid Sculpey or any of the
00:12:39 –> 00:12:41 varnishes that our polymer clay safe.
00:12:41 –> 00:12:47 So you can do that to seal it and you can also make PearlEx powders, large amounts of
00:12:47 –> 00:12:51 it into liquid clay, into solid clay.
00:12:51 –> 00:12:52 There’s lots of neat things.
00:12:52 –> 00:12:57 I’ve been here for half the day already so I don’t wanna go into those now but in another
00:12:57 –> 00:13:04 video, I will do that sometime soon and show you how the other ways that you can use PearlEx
00:13:04 –> 00:13:07 Powder in the clays and in other mediums.
00:13:07 –> 00:13:13 Alright, so I hope that was helpful for you and that you learned a lot from this video
00:13:13 –> 00:13:18 and if you like this video, do let us know and if you’ve got any products that you’d
00:13:18 –> 00:13:24 like to see me test in our Test Lab or do a demo on, do leave us a suggestion in the
00:13:24 –> 00:13:30 comments section below and if there’s a technique you don’t understand, we have done so many
00:13:30 –> 00:13:37 videos, so make sure you check those out and if you can’t find what you need, then leave
00:13:37 –> 00:13:39 a suggestion for that as well.
00:13:39 –> 00:13:43 Alright, so we will see you next time and bye for now.
Our goal is to translate these videos into as many languages as possible. If you are interested in helping with this initiative, then please do contact us and we will figure out a way to make it worth your while :)
Resource Links:
- Amazon: Pearl Ex Series II **
658 Aztec Gold
661 Antique Copper
662 Antique Silver
682 Duo Green-Yellow
683 Bright Yellow
684 Flamingo Pink
685 Spring Green
686 Turquoise
687 True Blue
688 Misty Lavender
689 Blue Russet
690 Sparkling Copper - Amazon: Pearl Ex Series III **
640 Carbon Black
641 Pumpkin Orange
642 Salmon Pink
643 Pink Gold
644 Reflex Violet
645 Grey Lavender
646 Mink
665 Sunset Gold
692 Duo Green-Purple - Amazon: Pearl Ex Pigment Series I **
650 Micropearl
652 Macropearl
654 Supper Russet
655 Super Copper
656 Brilliant Gold
657 Sparkle Gold
663 Silver
664 Super Bronze
665 Sunset Gold
673 Inference Violet
674 Inference Gold
680 Duo Red-Blue - Amazon: Pearl Ex Pigment Chromatic 8 **
630 Citrine
631 Scarlet
632 Magenta
633 Shimmer Violet
634 Sapphire Blue
635 Apple Green
636 Emerald
637 Dark Brown - Amazon: Pearl Ex Pigment 32 Color Set **
658 Aztec Gold
670 Interference Red
683 Bright Yellow
651 Pearl White
659 Antique Gold
671 Interference Blue
684 Flamingo Pink
652 Macropearl
660 Antique Bronze
672 Interference Green
685 Spring Green
653 Red Russet
661 Antique Copper
673 Interference Violet
686 Turquoise
654 Super Russet
662 Antique Silver
674 Interference Gold
687 True Blue
655 Super Copper
663 Silver
680 Duo Red-Blue
688 Misty Lavender
656 Brilliant Gold
664 Super Bronze
692 Duo Green-Purple
689 Blue Russet
657 Sparkle Gold
665 Sunset Gold
693 Duo Violet-Brass
691 Solar Gold - Related Video: Storing Craft Supplies in an Acrylic Cosmetic Organizer
- Related Article: Pearl Ex Powders And Polymer Clay Beads
- Related Article: Stenciling On Polymer Clay Using Pearl Ex Powder
- Related Video: Sealing Polymer Clay Best Practices
Resources marked with a double ** asterisk are affiliate links. If you click on them and decide to buy something, we may receive some compensation. This does not affect the price you pay in any way. What it does do, however, is helps us to continue providing free videos for you, here at the PcT website. Using our links to purchase your tools and supplies, is always greatly appreciated.
Sponsored Ads & Special Promotions
Shareable Images


To share this full blog post anywhere on the web that allows links in comments, here's a shortened url to copy and paste...
>> https://mypct.ca/v720 <<
Want to chat about today’s post? That’s what the comment section below is for. Scroll Down… We’d love to hear from you!
Or... if you would like to request a topic for a future post, here is the link to do that… PcT Suggestion Box
Well, you’ve done it again, Cindy!! I have been using the Pearl Ex powders on polymer clay for a couple of years, since I found them at Michaels and fell IN LOVE with the bling power of them! But I forget from one time to the next how the various colours look on different colours of clay. I can’t believe, with my compulsion to make sample chips of recipe results, that I never thought to make chips with the Pearl Ex powders as well! And I really like the idea of the black and white side by side. More samples to store and play with and mix up to see what looks nice together. :)
Glad to have inspired you to play some more making color chips Doreen! Have fun!
Love your videos! I would love to see some more videos showing the uses for PearlEx powders. I got the 32 set for Christmas. Keep up the great work!
Hi Eden, I will do some more Pearl Ex videos in the future. Thanks for commenting!
Hi Dixie Ann,
I can address your question.
Amazon only places a short 24 hour “window of opportunity” for us to be able to earn a commission from your purchases. In other words, as long as you complete your order within 24 hours of placing the item(s) in your wish list or shopping cart, then we would benefit.
However, there is a way to extend this window. At any point down the road when you are ready to do some more Amazon shopping or browsing, simple click through to the Amazon site from any Amazon link out our site(s), and this should “re-set” your 24 hour clock back to zero. So… as long as you buy your stuff within the “new” 24 hour period, then your purchases during this new session will get credited to our referral link.
I think the only exception to what I said above is if you already have a “24 hour” timer going from clicking through to Amazon from someone else’s web site. Then they would get the credit. Hopefully that all makes sense.
Thanks for thinking of us like this. Everything helps :-)
Oh Cool, thanks Doug. So when I get ready I will come back here and click on the link and purchase it right away. Once I do, I will delete it from my wish list. That is so doable.
Hi Cindy, I do have a few jars of Pearl-Ex powders. I bought the same series a few years back but didn’t realize they had so many colors. I can see right now I am going to have to go to Amazon and get that 32 pack. Question; If I click on your link and put the item in my wish list and then purchase it later, do you still get a residual from Amazon? or do I have to purchase it right away and put it in my cart? A lot of times I will put it in my wish list until I have enough money or a $35 total for free shipping.
Cindy, Something people might like to know is that if they get too much mica powder on their clay it can be removed with sticky tape.
Great tip Sharon! You are very correct. Thanks for reminding everyone!
Hi Cindy, I want to thank you for showing us the difference between black and white with Pearl-ex. I would never have thought of using it on black, but the results were quite beautiful. I’ve had two packs of Pearl-ex (same two as you I think) for over 10 years. I never knew how to use them really, so never got around to it. But I will now!
You are more than welcome Marion! You should get those Pearl Ex powders out and start playing with them! I have down a few tutorials using the Pearl Ex powders. Just use the search box at the top of the page to find them. They should keep you busy for awhile!
Thanks Cindy. Checked your search box and there’s plenty to keep me busy!
Marion
Cindy, years ago I became interested in making my own makeup. I found a website, TKB Trading that has tons of glitters and mica powders, including the color shifting interference colors, at prices that can’t be beat. I have a lot of the Pearlex and Perfect Pearls colors, and the mica powders from TKB are just as good. You can even buy 6 gram sample sizes – all the ones I looked at were under $2. That’s a fairly generous amount and will last quite awhile. The powders come in zip lock baggies but they also sell containers at terrific prices.
The year you made the video for the poinsettias I made at least 80 of them, a lot in white or pearl. My son and I decorated them with a lot of different mica colors from Pearlex, Perfect Pearls and the TKB micas. I didn’t seal them with anything and the few I have left have all held their colors so I know the ones from TKB are just as good. And they can do double duty for women – keep some out for eye shadows and use the rest for claying! :)
Thanks for sharing your resource information Tanya! I’ll have to look into that.