Using Pinata Alcohol Inks For Tinting Premo Clay
Video #728: In this video you will see why it takes much less ink to color translucent clay as compared to white polymer clay.
More...

IN THIS POST: — tinting polymer clay — alcohol inks — pinata ink — adirondack ink — translucent — white — premo — sculpey — (Topics marked with an asterick* are discussed in the Comments Section below).
Today I am going to teach you about tinting polymer clay with Pinata Colored Alcohol Inks.
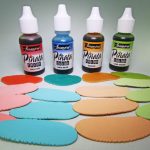
Recently I received a small selection of Pinata Alcohol Inks from Jacquard, and was testing saturation by mixing the inks into both Translucent and White Polymer clay. Seeing the samples side by side, and noticing the difference in how the pigment looks in white versus translucent clay, it occurred to me that most people may not actually understand how adding a pigment like alcohol ink, actually behaves with polymer clay.
We have been using alcohol inks with polymer clay for years. In fact I have a sample of a necklace I did for a tutorial done back in 2012, called Frosted Rainbow Flower Beads Tutorial. I used Adirondack Alcohol Inks in that project. I also have some samples of other tutorials using alcohol inks. So we know that inks in general, are compatible with polymer clay.
Up until now I hadn’t had the opportunity to try the Pinata Color Inks from Jacquard. They don’t have them in my local Michaels and I just hadn’t gotten around to ordering them online.
So I made up some sample chips and a small batch of beads and cabochons to test the colors and the saturation of the ink.
As you will see form the baked sample chips, the color in the translucent sample is much darker and richer than the samples of the inks mixed into the white clay. In fact, the sample of translucent with only 1 drop of the Pinata ink is multiple times darker than the sample of white clay mixed with 3 drops of ink.
The reason for this is because the white clay, isn’t just clay without any color… it is clay that contains a white pigment. So when the white pigment mixes with the colored pigment of the alcohol ink, it creates a pastel color. Whereas when the alcohol ink pigment mixes into the translucent, there is no pigment particles to mix with, so it tints the translucent clay whatever color the ink pigment is.
Watching the video will help you to visualize all this, much better than just reading my explanation.
So… to anyone that asks if it is possible to just buy white polymer clay, and make your own colors by adding alcohol ink, paint, powders etc. (a common questions)… the answer is yes and no.
Yes you can tint the clay to make new colors… but no, you can’t really make the same deeply saturated opaque colors that you can buy in the colored clay. You would need the same kind of highly saturated pigments that the manufacturers use, along with lots of patience and experimenting to get the right formula figured out. And by then, it would be much more expensive and much harder to do then just buying the opaque colors of polymer clay.
Using the inks on the outside is a completely different story though, which will need to be told on another day.
00:00:03 –> 00:00:08 Hi Guys! It’s Cindy Lietz, your Polymer Clay Tutor and today’s Studio Tip. I’m going to
00:00:08 –> 00:00:16 show you a little bit about tinting polymer clay with Pinata Alcohol Inks. Now, recently,
00:00:16 –> 00:00:23 I got some new Pinata Color Alcohol Inks from Jacquard and I got just a small sampling of
00:00:23 –> 00:00:28 all the colors that they have. They have tons of them and I wanted to test them out to see
00:00:28 –> 00:00:35 how they looked in polymer in some different mixes and there was something interesting
00:00:35 –> 00:00:39 that came about so I thought I would share it with you because I think a lot of you don’t
00:00:39 –> 00:00:47 really understand pigments and that kind of thing. So, now, we’ve been using alcohol inks
00:00:47 –> 00:00:56 in polymer clay for years, in fact, I’ve got a tutorial that I did years ago back in 2012
00:00:56 –> 00:01:02 called The Frosted Rainbow Flower Beads Tutorial and I used alcohol inks to tint translucent
00:01:02 –> 00:01:07 clay here and I actually used that Adirondac Inks at the time and I have a few other samples
00:01:07 –> 00:01:13 here of projects that I’ve done using alcohol inks. So we’ve been using alcohol inks with
00:01:13 –> 00:01:19 polymer clay for a long time but I– up until now I haven’t tried the Pinata Colors, they
00:01:19 –> 00:01:24 aren’t really here in my Michael’s store so it didn’t have to get them but now I have
00:01:24 –> 00:01:30 some so I want to test them out but what I did was I made up some different sample chips
00:01:30 –> 00:01:37 and to see how the color how strong is saturated the color was and I thought it was quite interesting.
00:01:37 –> 00:01:42 Now, what I’m going to do is I’m going to put a little bit of one of these colors on
00:01:42 –> 00:01:47 here to let it dry, it takes a few minutes to dry so and then I’ll talk more about how
00:01:47 –> 00:01:53 everything works but what I’ve got is some Premo White Translucent. This is a one inch
00:01:53 –> 00:02:00 by one inch square, rolled out a a couple of playing cards thick and I’ve done all of
00:02:00 –> 00:02:05 these samples the same size so that we can see the the color difference and I’ll just
00:02:05 –> 00:02:11 grab– I’ll just grab the green one that’s here. This color here is called Lime Green
00:02:11 –> 00:02:20 this particular grouping of colors has quite a– it has kind of a real South Western kind
00:02:20 –> 00:02:26 of look to it but I’m going to put one drop of alcohol ink on this square. I’m going to
00:02:26 –> 00:02:32 put one on this white one so this is white Premo, that’s white translucent these are
00:02:32 –> 00:02:41 all whites here then I’m going to put two on here and three on here. Now, I’m just going
00:02:41 –> 00:02:45 to spread those out and let them dry for a minute and then I’ll go back to explaining
00:02:45 –> 00:02:52 what the heck I’m up to it can take it a little bit of time and it’s advantageous to let it
00:02:52 –> 00:02:58 dry rather than to mix it in when it’s wet. OK, so let’s do that, spread it out and you
00:02:58 –> 00:03:05 can see, the concept here is to have a higher concentration of the alcohol ink for the same
00:03:05 –> 00:03:14 amount of clay just to see how strong it is. Alright, so, what I did here like I said I’ve
00:03:14 –> 00:03:22 got in these rows here of got white translucent clay mixed with the different colors of alcohol
00:03:22 –> 00:03:30 inks. So this one here is called Santa Fe Red, this one is Baja Blue, this is Tangerine
00:03:30 –> 00:03:37 and this is Lime Green. All of these sample chips here have been mixed together and baked.
00:03:37 –> 00:03:44 So this one here had– this is the translucent it had one drop of the Santa Fe Red on it.
00:03:44 –> 00:03:52 Now, look at the difference between mixing the alcohol ink with the translucent compared
00:03:52 –> 00:03:59 to mixing it with a white clay. So this clay here has the same amount of Alco– it was
00:03:59 –> 00:04:03 the same amount of clay with the same amount of alcohol ink so this one only had one drop
00:04:03 –> 00:04:10 as well and it’s so much darker when it’s on translucent clay. And when you look back
00:04:10 –> 00:04:16 over here at the samples that you would– you might not realize that that’s what’s going
00:04:16 –> 00:04:22 to happen and the reason why is because the white clay actually has a pigment in it, it
00:04:22 –> 00:04:27 has a white pigment in it so the white pigment is mixing with the red pigment in the alcohol
00:04:27 –> 00:04:36 ink and it’s making a pastel color. Now, you would need to end up putting quite a bit–
00:04:36 –> 00:04:41 this one here has the three drops, it’s finally starting to get some more saturation in it
00:04:41 –> 00:04:48 and you would need to add a ton, a ton of alcohol ink in order to get it like a deep
00:04:48 –> 00:04:56 rich solid opaque color like this one here this is Cadmium Red from Premo and a lot of
00:04:56 –> 00:05:01 times, people will ask me: Oh can i just buy white and then mix in something to tint the
00:05:01 –> 00:05:05 clay? Well, you can tint it but you’re going to end up with a bunch of pastel colors if
00:05:05 –> 00:05:11 you’re going to try to tint white. You’re better off– if you wanted a color you’re
00:05:11 –> 00:05:17 better off tinting translucent and the reason for that is translucent doesn’t actually have
00:05:17 –> 00:05:24 any pigment in it it’s just, well it’s not completely clear but it’s it’s translucent.
00:05:24 –> 00:05:32 So what happens is each of the little particles from the– from the Pinata Ink or the whatever
00:05:32 –> 00:05:38 alcohol ink you’re using the light hits it and it’s not mixing with the other white particles
00:05:38 –> 00:05:43 and everything else so you end up with a color that ends up being darker and I would just
00:05:43 –> 00:05:51 wanted to show you some of these samples here. These are all made just with the Pinata Inks
00:05:51 –> 00:05:59 and Translucent Ink I mean Translucent Clay and when you have it in even denser amount
00:05:59 –> 00:06:05 of it so this here you know this is quite a thin piece of the light is getting through
00:06:05 –> 00:06:11 so it– it’s relatively light but when you’ve got it mixed in quite a dense amount the color
00:06:11 –> 00:06:18 gets darker and darker and darker which has a very unique look. I was thinking of calling
00:06:18 –> 00:06:23 these Pinata Stones because they are made just with the Pinata Ink and of course they’re
00:06:23 –> 00:06:29 not a real stone, they’re a Faux Stone but so I just wanted to show you those and now
00:06:29 –> 00:06:37 these are getting quite quite dry. In fact, I think this one is dry here I whenever I
00:06:37 –> 00:06:45 mix an alcohol ink into polymer clay, I like to let it dry first. Some people don’t, but
00:06:45 –> 00:06:53 the problem is if you don’t let it dry first, that moisture that’s in the alcohol ink can
00:06:53 –> 00:07:01 bubble up in your clay and especially in translucent, you can end up with a kind of a mooning effect
00:07:01 –> 00:07:06 they call it or plaquing, sometimes they call it, where you get these little breaks in the
00:07:06 –> 00:07:14 clay but now that this is dry. The one drop drives quite quickly, I’m just going to be
00:07:14 –> 00:07:21 able to mix this right in by folding it over and mixing it in with the– once it’s dry
00:07:21 –> 00:07:28 you’re basically just left with the pigment and then you can mix a pigment in. And you
00:07:28 –> 00:07:36 can see, it gives kind of a cool color and baked up that milkiness goes away in the translucent
00:07:36 –> 00:07:41 and you end up with a color just like this and see, there is a bit of a color shift once
00:07:41 –> 00:07:49 it’s baked but it’s not a huge difference. Now, for the white clay, I’ll just– I’m not
00:07:49 –> 00:07:56 going to bother mixing them all through but here’s this one is dry now and you can– for
00:07:56 –> 00:08:01 the white clay, it’ll be just a little bit different it will have a more pastel kind
00:08:01 –> 00:08:11 of look to it and you can see it mixes in quite easily. Now the problem is– I mean
00:08:11 –> 00:08:16 it’s not a problem but if you really really wanted a super rich color competing with the
00:08:16 –> 00:08:25 white pigments in the clay, you would need a lot of alcohol ink and it just it could
00:08:25 –> 00:08:35 hinder the consistency of the clay and especially if you didn’t let it dry and it could well
00:08:35 –> 00:08:40 –could end up being more expensive than just getting the more opaque lay so tinting your
00:08:40 –> 00:08:46 own clay it has its effects and you can do some very cool things with it but it’s not
00:08:46 –> 00:08:50 going you’re not going to just be able to buy white clay and get all the really rich
00:08:50 –> 00:08:57 dark, dark colors like you can if you buy the the solid clays. Alright, so there it
00:08:57 –> 00:09:01 is. It’s nice and mixed and you get the idea so I just wanted to show you that there’s
00:09:01 –> 00:09:06 lots of cool things that you can do with the the inks. You can tint your clay, as you can
00:09:06 –> 00:09:13 see. And as I was saying, it’s more effective if you’re tinting a translucent clay than
00:09:13 –> 00:09:18 some of these other ones or you can also use it on the outside of your clay like I have
00:09:18 –> 00:09:24 in some of these other techniques and you can use it for lots of really really neat
00:09:24 –> 00:09:30 projects. So I encourage you to start playing around with some alcohol inks with your polymer
00:09:30 –> 00:09:39 clay and try out some new techniques. Alright, if you want to learn more about polymer–
00:09:39 –> 00:09:48 using alcohol inks you can go to our blog and at www.polymerclaytutor.com. If you have
00:09:48 –> 00:09:54 any suggestions or if you have techniques, products, anything that you would like me
00:09:54 –> 00:09:59 the test that you don’t know more about, you can check them out on the blog or you can
00:09:59 –> 00:10:05 leave a suggestion as well and do let us know if you like this video. Alright, so we’ll
00:10:05 –> 00:10:08 see you next time and bye for now.
Our goal is to translate these videos into as many languages as possible. If you are interested in helping with this initiative, then please do contact us and we will figure out a way to make it worth your while :)
Resource Links:
- Amazon: Pinata Inks Products **
- Related Video: Frosted Rainbow Flower Beads Polymer Clay Tutorial
- Related Video: Mixed Media Art Sheets Technique
- Related Video: Polymer Clay Batik Technique
- Related Article: Using Alcohol Ink With Polymer Clay
Resources marked with a double ** asterisk are affiliate links. If you click on them and decide to buy something, we may receive some compensation. This does not affect the price you pay in any way. What it does do, however, is helps us to continue providing free videos for you, here at the PcT website. Using our links to purchase your tools and supplies, is always greatly appreciated.
Sponsored Ads & Special Promotions
Shareable Images


To share this full blog post anywhere on the web that allows links in comments, here's a shortened url to copy and paste...
>> https://mypct.ca/v728 <<
Want to chat about today’s post? That’s what the comment section below is for. Scroll Down… We’d love to hear from you!
Or... if you would like to request a topic for a future post, here is the link to do that… PcT Suggestion Box
The most impressive thing about this video might be that you didn’t get any ink on that white shirt during the demo! (;
Thanks for all your good info!
That’s funny, someone on YouTube said the same thing! I wasn’t worried… I rarely get stuff on my clothes. :)
You are a rare breed! I would have been a hot mess. LOL.
Perhaps you should get yourself a HAZMAT suit, to wear on such occasions? LOL
Love the look of the thin translucent clay with the dye inks. Some day I want to make something like the string of disks you have sitting next to you!
I noticed one thing, however, which is that you talk about pigments in the dyes. Dyes do not actually contain pigments, as I’m sure you know, but I realize that’s kind of beside the point in this video, and too much to explain.
Here’s something I found that people might find interesting about dyes and pigments.
Thanks for doing all these tests, so we don’t have to! …Harriet
Harriet, what a great article, thanks!
Fran
You make a good point Harriet, about the difference between Pigments and Dyes. You are right I should have referred to the alcohol inks as dyes rather than pigments, that was a mistake on my part. And you are also correct that sometimes a short video can’t explain all that there is to explain in the limited time. This distinction is something that I should delve more into in future videos. Thank you for bringing up that point and for passing along the link to Ginger’s article. It is a good one that explains the information quite clearly.
Hi Cindy,
Just wondered what the effect of using alcohol ink with Premo” pearl” would look like? I’m new to this form of medium and LOVE it!!! Just started watching your videos almost 24/7 and there is so much to learn but you have definitely made the learning curve easier! Also just want to say I went from a toaster oven to the Convection oven and think it’s a must for everyone. So much easier and have no worries with burning. Thanks for all your good energy and great tutorials!
Tina, best way to see this is to make a sample. Play around and see what you can come up with. All of the inks are compatible with Polymer Clay.
Have you tried Copic Re-inkers with Polymer Clay? Just wondered if the re-inkers is more concentrated than other alcohol inks and if it will affect the colour of the clay.
Hi Sareana, although I haven’t tried the Copic Re-inkers, I have used Copic Markers with polymer clay and it is compatible… therefor the re-inkers would be as well. As far as how concentrated it would be against the other alcohol inks, that I do not know, because I have not done any side by side comparisons of them yet. Something to add to the list though. Do let us know what you think, if you end up trying them yourself.
The article linked to below, in Harriet’s comment, says you can buy empty Copic markers and fill them with Liquitex Acrylic Ink with which you can then draw on polymer clay. I don’t know about mixing acrylic ink with the clay, it would be more opaque than alc inks, but it might still be interesting to experiment with….
Yes I agree it would be something to test alright! I’ll add it to the list!