Vol-017-4 Chandelier Earrings and Pendants PcT Tutorial (Intro)
Video #128: “String together beads and you get jewelry. Fashion the same beads with unique handmade wire and you have a work of art!” ~Polyanya
More...

** This post is an introduction to one of our paid tutorials.
By walking around the bead aisles of your local craft store, you will most likely see many jewelry findings available for purchase. You may also notice that they are often expensive and unoriginal.
When you have gone to all the work of making fabulous polymer clay beads, why choose run-of-the-mill findings or overpriced ones? Especially when you can easily make many of them yourself!
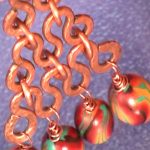
I will be adding another easy to do wire work tutorial, called the Chandelier Wire Work Technique, that I think you’re going to enjoy. Not only can you use these looped links in the way that I show you in the video, but you can also incorporate them into necklaces and bracelet designs as well. I’ll show you those in a future post.
“
I love the Chandelier wirework video, too. I've already got an Idea on how to use this technique differently that what you've shown us. Cindy, I think I've had one of your SHAZAM! moments. Thank you!
Ken H
“
Cindy, thank you for being such a generous teacher and sharing your fabulous ideas with us. I am very grateful to have found your web site and have already learned so much from your videos. Thanks again.
Pat H
“
Cindy, besides claying, wire working is my passion. I'm glad you're sharing your wealth of experience. You inspire us to go beyond our comfort zone and try new things like the Chandelier Earrings and Pendants... so COOL! I love copper but I bet these are stunning in silver. I'm going to do them this weekend in silver.
Laurel B
Transcript coming soon...
Transcript coming soon...
Our goal is to translate these videos into as many languages as possible. If you are interested in helping with this initiative, then please do contact us and we will figure out a way to make it worth your while :)
Shareable Images


Want to chat about today’s post? That’s what the comment section below is for. Scroll Down… We’d love to hear from you!
Or... if you would like to request a topic for a future post, here is the link to do that… PcT Suggestion Box
@Brenda – You’re welcome.
@Edie – Welcome to the Library Edie. It is great to have as part of the community. One of the reasons why I don’t have printable supply lists for the weekly tutorials is because most of these videos are focused on teaching you specific techniques as opposed to projects. That being said, my plan is to also film some project oriented videos, in the form of mini courses. And having a supplies list for them does make a lot of sense. Thanks for the suggestion.
New to your membership today. Would love to see a list (printable) of supplies needed to do each project. Thanks
I love this chandelier wire work… I cannot put my tools down :) Thanks Cindy!
It sure would, IF it could be explained in english and not in the language of science, It was never my strong suit in school.
@Ken: Yes a rawhide, plastic or rubber mallet will work harden the wire without denting or flattening it too much. It’s something about the vibration when you hit the metal that causes the particles to line up and compact, which makes the metal harder to bend. When metal is warmed with a torch, those particles get all ‘jumbled up’ and the metal gets soft again. It would be cool to learn more about the Science of how that works, wouldn’t it?
@Ritzs: I am sorry, I couldn’t tell from the photo that the wire was coated. You are right about not hammering the coated metals with a regular hammer. The coating will just chip off. A rawhide or rubber mallet would be the way to straighten and harden the wire. I am so excited for you getting to come across the pond to America! Have a great trip!
I didn’t hammer them as this was just a try to see if i could do it, and also my wire supply came from an Alternator rewiring firm and is insulated not plastic coated but i was eager to start the chandelier, the wire comes in the most amazing colors i don’t no if you were able to see a close up,the rewiring firm said i can have all the offcuts as long as i make his wife a necklace how lucky am i, however i am going to hammer a piece today and see how it looks. Ken i have never heard of a rawhide hammer it sounds interesting. Now i have to go and do my packing for my journey tomorrow see you all when i get back in three weeks,unless i can get Internet access by for now Ritz’s Wales u k
I read about using a rawhide mallet to work harden and not to get the flattening and dents in the metal, does this truly work and does it work on all the metals?
You have got a clever husband Ritzs! I have put masking tape on my tools before to prevent nicks in my wire, but hadn’t thought of using the wire coating like that! Thanks for passing along that tip!
Nice to see you started making the chandelier pendant so quickly like that!
I see you didn’t hammer the loops. Is there a reason for that? The hammering will flatten the loops out nicely and give them much more strength. It will also disguise any nicks you may have gotten in your wire from your tools.
Dear Cindy and All,
I don’t know if this is of any help to anyone, but after my first attempt at Cindy’s chandelier wire work I was very happy until I noticed all the marks on the wire caused by my pliers, so I put my husband to work and he has covered the tips with the covering of (you guessed) brass wire from electric cable I don’t know if it will last long if not it will keep him busy, lol, Ritzs.
WHEEEEEEEEEEEEE!!!!!!
(didn’t want to miss out on the fun either)
Thanks SO MUCH everyone!
@Deb: I do make my own jump rings. I’ll show you how sometime. I don’t usually hammer them unless it’s part of the look I want.
I loooooved this vid Cindy! I am going to make some pretty stuff with this technique…now I just have to make some beads that suit/fit this style. *lol*
Can’t wait for the next wire working vid..!!! :)
~Lisa
Cindy – do you make your own jump rings? Are they hammered as well?
thanks
Deb
Love the wire work. Haven’t done much wire work so this has really helped guide me in a new direction that still allows me to keep working with polymer. Cindy I don’t think I would ever be disappointed in anything you would chose to share with us.
Thanks again Cindy!!!!!!!!!!!!!!!
AWESOME!!!!
Cindy:
Besides claying, wire working is my other passion. I am glad you are sharing some of the wealth of experience you have in this area also. It is always fun to get inspired to go beyond your comfort zone and try new things. These are WAY COOL!!!! I love copper but I bet these are stunning in silver. I am going to do them this weekend in silver. :)
Laurel
Wow, Wow, Wow!!! is all I can say Cindy
just seen the Chandeleir Video and cant wait to do some.
just loved it.
Have plenty of wire and beads and now I know what I am going to do with them.
Guess I’ll never go to bed round here.
love
ElizabethK.
I am so into wire-work now that i have found a supply of wire, i have a hot seat i just cant wait for this video ( can we have it on Thursday) lol sorry Cindy i am so exited. i am trying to cram everything in before i go away on Monday. I hope to be able to get on the Internet in Chicago so i don’t miss anything but i am not sure yet keep your fingers crossed for me.
I haven’t seen the full video yet and I’ve already got an Idea on how to use this technique differently that what will be shown.
Cindy, I think I’ve had one of your SHAZAM! moments. (sorry couldn’t help myself)
YAAAAAAAAY!!!!!!!!!!!!!!!!!!!!!!
Wanted to get in on the fun! :P
Ken Hamilton
Philadelphia, Pennsylvania,USA
FABBBBULOUSSSSS!!!!
Hi Cindy
In danish we would say: JUBIIII!!
YAHOOOOOOOOOOO!!!
[Sorry… couldn’t help myself LOL]
Isn’t it fun to see how adding exclamation marks to the end of a series of letters that don’t even spell a real word… can express so much excitement!? I love it!!!
Hopefully all of the foreign language and international visitors who use translation tools to view this page, don’t get confused ;-).
Hmmm… I wonder if other cultures do this same sort of thing with their letters and how that would look in Russian… or Mandarin… French, Italian, Spanish… Danish, Swedish, Norwegian? Oh and Israel too!!!!
YIIIIPPPPEEEEEEEE!!!!
WOOOOHOOOO!