Vol-015-3 Gerbera Flower Cane Petals Pt2 PcT Tutorial (Intro)
Video #119: “I find myself looking forward to your new video every week, along with the color recipes.” ~CJ
More...

** This post is an introduction to one of our paid tutorials.
Today’s video tutorial posted in the Polymer Clay Tutor Library is the second in a 3 part series focused on building a Gerbera Flower Cane. Listed as Volume 015-3, it will show you how to create the beautiful flower petals that will surround the flower cane centers you made in Volume 015-2.
The third and final video (Volume 015-4) in this flower cane miniseries, will show you how to combine all pieces to end up with a complete Gerbera flower cane.
The flower petal cane that you make this week is quite versatile and can be used in other projects besides the Gerber flower design.
As you will see in the sneak peek video, it can be used to make Calla Lily beads – a technique I will show you in Vol-016-1. It can also be used to make larger flower pendants and pin brooches. Or, you can incorporate the flower petal cane slices into polymer clay pattern backgrounds.
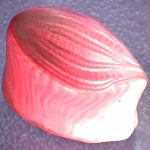
This pretty striated flower petal cane is quite simple to make, even though its design appears to be fairly complex. It can be created in any color combination you desire and can be combined with any center cane, to make the possibilities of flower cane designs practically endless.
Transcript coming soon...
Transcript coming soon...
Our goal is to translate these videos into as many languages as possible. If you are interested in helping with this initiative, then please do contact us and we will figure out a way to make it worth your while :)
Shareable Images


Want to chat about today’s post? That’s what the comment section below is for. Scroll Down… We’d love to hear from you!
Or... if you would like to request a topic for a future post, here is the link to do that… PcT Suggestion Box
Thanks so much for the warm welcome! I have purchased more back issues and I think I’ll be busy for a while catching up! I think I need to take a vacation from work so I can play with my clay, LOL!
@Kat – Nice to meet you too. I am from Rochester, NY – all the way across the country.
Hi Cindy, I am new to PC and your site. I have soaked up as much info as I can find about PC and am so excited I can’t find enough time to try everything. I purchased your beginner course and am working my way through your back issues. I recently purchased the Vol#9 Teardrop Blend and Vol#15 Gerbera Flower Cane. You make it look so easy!! I tried the flower cane this weekend and I am amazed!! It turned out awesome (for a first flower cane). Oh, I also love all of your awesome color blends. I am hooked and will be purchasing more back issues. Keep up the great work!!
@Laura Z: Welcome! Thank you so much for the sweet comments. I appreciate that more than you know! It is wonderful to hear you are having fun and achieving success. This polymer clay journey is a fantastic one. I think you are really going to love the creativity it offers you and the friendships you will make along the way. Make sure to ask questions and interact with the other clayers here at the blog. We are all happy you are now part of our community!
@Laura Z: Welcome, Laura! How funny…the two back issues you mentioned are the first ones I purchased! I loved them, as I do all of my tutorial videos by Cindy. Happy to meet you!
~Kat – Riverside, CA, USA Where are you from?
Hi Heidi! I am so glad you are enjoying the tutorials!
When you have a question, it is a good idea to scan or read through the comments in these threads… because many topics have already been addressed either by myself or another member. For example, if you scroll above to my August 15, 2009 comment, you will see that I have already answered the question you just asked.
I’m taking the time to “educate” you about this, so that you will know how to find quick answers to future questions that come up for you… instead of having to wait for me or someone else to answer them. It is getting so busy around here that it is hard to get to everything done as fast as I would like :-)
The search box at the top of the page is also very handy for finding answers. Just type your keyword in the box and a list of articles will pop up. Many questions have already been answered. But if you can’t find what you need, don’t hesitate to ask. It’s wonderful to have you as part of our community!
I have recently purchased almost every back issue video you have, and am completely addicted!! lol My question is in the this tutorial 15-3 the flower petal cane what exactly did you use for the skinner blend and how much of each element. That info. would be much appreciated!!
@Sue C: Hi Sue, you can’t be too rough on clay — it’s supposed to take what we dish out…all of our agressions! ;D I don’t want to say too much and give anything away about this technique. But as for your question — yes…maybe. You might’ve been overly agressive when you tried to ‘neaten-up’ the stack…reducing/squeezing the sides in too much. In the video Cindy rolls, presses, squeezes until it’s a neat – but not perfect – rectangular block (a little wider than it is tall for more visible striations.) The width or number of your slices makes a difference…if there are too many in proportion to the block, they will be too thin, creating barely visible striations. For example, a tall block with lots of slices will result in tiny striations. Try to keep the proportions similar to those in Cindy’s video. Also…the striations will show better if you use contrasting colors — like the white to Alizarin Crimson in this video.
I don’t want to say anything else…don’t want Cindy mad at me! I hope this helped you a bit. Of course, if you need more of an explanation, I’m sure Cindy will be there in a flash! Have fun! ~Kat :D
When trying to make this flower petal cane, I do not get the nice striated colors. They seem to get all squished together. Do you think I am being to hard on creating the first cube after running the skinner blend through the pasta machine?
Thanks, Stephanie. Yep, I am addicted to them, and stay up late, too! I became a regular member a few weeks ago. I thought about doing it when I first came across this blog, but I put it off. Now I am kicking myself, because I missed out on all that value! At least now I will get future videos at the super cheap price. I will also try to pick up one of the back issues ever time I can afford to. I just love this site and Cindy’s videos! (And, of course, polymer clay…)
Phaedrakat, I am so glad you bought the #9 Vol. I hope you continue to get Cindy’s videos. I look forward to each one. I stay up late on Thursday nights because just after midnight the video is in my e mail. Enjoy!!!
Thanks Carolyn & Stephanie B.–I went ahead and got back issue #9. Boy, am I glad I did! I watched Cindy’s teardrop skinner blend method first, of course. I then started the other videos, and you are so right. Even though I knew how to make some of the other things, I still got so much out of those videos. And the trumpet flower bead–how cute is that? I didn’t even think I would be into that, but after seeing the earrings she’d made, I know I’ll be making that project, as well.
Cindy’s Quick Skinner Blend is so simple, yet such an awesome idea! I can tell it will be such a time saver, and a clay saver, too! Being able to do test blends helps identify colors that won’t blend well (before commiting a large amount of clay, not to mention time & effort, to a regular blend.) This is just the trick I need for when I want to do a small project, but I don’t have time to condition a bunch of clay, sheet it, set up a blend, make the blend, etc. Now I can go from balls of clay to blend pretty quickly. Very cool. Thanks so much, Cindy!
Phaedrakat, I joined at video #15. I love each video set Cindy has. I went back and bought several of the back issues. #9 was one that I bought. I too, wanted to know her shortcut to the skinner blend. All of volume #9 has GREAT ideas as well. Yes, it is worth it. You won’t be sorry!!!!
I am dying to know how to do this “Lietz teardrop method” for quicker skinner blends! I must know! LOL. I was wondering if it is covered in this Flower Petal Cane video? It says above (under the preview) that the video covers “How to create a Skinner Blend Block using a Teardrop Color Blended Sheet.” Does Cindy show her teardrop method in the video, or does she already have a blend made and just show how to make the skinner block? If the mysterious “Lietz method” is on this video, I could just buy the Vol. 15 back issue package (I love those graffiti beads and the gerbera cane,) instead of the Vol. 9 pkg. (where I already know how to make everything but the quick blend!) Could someone who has this video please do me a favor and check? I’m on a very limited income. I hope to get all her videos & color recipes eventually, but right now I can only get one back issue…
…And I must learn this blend. (Haha, so very desperate.)
@Phaedrakat: You need to purchase video #9 also. It is well worth the cost. Cindy’s ‘quick skinner blend’ is awesome. The other videos in #9 are excellent also!
Hi Tina, great questions!
Your pasta machine rollers could be out of whack. If you flip your sheet each pass it could straighten it out. For example, if you are doing a blend from white to black and you always put the white side to the left, put the black side to the left the next time.
Before putting your flattened plug back through the rollers, make sure the plug is even sized all the way down including the ends. This will help keep the sheet square. If it is fatter or thinner on one end, it will never come out straight.
If you’re trapping too much air, your clay may be too soft. Roll out your clay at a thicker setting and this should solve your problem.
Hope that makes sense. (Would be way easier to show in video then trying to explain.)
Cindy, how do you get your teardrop blends to be so square, mine are always way out of shape, then when I roll them, I seem to have air bubbles in the middle of my plugs … thanks ! Tina
It was hollw Jennifer. Just like a real donut.
Cindy,
The donut that you made with the BluTak, was it hallow or did you just make an indent? I made a donut out of mold putty and the flower I made did not bend at all. The petals stuck straight out instead of bending down the donut. I wonder if it was the putty I used.
Thanks,
Jennifer
Thanks Cindy, And yes that helps alot! It has already given me an idea.
Thanks everyone for your sweet comments. I really appreciate that!
@Jennifer: I actually formed and baked that one over a donut of BluTak (you know that stuff for putting up posters). It doesn’t harden in the oven so you can remove it after baking. Took awhile to remove though and was a bit of a pain, but made for a cool pendant. May show you guys how to use that stuff sometime down the road.
Hoped that helped a little.
Cindy,
I love the pendant that you showed in the beginning of the tutorial. Can you please tell me how you made it? I think I understand how it is made, but the part that I am having problems with is how to get it to fan out and raised with the center going inward. I hope that made since.
Thanks!
Jennifer
Thats great news for you Cindy, you must be thrilled. I’m very grateful to you for the teardrop blend and use it everytime.
Cindy, that is the absolute best news I have gotten all month!!!! Congrats on the Cafe article, and I am sure that Judith will include your methodology in her new book. So excited for you!!!!
Cannot wait for my autographed copy of both….heehee (my purchases).
Hi Tina,
Glad you found your password :-) — and yes you can change it if you like. When you are logged in at the Polymer Clay Library site, you will see a link at the top of the right side bar that is labeled ‘Site Admin’. That will take you to a page where you can change the password info for your account.
I’ll see what I can do about identifying the color names better for you, in future videos.
Thank you so much for the feedback about my Teardrop Method. Polymer Café has given me the thumbs up to submit an article for publication in their magazine… just now trying to find the time to add this to my long list of things to do.
I will also be submitting photos that will hopefully get included in the new book that Judith Skinner is publishing next year in 2010. She wants to include a section that focuses on modified Skinner Blend Techniques such as my Teardrop Method.
I found my password (lost it for a while).. btw is there a way to change it to something I can remember?
And was viewing some of your older videos, I noticed on those you put up a little screen that listed the color names, that was most helpful. I am sure you have your hands full but it might just be a thought.
I LOVE your teardrop method and I really think you should get that in PC magazines so it can become a household name, it is really that great !
Take care,
Tina
Thank You, Cindy!!!!
Hi Stephanie, you are asking good questions. Thank you!
The reason I don’t say specific amounts of clay in the videos, is because you can use whatever amount you need for the project. I don’t want you to mix up a huge batch of clay making blends, if you just want to make a few beads in that color or style.
The cool thing about the Teardrop Blend, is you can use any amount of clay you want. For example, in this flower petal cane I used about a 1/4 package (1 bar of a block of Premo) of Alizarin Crimson and 1/4 package of White. This made enough for the size of cane I wanted.
I could have used a 1/2 package or 1/8 package of each and it would have worked the same. Just the length of the cane would be different in the end. (More or less of it to use for making beads.)
With the teardrop blend, you also don’t have to be very picky about having equal amounts of the colors either. If you have more white than red, then the blend will have more pink in the middle. If you have more red than white, then you will have less pink, but both will still work.
Also, I want you to feel like you can have the freedom to do the techniques in the colors that are more suited to your personal style. So when I show you the technique, I mention you can use any color you like.
I tell you this because I want you to feel more artistic in your creations. Unless you’re going into the business of selling a specific cane design over and over, then it doesn’t matter if your canes are identical every time. In fact it is nice to have a little variety.
Same with your beads. If the size is a little different than mine, or each bead you make is a little different from one another, you are only adding to the uniqueness and handmade quality of your designs.
Try not to worry too much about being precise. If you need to, judge the amount of clay I use by the size of my hand and compare it to yours. That might help for the videos that have already been made where I didn’t give exact amounts. In the future, I will try to reference amounts more if it is important, but you should know you can adjust it to your needs at any time.
I hope that helps. If you have any more questions, feel free to ask!
I agree with Tina, I wrote and asked how much clay and you commented back it was 1/4 of a 2 oz pkg. You also told us about the 5 way teardrop blend. So When I choose my colors, I* picked 1/4 pkg of 5 colors…I guess I didn’t understand.. So Yes, I think the color and size of the color be told to us… Also what size our piece will be when finished. Thanks for all the hard work you share with us.
Hi Tina! I try to mention the brand and the color in the videos but I guess I get too excited and forget. 90% of the time I use Premo Sculpey Clay. In this video I used Premo in an Alizarin Crimson and White teardrop blend. Like I always say though, use whatever colors you like instead. Thanks for the comment!
Cindy, is there any way that you can list the color and PC type you use on your video’s ? I know you state we can use any color but for me if yours turned out so nice, I find I want to use those colors too !
Thanks and keep up the great work !
Tina
Hi Cristina,
Welcome to the library. Glad to hear you are getting some great tips and ideas from the videos. I would absolutely love to include downloadable PDF files along with the member videos. The only issue is hours in the day to get everything done. I would have to oursource something like that which would add to the cost of the membership. I’ve purposely kept the monthly fees as low as possible to make my tutorials accessible to as wide an audience as possible.
However, if there is someone that would like to volunteer to write up the step by step details for each of the videos, I would be happy to make them available as downloadable PDF’s in the library. If anyone is interested, do let me know.
By the way Christina… what country are you from? It’s wonderful to see where everyone lives. And it also helps you to connect with others that may be local to you.
Hello Cindy,
I’m a new member and I want to know if you have your videos in PDF files? Could will be possible having all the steps from the video later for us members to consult when ever we wanted? Thank you for your great ideas and tips.
cristina oliveira
You are very welcome Stephanie. They really aren’t that complicated are they!?!
Oh Cindy, I am so excited to know how to make this pedal!! I have asked others, how they made their pedals and all I ever heard is that it was too complicated to tell me.. Well now I know. Thank you sooooooooooo much!!!
Thank you everyone for the great comments. I am so glad you enjoyed the video. The technique looks fantastic in any color combo as well, so have fun with it.
@Lynn: I will be doing a Calla Lily Tutorial next month and some wire working tutes soon. So stay tuned for that.
@Stephanie: I used a quarter package each of White Premo and Alizarin Crimson Premo to make the teardrop blend in the video. You could use more or less, depending on the cane size you wanted.
Thank you so much for the brand new flower pedal!!!! I’ve never seen this one before and I’m so very excited!!!
Hi Cindy,
I am fairly new to claying. It would be of great help to me if you were to tell us how much of each color you are starting with to make this cane.
Thanks I love your teachings!!
Cindy, I’ve just made a petal cane using your tutorial. It was easy to do and looks GREAT!! I want to make some calla lily pendants & earrings for a friend. Your lily sample has a unique wire wrap and sets off the bead nicely. How did you wrap it? Please tell! Love your ideas and easy to follow video instruction. Keep them coming!
Cindy, you are a saint! I don’t know what it is about your teaching methods, but watching you just makes things click in my head! Don’t think I’ll get much sleep this weekend but I sure will have a lot of canes!!
Enjoyed this weeks Gerbera petal Video. You make it look so easy and I no longer am hesitate about doing canes. Once again Thank you for all your hard work.
Ahaha, Cindy you say “I hope you find this interesting.” What an understatement. I was riveted and amazed through this entire video watching you create this petal cane.
What a wonderful effect the offsetting makes. Avoided stuff that looked like this forever, but, you are right, after watching this video it is easy.
Cannot wait to try it. Thank you so much for another stunning tut/video!
Lovely Cindy, I’ve been dying to know how to make that one and just couldn’t figure it out – I kept trying to reverse the slices instead of lifting – which of course gives another look. Thank you again.
Cindy, this video is totally amazing. How do you ever figure these things out? I was watching and thinking okay, next she is going to…. and I was totally wrong and amazed. I saw you slice the block and thought, well that is a interesting way to slice before forming the petals and “Presto Chango” you made it into another log, several times. If anyone has doubts about becoming a member, this video is an example of how fortunate we are to have access to these lessons.
Cindy, The flower petal cane tutorial was awesome!!! Thanks so much for all you do! I love coming home from work Friday mornings and seeing your emails!!! Gotta go get more clay!! Pam
Ok, once again the guru of clay has amazed me again. This technique seems so do-able… now that I have visual watched you create this part of the cane. Cindy, thanks as always for being a great tutor. Going to work on this technique tonight… I’ll post my good and bad happenings….
Cindy, I love how you show how versatile a single cane can be. I used the video last week and as always the directions are easy to follow and a definite inspiration to us claybees. I have made several of each cane that you showed us last week. Can’t wait for Friday to incorporate the next step….
Oooh, you are making me so excited to do these but I can’t till after the daughter’s wedding dress and flower girls dresses are done. Darn!!