Vol-015-4 Gerbera Flower Cane Assembly Pt3 PcT Tutorial (Intro)
Video #120: I love the videos you send every week. They really do inspire me!” ~Abby-M
More...

** This post is an introduction to one of our paid tutorials.
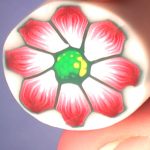
Today’s tutorial is the third in a 3 part mini series focused on building a Gerbera Flower Cane.
Listed as Volume 015-4, it shows you how to create the full Gerbera Flower Cane by combining the flower cane centers you made in Volume 015-2 (Vid #118) and the flower petal cane from Volume 015-3 (Vid #119). Also you will learn how to pack the background of your full Gerbera Cane using extruded translucent polymer clay.
This video tutorial contains helpful information that can be used for creating any flower cane, since you can easily change the flower center and flower petal designs to create a whole new flower pattern.
Transcript coming soon...
Transcript coming soon...
Our goal is to translate these videos into as many languages as possible. If you are interested in helping with this initiative, then please do contact us and we will figure out a way to make it worth your while :)
Shareable Images


Want to chat about today’s post? That’s what the comment section below is for. Scroll Down… We’d love to hear from you!
Or... if you would like to request a topic for a future post, here is the link to do that… PcT Suggestion Box
My Pleasure Michelle. Thanks for being part of the community!
Thanks for replying so quickly and completely to my customer service email questions… not that I would expect anything else from you… I know it’s the way you work and I appreciate it… THANKYOU!
Thank you so much Betsy for sharing those kind words. I really appreciate it!
Hi Cindy,
I tried the Gerbera Flower cane, and it’s the most beautiful cane I’ve made yet! I’m looking forward to seeing more of them. I just love all your videos! I never thought of making beads with my polymer clay canes until I found your website.
Betsy
@Catalina: LOL That is too funny! You could make those evil eye beads that ward off evil spirits, with your eyeball cane! Or you can save it for making into a face cane down the road. Glad you liked the flower cane. You’ll find lots of uses for it!
@Stephanie: I was away for a few days and that was why I hadn’t responded to your email yet. Thankfully Jocelyn answered your question quite beautifully. Although there are usually videos on each Friday, our software in the video library only accounts for there being 4 weeks a month. Which means, every once in awhile when there is a month with 5 Fridays, there won’t be a regular tutorial video. We do try to make that week fun still, by doing something else… like showing a different video, having a special article, adding recipes, etc. so you aren’t disappointed. Glad to hear you love the videos so much that you can’t miss a single one though! :-)
@Jocelyn: Thank you so much for helping out Stephanie!! I appreciate that very much! I am sending you virtual hugs right now, for all your help! :-)
Stephanie, please see the following link for an explanation of how Friday’s video was handled this week: Polymer Clay Tutor Good News Bad News
Also, this link below gives a video today different from the norm:
Polymer Clay Tutor Interview Video
It’s fun to see Cindy, the whole person, in this one, LOL! Hope this helps you out.
I don’t understand Cindy, I thought I would get a lesson every Friday. I didn’t get one today.. Is it still coming. Also I send an e mail this morning, thought you would have responded by now.. Getting a little concerned.
Thanks hope to hear from you soon.
Stephanie
Great video! This was my first series that I followed on schedule! But, I made one mistake. I started with some scrape clay – Sculpey III. It did mess up a bit and I knew I should have used Premo like you stated in the video. But, I did learn a lot from your technique.
The first cane I ever made was of an eye ball! I decided that would be really cool. Since I didn’t have a clue how to really build a cane, it did come out pretty well. But, what do you do with an eye ball? I think I’ll stick with flowers for now. :)
@DaisySoapGirl: It is the perfect time to start thinking about making stuff for Christmas. Lots of time to make things how you want them, without rushing too much!
@Jocelyn: Thank you so much for your comment! As an experienced clayer who has seen a lot of tutorials, it means a lot to hear your comments. Someone new to clay may not notice the little tips that will make their lives easier. They may just assume that is how everyone does it. Thank you for pointing that out. I do try very hard to make things as easy as possible for people.
@Joyce: I love your comment. How could you know what to ask if you don’t know what is going wrong? I am so glad the tutorial solved some problems for you!
@Melinda: I am so glad you said that! I just can’t bear to use 13lbs of clay (trust me I’ve seen a cane that big) on one cane design. If you made a living selling canes, that would make sense, but most people don’t do that. Plus as a beginner to cane making, why would you want to spend $50 on one cane that could turn out ugly? Better to make a tiny cane that you can flatten if it is ugly and roll into a cool flower center cane! Pleased to hear you’re so happy with the tutorials! :-)
@Catherine: Thank you so much for your comment! I feels really good to hear you are getting such good value from the videos! I can’t wait to see your beads and do a spotlight on you!
*For those of you who do not know what a Spotlight is, it is a feature where we ‘spotlight’ one of our member’s polymer clay projects inspired by the video tutorials. If you want to see the most recent spotlight feature of Rob Kerfoot’s work, click the Rock Tumbler link by my name.
Cindy, I have found that your tutorials are so easy to follow and easy to understand. I prefer to learn by seeing and your videos definitely do that and more. I am so glad that I came across your website because I found that your videos and membership are so reasonably priced. Again, thanks for your hard work and I, too, soon hope to submit some of my works for your Spotlight.
Very good tutorial today. I’m so glad you kept your cane at a reasonable size…. I’ve seen lots of sites where they use literally pounds of clay to make a cane. I would just sit back amazed and astounded at the sheer volume of clay and huge amt of money. Now eventually I got past that hurdle and scaled back measurements for my canes and eventually learned the little tips you freely gave out in these tutorials. I really wish I had this a year ago. Fabulous teaching!!!! AND I love the petal which is different than any of the petals I’ve learned before and the center made by the extruder is GREAT!!!! It makes such a nice natural center. I will definitely be using that center a lot! Thanks
This is wonderful, Cindy. It answers so many question I didn’t know how to ask. Will enjoy this technique tremendously. Thanks so much!
Wow! Now that was one excellent tutorial series, Cindy. Thank you! I learned so much and had so much fun trying each of the components!
Finally, someone demonstrated the need and proper procedure for adding the registration line. Now I understand why so many of my ealier attempts at canes failed. By trying to reduce them by rolling them like a snake, the inner contents got all twisted and irregular.
So many wonderful tips, and the final result is spectacular. Due to the nature of the flower chosen, many other natural flowers can be done using the same techniques but changing the colors: blanket flowers, ox-eyed daisies, sunflowers, primroses, phlox, marsh pinks, violets, genetians (ahaha, can tell I have the wildflower book out now…).
Just an incredible value for the cost of membership and one series of videos.
I love this site and really have to get back into creating. Maybe I’ll work on some things for Christmas gifts.
Yummmm!!! I love banana bread :) :)
Your site is teaching me so much; wish we were neighbors so that I could bring you tea and banana bread while you teach!