Vol-030-3 Glow in the Dark Pod Beads PcT Tutorial (Intro)
Video #180: “Very cool! I know Cindy is going to make this easy for us. She always finds ways to make the steps easier than ever!” ~Phaedrakat
More...

** This post is an introduction to one of our paid tutorials.
When working with polymer clay to make beads and canes, it is always good to know several different bead shapes that you can create to keep your work fresh and interesting.
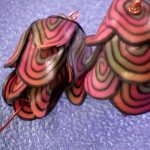
One classic polymer clay bead shape, popularized by Polymer Clay Artist Karen Lewis (aka Klew), is the Leaf Pod Bead. This week I’m going to show you my spin on the pod bead shape, by using several different cane varieties other than the traditional leaf cane. As well, I’ll show you how to modify the size and shape of the pod to give you an unlimited number of unique bead design possibilities for this fun project.
You’ll be amazed how this simple bead building technique will allow you to make pods shapes that resemble everything from flower buds, to pine cones and even fuchsia blossoms.
“Just LOVE those pod beads you made with the feather canes. I do believe it is going to be a VERY BUSY weekend at my work table. Can’t wait!” ~Marlene-C
“These are stunning!! I think my favs are the pod-looking ones, especially the one that looks like a flower with leaves. Can’t wait to learn this!” ~Elizabeth-S
“Very cool! I know Cindy is going to make this easy for us. She always finds ways to make the steps easier than ever! I love the samples in the preview video… cool “pod” beads done many different ways.” ~Phaedrakat
“PODS ! I have wanted to do pods. Now I can. Thanks to the Dream Team, again.” ~Patt-W
“
Love this tute!!! I need some dangle earrings and this is perfect with the feather cane..... wow!
Andrea P
“
Cindy, I love this bead technique. After I get back from grocery shopping this afternoon I'm going to be making some of these Pod Beads. Yippee!! Thanks for another great tute Cindy!!! Peace, Love, and Clay.
Lisa W
“
Good job Cindy. I have so many canes just waiting for me to create something beautiful with… Pod Beads! Thank you for all you do for us polymer clay enthusiasts.
Sue C
Transcript coming soon...
Transcript coming soon...
Our goal is to translate these videos into as many languages as possible. If you are interested in helping with this initiative, then please do contact us and we will figure out a way to make it worth your while :)
Shareable Images


Want to chat about today’s post? That’s what the comment section below is for. Scroll Down… We’d love to hear from you!
Or... if you would like to request a topic for a future post, here is the link to do that… PcT Suggestion Box
Well, I guess I am truly new! Cindy and fellow clayers, do I replace the now unavailable ‘glow in the dark’ Premo with the Fimo Nightglo (or whatever it says)? I only saw Fimo and Sculpey III available, and well… you know! Fimo rules, right? Unless anyone has a better suggestion, I am going to use the Fimo brand, but the Premo is what I generally use. Oh, and hello to all from Ontario, Canada! Suggestions, comments and ideas are welcome and encouraged, please :)
Hi Marianne, The best replacement for the Glow in the Dark Premo is to use the Sculpey III version of Glow in the Dark clay. (I know I am not a big fan of Sculpey III, but they have improved it over the years and it will be more compatible to use with your other Premo clay than the Fimo would be.) Hello from the West Coast!
Cindy,
Thank you for the reply. I bought the Fimo, but I haven’t returned it yet. I am hoping that Michael’s has it, then I can exchange the Fimo for S3. I am grateful for your opinion, and I just love the videos. The PC game is a little slow going, and I need to figure out how NOT to over-condition my clay in the pasta machine! So new at this. I am starting to get the hang of making the clay the correct width. Oh, what do I do when hammering and cutting, rolling, etc just doesn’t soften my clay? I spent 2 hours and it still broke into tiny pieces. (new block of Premo turquoise pearl)
Sounds to me Marianne that your ‘new’ clay, may not be that new after all. It may actually have been stored improperly and could even be partially baked, which means you’ll never get it to come to life, no matter what you try. If you can take it back, do. If not, you can still use it as an inclusion in some faux stone beads like the ones in this Faux Pebble Bead Tutorial, so not all is lost.
Make sure to watch our video on how to buy polymer clay. There are lots of tips in there, so you don’t run into this hard clay problem again.
Also, remember, the search box is your friend! Type whatever keywords you want into the search box at the top of the page and a list of posts and tutorials will pop up to help you. Sometimes it can get busy around here… myself and the other members try and answer questions best we can, but you may be able to find the answer yourself a lot quicker.
It’s wonderful to have you here! Glad you having fun with it!
Oops, forgot to mention how much I loved this tutorial. Cool pod beads, Cindy! I loved all of your examples, too. And the video instruction just makes it really easy to follow.
While I haven’t made my pod beads yet, I’ve got everything ready. So once I slice that cane, “Whoo-hoo! It’s pod-dy time!” (hahaha…”Party time”, get it? Well, okay…sorry! I’ll spare ya the bad puns next time…) LOL ;D
Anyway, thanks, Cindy (and Doug) for a fantabulous tute!
Hi Cindy and all.
Love this tut, real cute.
Love Koolbraiders thoughts on the red and green Xmas ear rings, great.
Pine cone beads too. I will have to get going on these.
Love
E XX
Good job Cindy. I am anxious to try this method as I have canes just waiting for me to create something beautiful. Thank you for all you do for us polymer clay enthusiasts.
How funny that you show this one now, a couple weeks ago I went to the San Antonio Guild for a 2 day class ( I live in Houston) given by Lynne Ann Schwarzenberg and this was one of the items she showed, totally different than how you did it but now I have 2 great ways to make pretty flower pods !
Hi Cindy
I am really enjoying your videos and this weeks pod beads videos is great. I have already made one and it great fun making it.
Has anyone used Judykins Flux Enameling Resin? If so what did you think of it?
Thanks and keep up the great work.
Barbara
@Barbara Case: Hi Barbara! Cherie, a longtime member, made some comments about using Judikins Fluxe Enameling Resin some time ago.
There might be additional comments, as well. You could use the search box at the top of the page to find them. Just type “Judikins” into the box — or add more info if necessary. There are several Judikins products, however, so it might be even more confusing. Hopefully you’ll get some feedback from someone…hint, hint, Judikin’s Fluxe users! Good luck, Kat~
I LOVE this!!! I’ve been wanting to learn how to do pod beads for a long time. Thanks, Cindy and Doug.
Oh, I’m really looking forward to this one! I love these pods.
This video is another winner Cindy. Koolbraider is right on when she said the pine cone shape and sparkly red and greens would make great holiday earrings or maybe even ornaments.
Pods! I love pods! Can’t wait for this one.
I was hoping Cindy would show us how to do these… I got my wish! Yay!!
Thanks Cindy!!
Clay On,
~Lisa :)
I really like the look of these! You are an endless source of inspiration and ideas…..and this is SO MUCH FUN! Thank you once again Cindy.
Oooh, looks like fun! This should be a cool tute…just as I said in my “quote” above (LOL) Cindy will surely simplify this process so that anyone can do it. And “experts” will benefit, too. I mean, who doesn’t like to learn an easier way to do things — or at least discover a new spin on a technique? Thanks, Cindy…looking forward to Friday!
Another way to use up those not so perfect canes. I really like the “pincone” type of beads. This should really be fun. Hurry up Friday!!!!!!!!!!
Wow again…… these look very intriguing. Can’t wait as usual for friday’s
These are awesome! I love glow in the dark creations…especially these flower shaped ones! Looking forward to the tute, Cindy!
This is so cool; I love the glow in the dark pod beads and the mitered cane pod too. Very different look. The flower shaped one is beautiful too. I’ve not had much time to try out every technique but I’m getting there slowly!
I make Christmas pine cone ornaments that resemble these. I can hardly wait to see how these are made. Wouldn’t these make great holiday earrings done with reds or greens and sparkles??