Vol-020-3 Lace and Ink Textures PcT Tutorial (Intro)
Video #140: “I am excited about the new video tutorials especially the Lace and Ink Textures.” ~Lupe-M
More...

** This post is an introduction to one of our paid tutorials.
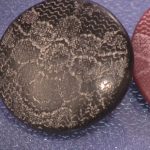
The other day we had a preliminary discussion about this lace and ink texture, polymer clay technique. And today you get to see the sneak peek video. The full video tutorial is posted in the Polymer Clay Members Library as Volume-020-3.
This is a beautiful and easy technique you can use to make beads, pendants and charms for a variety of romantic or sentimental jewelry pieces. And because it is such a lovely surface technique for polymer clay, it combines well with other techniques.
“When I saw this technique, I thought of my grandma right away. I can’t remember a time when she wasn’t crocheting, embroidering or sewing. It would be a wonderful way to honor her memory, using either remnants of lace from her sewing or items she created by hand. The pieces could make meaningful gifts for family too.” ~DJ
“Cindy, I am excited about the new video tutorials especially the Lace and Ink Textures and the Tribal Canes. I can’t seem to give you enough thanks for putting them together for us each week. It requires a lot of work and dedication… so I agree with Elizabeth, you should get an award for Teacher of the year… of this decade! Best wishes to you and your entire family and a very Happy New Year!” ~Lupe-M
“
Just finished the video, love it! Perfect for valentine gifts. Lace is one of the items we watch for at yard sales. I use it in scrapbooking, on the girls shirts and jeans when we fancy up an outfit. It'll be hard to decide which one to use. Thanks again Cindy for a FANTASTIC video! Love and Uuugggs.
Peggy B
“
I grabbed some lace and ink and got started on this right away. I used some high-density metallic pigment ink I had, which took far too long to dry, so I ended up setting it all aside, and starting over with new clay, lace and the proper ink... success! Thank you, Cindy, another great tutorial with multiple uses!
Phaedrakat
“
Cindy, great tute on the Lace and Ink Texture. I've learned a lot from it. In the past, I have used inks for greeting cards, but never thought to heat set them, and they do smudge if I'm not careful, so I will do that from now on. It makes a lovely job, and looks very natural.
Elizabeth K
Transcript coming soon...
Transcript coming soon...
Our goal is to translate these videos into as many languages as possible. If you are interested in helping with this initiative, then please do contact us and we will figure out a way to make it worth your while :)
Shareable Images


Want to chat about today’s post? That’s what the comment section below is for. Scroll Down… We’d love to hear from you!
Or... if you would like to request a topic for a future post, here is the link to do that… PcT Suggestion Box
NEW PHOTOS JUST ADDED:
Hello to Everyone,
Some new Spotlight project pictures that relate to the topic of this page (Lace and Ink Technique), have just been added in another post. They were submitted by Carole Holt. The link by my name will take you to where you can see them, along with a bit of a write up. Hopefully they will inspire you to achieve great things with your own polymer clay projects.
NEW PHOTOS ADDED:
Hi Guys,
Some new project pictures that relate to the topic of this page (Lace and Ink), have just been added in another post. The link by my name will take you to where you can see full size photos along with descriptions and stories about each one.
@Cindy. Thanks~ I’m new to “posting” in blogs, so I’m trying to find a way to shorten my thoughts. My comments look like I’m long-winded!
@Phaedrekat – You definitely do not have to apologize for the comments you are adding. Pointing people to helpful resources here at the site; answering questions that come up; and just generally being involved in the conversations is exactly what community is all about. You are an invaluable benefit to everyone here.
I’ve been reading a lot of the old posts, and I thought I’d read something about the hollow beads. I found the page — Sue recommends adding hollow focal beads to Cindy’s “to-do list” here:
Aims talks about how she uses extruded clay to hide the joins a few comments after that,
Sue explains her technique for sanding/gluing these hollow beads a few more comments down the page. She also mentions an alternate method where the bead is domed on one side and flat on the other.
Sorry for so many comments — looks like I’m trying to “take over!” Scary! I’ll try to keep it short~
@Carole: The hollow lentils are usually made by using a mold of some sort, like a metal paint palette, escargot/deviled egg tray, or you can even use a light bulb. You make patterned sheet(s) and then cut out same-size circles of clay. You bake the shapes on the upside-down tray (or lightbulb.) After baking, the edges need to be sanded down flat so that they match up right against each other with no gap. Then just glue the two sides together.
If you don’t want to sand, or want a different look, you can run a little snake or extruded shape of clay around the edges where the halves meet. (You would use liquid clay as glue to join them.) Then bake again. (I’ve read some people put a little ball of scrap clay between the halves before re-baking so that they don’t “sag”.)
I think I saw someone’s comment about this on another page. I’ll post the link here if I find it. Otherwise, let me know if you want to know more about the top method. I have made beads like this a few times. You can make a good-sized bead with very little clay.
How do you do a ‘hollow’ lentil bead so that you have different patterns on each side as you show in your intro?
I did this technique again, this time using a more “polyester” type lace than the first time around. I liked this better, because I used a lot less ink. The first lace I used had a beautiful pattern, but it had more of a “cotton” feel to it, so it absorbed more ink. Anyway, I was able to ink this polyester lace very quickly, so it’s faster, too. Love this technique!
Hi Laurel: I looked at you website–you have some really pretty jewelry! I laughed on your links page where you said that polymer wasn’t addictive…it would only keep you from getting housework done. How true that is! Have fun!
I just realized I never commented on this video. Not sure why, because I loved it! I grabbed some lace and ink & got started right away. I did have a small problem though. But it was because I used some high-density metallic pigment ink I had just purchased.The ink was on clearance, so I thought “what the heck.” (I’m still hoping it was a good buy, just not for this project.) The high-density ink took way too long to dry (even after some blotting and quick bursts with my heat gun. I didn’t want to end up curing the sheet before I could do anything with it, so…) I ended up setting my sheet aside, along with the lace & offending ink, and starting over with new lace & different ink. This time, success! Just as the tutorial said. This reminds me, though. I have that metallic-lacey clay laying on my “unfinished” shelf. I’d better get back to it and see if that crazy ink ever dried!
Thank you, Cindy. Another great tutorial with multiple uses!
Very cool, will be trying this one soon !
It is wonderful to read all your wonderful comments! Sound like you guys are having fun trying different way s of going about the project and are coming up with your own twists. That’s the kind of thing I love to hear.
As far as Future goes, Carolyn is so right that there is tons of info on alternative finishes you can use. Just remember to be using that search box at the top of the page when you need to find something. With more than 700 articles and over 10,000 comments, most likely your answer is already on this blog somewhere.
Elizabeth also rightly pointed out that just sanding and polishing gives a lovely finish, then you don’t have to worry about drips and such.
And to Rose, you should type the word ‘cracked’ or ‘cracking’ into the search box to find more help there. There are several reasons why your clay might be brittle and you should be able to find what you need to fix your problem. I have linked beside my name to one article that you should be helpful for you.
Ok, I tried this technique last night. I found a couple things helpful. When I rolled the lace into the clay, I put the plastic wrap between my roller and the clay so the roller did not pick up the ink and roll it into the clay between the lace (the lace holes, as it were).
Also, the ink pads that I had available were kind of old and dry and weren’t working great (going to get some new ones) so I thought, hmmmm, I wonder what would happen if I used my Pearl Ex powders. I rolled the lace onto the clay then brushed the powder over that. WOW! It turned out awesome! I loved the effect. So that might be something others want to try too.
I love this total look, whether with ink or powder. Thanks for showing this to us Cindy. :)
@Laurel: Laurel, Did you leave the lace on the clay when you brushed the powered over it?
@carolyn: Carolyn: Yes, I left the lace on the clay. Then brushed the poweder on, then took the lace off. I sent some pictures of the results to Cindy which she said she will post here when she gets the time. Poor busy Cindy.
Anyone wanting info on finishes, Cindy’s blog has been full of comments on Future and verathane. There is also PYM II which is a fabulous spray. I’ve used it on a lot of my pieces recently and am extremely pleased.
Since Cindy mentioned that the pigment inks can be washed off the clay with water, I also rinsed out my lace when I was finished. It cleaned up great, so now maybe I can try a bit of my wedding lace!
Hi Cindy ,and all here.
Cindy thanks for the recent TUT on the Lace and Ink Texture.
It is always great to see a technique demoed like you do here.
I have already learnt a point from it I had not realized re the Inks.
I have them and used them for greeting cards but never thought of heat set as the do smudge, and the baking of the polyclay will do that.So will do that,with cards now, I will get my heat gun to work.
RE the Future polish. I am lucky enough to have this and have decided to use it more as it does a lovely job after sanding and then polishing with the f/p. I usually gloss beads, but just sanding and polishing still makes a lovely job and not using messy gloss is a bonus, and looks more natural I think. Hope others can still find this polish.
Looking forward to next week
Love
E.
I have recently notices that several stores have quit stocking Pledge with Future Floor Finish. Is there another alternative out there that will provide the same outcome and wearability?
This week’s color, rose cream, is a beautiful pale pink – good enough to eat. I used it for a heart with dark red lace. Also made a black one with silver lace. I’m looking forward to getting them out of the oven & finishing them.
Cindy – this is a beautiful, classic, effective and best of all, an easy technique! Thank you, again :)
There are a lot of things I like about this site, but today it’s all about TGIF & I can start again. I’ve had a frustrating week losing hours of work day after day due to cracking. I’ve read everthing I can find & tried it without sucess. the worst of it is, that I haven’t learned from it since I don’t know what I’m doing wrong – at least yet. Someone from Premo told me something to do which I haven’t yet tried. I will next week, but today I have something totally different to do – something easy, pretty, & wearable. Thank you, Cindy.
Just finished the video and love it so very very much. I know what I am making all my daughters and grand-daughters for valentine gifts. So very pretty and lucky me lace is one of the items my family watches out for at yard sales for me. I use lace in scrapbooking and on the girls shirts and jeans when we go to fancy an outfit up. So I will probably have a problem deciding which one to pick out to use. I need to get busy on beads for the contest so it will be a couple of days before I try this. My company leaves today so I hope I feel like clay fun later this afternoon.
Thanks again Cindy for a FANTASTIC video!!!!!!!!!!!!!!!
Love and Uuuuuuuuggggggggggggs, Peggy
My lace is special in that it was once part of my sister-in-law’s bridal
gown. After she passed away my brother had offered the gown to a friend for her daughter’s wedding. But the young lady wanted her own
new one. I guess we can relate to that. So I was asked to dress a doll
in this fashion. It was a challenge to scale everything down but a fun time. The doll belonged to one of my sisters and was an older vintage.
She was happy with the results and my brother was really surprised to see this at our family reunion that year. So some of the lace motifs will become part of this technique. I will have to pass on one of the pendants to my sister and hopefully have success with a miniture for the bride. Found the ink pads at MIchale’s today so I am set to go. Can’t wait for Friday.
An afterthought, maybe I’ll make enough pendants for all the ladies in the family. Won’t they be surprised!
@Joyce M:
Joyce how truly lovely that you will be able to take this technique of Cindy’s and turn it into something so very special for you and your family.
How great you must feel to be able to use the lace once again for something so beautiful from the inside out.
Enjoy!!!!!
Love and Uuuuuuugggggggs, Peggy
Can hardly wait now that I found some scrap lace hem facing. Also found a tiny strip that looks like it would make a great border. I know once we see this video our mental wheels will really start spinning. Lace is timeless and will appeal to several generations. Will have to make several different pieces for the church sale and see what the reaction is. I’m going to be so busy between now and 2/7!
This video is perfect with the heart pendants I plan to make for some Valentine gifts. Icing on the cake or cherry on the whip cream. I of course like both. Another fun filled Friday. Thanks to Cindy there is never a dull moment in my craft room anymore.
Love and Uuuuuuuuuuuuuuuggggggggggggs, Peggy