Vol-016-2 Butterfly Pendant Necklace PcT Tutorial (Intro)
Video #122: “Very Nice. I love butterflies and think a video would be great.” ~Loretta-C
More...

** This post is an introduction to one of our paid tutorials.
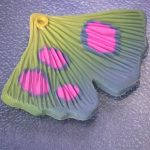
Butterfly jewelry is all the rage right now, so why not make your own butterfly pendant with polymer clay! This large and funky pendant is made using the Studio by Sculpey Shape Maker’s Leaf Set IV, Studio by Sculpey Clay and Premo Translucent Clay.
I chose to use the Studio by Sculpey Clay for this project for its strength, and the Premo for its transparency. But any strong polymer clay in any color combination will work. The pendant, in the photo above, has not been baked yet, so the translucency is not obvious yet.
If you want to see a fully baked and antiqued pendant, then scroll down to the preview video below.
This butterfly pendant is fun to make and even more fun to wear! I have received many compliments about this unique piece of jewelry when it’s been hanging around my neck.
ADDENDUM: Unfortunately, the product used in this tutorial is no longer in production, so this Vol-016-2 tutorial is not available for purchase anymore. However the button below, will take you to our Polymer Clay Tutor Store, where there is a wide variety of other premium tutorials that you can choose from...
Transcript coming soon...
Transcript coming soon...
Our goal is to translate these videos into as many languages as possible. If you are interested in helping with this initiative, then please do contact us and we will figure out a way to make it worth your while :)
Shareable Images


Want to chat about today’s post? That’s what the comment section below is for. Scroll Down… We’d love to hear from you!
Or... if you would like to request a topic for a future post, here is the link to do that… PcT Suggestion Box
I found the leaf set on Amazon and got it today. I made my first set with the same colors Cindy did, but will soon venture out and make more sets in more colors. This was so easy. I’m glad I made them. Thanks again, Cindy.
That is fantastic Peg! Thanks s much for coming back and letting us know how the project turned out for you. That is neat that you were able to find these cutters since it has been a long time since they have been in production. Good old Amazon!
Well I came into this party too late, way too late. That set of ginkgo cutter and texture are no longer available and not being produced anymore. I’ve searched and searched but can’t find anything even similar to this. I would really love to make these so I was wondering if there was anyone willing to help me out by sending me one leaf with texture so I can’ make a mold of it? This is so cute, I hate that I missed out on it.
Louise, would be glad to do this for you and ask Cindy to forward my email
address to you so you can send me your address. Waiting to hear from you.
Joyce
Thank you so much Joyce!! I am so excited and thankful for your help! I will ask Cindy right away to forward me your email. And just and FYI, I am in the states, I should have said that in the original post.
Hi Louise, I just found the ginkgo set at this glassceramics site and ordered it. Happy Claying!
You are welcome Phoenix. It’s great to have you as part of the community here.
For anyone who has not yet seen today’s post, please click on the link by my name and offer some condolence to a member who’s dear husband recently passed away. Phoenix… I know you were already over there. Thanks for offering words of encouragement to Jackie. I know she appreciates it immensely.
Pretty soon this page is going to take flight with all the pretty butterfly wings that are fluttering in LOL. Phoenix, yours looks great too! Thanks for posting :-)
My first butterfly pendant :)
It was such fun.
Cindy, your tutorials demonstrate clear steps and they’re very easy to follow.
Phoenix Forbes
Chicago, IL
Hi Phoenix
Just love your butterfly .The colour is so brilliant , love the white on blue.
Really stands out.
As you say, Cindys clear steps make it easy for us to take it and make it our own.
keep up the good work
love
Elizabeth K.
@ElizabethK: Thanks, ElizabethK! I adore your lime green butterflies. It’s so cool to see everyone’s work.
Thanks, Cindy for posting my pic :)
@Phoenix:
Hi Pheonix, thanks for your comments. Love those butterflies, yes one of my fav colours is the lime green. What a wonderful group this is .
I am so uplifted by all the wonderful comments for Jackie, and so glad I am a part of it.
Elizabeth K. XXX
Thank you sweetie! It is my pleasure serving such sweet people like you. Btw I do sleep, but I could always use a little more! :-)
Hi cindy
thank you for the comments on my butterfly work, so thrilled to see it here. Yes I intend to use the grommets but did not have them at the time.
The only craft store for us is over the other side of our city so has to wait til I get a chance to go there.I think the grommets will certainly be an improvement.
Yes i think I forgot a few stages like the cornstarch so eager was I .
also forgot to do the antiquing but will on next lot.
The dangle came about because I wanted to keep them all together.
Your wings are delightful Elizabeth! What a fun way to hang them. I love them as a dangle!
One way to give them a nice clean finish along the edges is to smooth them a little with cornstarch on your finger, before you bake them. Then to give them a light sanding on the top, bottom and along the edges after their baked to give them a more natural look.
I think you may have done that on the blue one in the middle on the right since it looks much smoother than the others.
I can’t quite see in the photo, but it looks like you added some sparkles to the circles on the green wings. It looks cool whatever you did!
See if you can find some grommets for the holes. (I found some in a dollar store). You’ll find them to be more durable than without grommets.
Keep doing what you’re doing and experimenting with the colors. You’re doing a wonderful job! Thanks for sending me your photos! :-)
Hi Cindy,
Thanks for all the great Videos of late.
I am a bit behind sending you these pics of my first efforts of the Butterfly Wings. I had to wait until I purchased the equipment to do them, and am so happy with the results, but can see how to improve, as these are my first efforts. Have made them into a dangle, but intend to make more and get better at it as I go. Love, Elizabeth
@Peggy – Blushing – thank you so much for taking the time to write out your feelings like that. My sincere hope is that others will read what you have said too, and also decide to become part of this “little clay family.” I love it how supportive everyone is of each other. Blessings.
@Ifama – That is a great point about the cost of the videos being a tax deduction if you are purchasing them for your handmade jewelry business venture. I think sometimes people forget this, so thank you for that mention and reminder.
Ifama – Thank you for sharing with all of us. Your items are beautiful. You have shown and reminded us how wonderful Cindy is at teaching us all how we can take her videos and put our own personal touch on them. We can take and make something all our own thanks to Cindy.
Cindy – I think we are the ones who are blessed to of found you. Thank you for everything I have learned and continue to learn. I have each and everyone of your videos from beginners on. I still continue to go back and watch all of them over and over learning even more each time. You do not have to be a beginner to get much needed information from the Beginner Polymer Clay Course. Even some parts that I had read about in books before, watching it on video helped me to understand it better.
I also want to thank you for all the questions you have answered for me. You make me feel like no question is a silly question.
Also thank you to all of the other members who have helped with my questions and concerns. I feel like Cindy has made us all a part of a special little clay family where we can help each other.
So I am sending all a special THANK YOU!
Keep Claying, Peggy
Thanks Cindy, I have ordered more back issue volumes today. I love what you do. I believe that acquiring the best instruction for various techniques is key in making the designs that I love and will eventually sell. Your videos provide me the instruction I need and are an investment. A plus is that in business, they are tax deductible. Again, thank you so much.
Thank you so much everyone for all the kind words and support. I feel blessed to know all of you. And Ifama… your butterfly wings are so pretty. Thanks for sending the picture for everyone to see.
Hi Cindy,
I made the butterfly and would like to share it with you and everyone else.
Also I would like to respond to your request for feedback about the beginners course that I purchased. I can’t think of any thing to say that could improve it, except do a second one, LOL. However, I can state how the course has helped me as a beginning clay-er. Your step by step visual from how we are to sand, what products to use, the types of clay, conditioning the clay, what equipment, the introductory to caning, marbling and blending colors is priceless. Also having access to this course when needed is so valuable that I don’t think words do it justice, as I couldn’t remember all the information you have provided when I need it. I love this course, being able to SEE it is far more than the instruction I have seen on the internet in words only. You explain things so well. I have learned to set up my work area watching your course; I have bought each item you suggested (even though I bought a lot of Sculpey III BEFORE I got the course). Even though I have viewed the course a number of times, each time I come back, I see something new. I love it, keep up the good teaching.
Ifama
@Ifama Jackson:
I think your butterflies are spectacular, Ifama. Love the colours. Isn’t it nice to be able to see others completed work here? I just love this site. How any one can be lonely or bored with so much to do beats me. Keep up the lovely work. We are so lucky to have a teacher like Cindy who puts her all into everything, don’t know how she does it, yes does she ever sleep. Thank you so much CindyXXXXX.
Elizabeth
XXX
Cindy: How do you do it! I mean you are so busy, blog, twitter, videos and all the great advise. I absolutely love the butterfly pendant. I am even going to try to use the ginko leaf cutter to make some butterfly pins. Your brain must continue working and spinning even when you sleep. Or do you sleep? As I said as long as you continue I will follow. You amaze me every minute.
Thanks again for all your talent. You are a true artist.
Truely inspired, Peggy
Anna, I’d try that crackle you mastered on some Christmas themed items like fir trees and decorative balls…bet folks would line up to add them the the Christmas tree this year!
Oooh, alcohol ink foil butterflies! I love that idea!
For some reason I just don’t like the gingko shape. Weird. The effect is pretty though.
Good point, Sue! Those wings in the alchohol ink crackle treatment would be spectacular.
Still going to try a Whale tail diving into sea foam, a pendant, or jar lid cover. Your favorite ocean blues in a mokume cane block pierced repeatively with two sizes of bamboo skewers makes luscious sea foam or lace, when you slice off thin layers,and would love to have that accent around a metallic deep blue whale tail, with some appropriating markings on its tail.
While this isn’t my kind of thing, I think the alcohol ink/crackled metal foil technique and the smooth faux raku technique would be effective for butterfly wings too, as they both give colourful shimmery results that mimic what you see from the tiny scales on real butterfly wings.
Just to know its coming is awesome. Friday will be a truly fun day at home. Well, after watching the video there’ll be a short trip to JoAnn’s for any supplies needed but then to dig in and try my wings! Such excitement used to only come at Christmas. Now you bring it to us every Friday. Thanks Cindy.
Wow! I’m really looking forward to learning how to use the eyelets in my work … should make it look even more professional! Another winning video Cindy. Thanks again and again!