Vol-030-1 Polymerize Your Postage Stamps PcT Tutorial (Intro)
Video #178: “I am trying to use vintage postage stamps and labels on my Fimo clay. What is the best thing to use?” ~Deb-W
More...

** This post is an introduction to one of our paid tutorials.
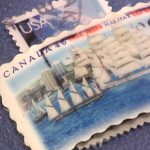
Back in July, a question came up about how to incorporate postage stamps into polymer clay jewelry projects. The weird thing was… it was just the day before that I had been playing around with a new idea on that very thing… so I actually had a Polymer Postage Stamp sitting right on my desk when I responded to the comment.
“I am trying to use vintage postage stamps and labels on my Fimo clay. What is the best thing to use to adhere the stamps and labels to the clay and then how do I prevent it from puffing up in areas after baking.” ~Deb-W
“Hi Deb, just thought I’d better pop in here and mention that I have a really cool way to incorporate stamps and any other types of paper materials into your polymer clay art projects. I will be doing a tutorial soon, so stay tuned!” ~Cindy-L
“
Thanks for another great video Cindy and Doug. You made my day… again. This technique is working great for me. I was a stamp collector in my teens and I still have all those old stamps.
Lawrence S
“
I can't tell you how much I enjoyed this tute. We are all so thankful for your wonderful videos Cindy and Doug. The Lietz team out did themselves once again. Our imaginations are running wild, just as Cindy keeps teaching us to do. THANKS FOR ANOTHER PERFECT LESSON!!!
Peggy B
“
Who would have thought this could be so simple! What a wonderful and easy thing to do with Polymer Clay! Hats off to you Cindy!
Aimee A
Transcript coming soon...
Transcript coming soon...
Our goal is to translate these videos into as many languages as possible. If you are interested in helping with this initiative, then please do contact us and we will figure out a way to make it worth your while :)
Shareable Images


Want to chat about today’s post? That’s what the comment section below is for. Scroll Down… We’d love to hear from you!
Or... if you would like to request a topic for a future post, here is the link to do that… PcT Suggestion Box
Awesome. Thanks!
Awesome polymer stamp video. This is the first video of yours I have purchased and viewed. Well it was the reason I came to your site in the first place.
A question. In the video you show after coating the back, you bake at 265 degrees for 10 minutes. What about after coating the front? Again 265 for 10 minutes, or according to manufacturer’s instructions on the bottle, or?
@LisaBear: Thank you Lisa for your sweet comment! I am glad you are enjoying the tutorial. As far as the second baking, that depends on if you are going to add your stamp to another piece of polymer clay that will be baked again. If you are, then I would only bake the stamp for 10 min like the backside. Then when it is baked in the final piece, you can bake for a full hour.
If your stamp is going to be used on its own and will not be added and baked with a polymer clay base, then cure your stamp for a full hour at 265F. This will ensure a full cure, giving it strength and durability.
If you are unsure why I bake for so much longer than what the directions on the package says, read the article I have linked to my name. Hope that helps!
Did anyone have a spectacular outcome with actual photos?
Think if you have a black background underneath you could use this for imagery in magazine pictures or newspapers.
@Jocelyn: I did a bracelet for a client who has a daughter at UF(University of Florida). I put a charm on it with a photo of the “Gator” that I printed on white card stock and then covered with Bake and Bond. It came out just as Cindy stated in the tut and the comment above “nice and clear”.
@Marlene: Thanks so much Marlene! Now to experiment with the printed word via newspapers or magazines…..
Anyone tried it? How did you “black out” the back of the paper?
I have a question…If you want to use a new stamp, should you try to remove the glue first?
@Linda K.: You could if you wanted to Linda, but I don’t know if it is necessary to remove the glue first. When I made mine I just removed the paper, but didn’t work at removing all the glue and there wasn’t any adverse reaction. Wouldn’t hurt though to use a damp sponge and wipe some of the glue off though.
@Cindy Lietz from Translucent Polymer Clay Secrets: Thanks, Cindy. I was worried that the glue might eventually break down the clay.
I see I forgot to hit submit the other day so my comment did not show up. An ‘easy ‘ tutorial technique wise but trust our Cindy to come up with something so simple but with so many possibilities. Thanks Cindy & Doug for the team effort!
Now I’m excited! I discovered long ago that I am image transfer challenged (one of many I’m afraid). With this tut however, I see the light at the end of the image transfer tunnel. WoooHooo!!
Thanks Aims!
@Peggy Barnes: Reading your words gives me that warm satisfied feeling that makes all the long hours Doug and I put into this business, worth it. We work very hard to bring you all the best and most helpful information for the lowest price we possibly can. Having you recognize that and ‘shout it from the rooftop’ for everyone one to hear is incredible. I am so grateful for you Peggy! You are what makes this community GREAT!!
@Elizabeth Kerr: You are soooo cute! I can just picture you happily working with your clay, while your pasta machine whirs noisily in the background!
@Elizabeth S.: There are lights at the end of all claying tunnels… you just have to figure out how to turn them on! lol :-)
@Cindy Lietz from Toner Based Image Transfers: What a perfect way to put it, Cindy. The trouble for me, though, is that sometimes the switch gets stuck. lol. Gotta comment on my week-end as the perfect follow-up–I accompanied my husband to Washington DC where he has a meeting. I forgot the pc I planned to bring to color mix and so have spent that time re-watching many of the tuts that I love but haven’t implemented as successfully as I wanted to. You’d be amazed at what I have discovered by just sitting here watching–all the little nuances of how you get to the perfect outcome. It’s been a delightful time with lots of “oh, I see how she did that, now”. Can’t wait to get home and back into my craft room. Please know how much I appreciate what you and Doug do for us–I could never say it enough.
Hugs,
Elizabeth
@Elizabeth S.: :-D :-D :-D
(do ), was the last word I missed editing.
Drat !!!
Hi Cindy and all here.
Thank you Cindy for another interesting, informative and useful tute.
I have used TLS like this on some things, but never thought of using it for making Stamp Ephemera, just great as I keep all the stamps that arrive at my place,so will have lots to try it on.
I might even buy the Bake And Bond, it looks good , I like the thickness of it.
I like the idea of covering with resin too.
As was said,to be able to replace the image transfer method is so useful.
As to the motor on the pasta machine.
Your comments were all relevant except (to have it for have its sake), well thats me, I have one and love it, and it is a hit when I take it class, everyone uses it instead of their own LOL!
I first saw the motorised ones when I first started Poly claying and went to a
Poly Clay Retreat in 05 ( I think) there were so many in the room, it was so noisy I hated them, not knowing that I would eventually have my own, and be one of those noisy gals LOL.
I dont take it anywhere tho like that now.
But it is so useful
I love it.
Also I can take it to pieces and clean it like Cindy has shown, so theres no drama there.
Bye for now, Thanks again
Elizabeth
XXX
P.S. I am with Peggy B, We do get a lot for our Sub, even just to be here among likeminded people, so dont ever go broke Cindy,because of the small fee charged for this. I hope you continue to get so many new students, that you can go on the way you
Love
E. XXX
I think I forgot to say I LOVE this tute!!!!!
Many Uuuuuugggggs, Pegggy
I don’t know how you come up with these ideas either but I praise God every Friday for giving the two of you you special gifts then to top it with the generosity the two of you have going in those creative minds of yours. absolutely. You start us on the path of a new creation with endless possibilities every Friday. The love you have for your art and your students comes out every Friday in our Awesome lessons and every 3 months in our bills. Am I grateful for the low cost yes BUT I think and would not be upset in anyway feel you should raise your fees. There is nowhere else on or off the internet you could get a lesson half this good for twice the money. I know I taken many lessons on-line and in studio’s and classrooms. I have learned more from you for a fraction of the money. I have not met a person yet eho doesn’t like to save money and time. How about you?????????????????? Come on join NOW!!!!!!!!!!! I promise you won’t regret one minute or cent of it. Hurry
Thanks for another super Friday team Lietz!!!!
Many Uuuuuuuuggggggggs, Peggy
Who would have thought this could be so simple! What a wonderful and easy thing to do with PC! Hats off to you Cindy!
Bake and Bond!!! Fantastic!!! I have been looking for a transfer technique that is fairly simple but only have an ink jet printer, which means all kind of extra steps or specialty items. Thanks to you I will be getting my bottle of Bake and Bond out and having a blast. You are the BEST!
@Brenda: By photos, I’m guessing you mean glossy ones? I haven’t tried it actually, but I can’t see why it wouldn’t work. Why don’t you try it and let us know?
@Marlene: You’re right, this is the perfect technique to replace the typical image transfer. Cheap, problem free and nice and clear too!
I wonder how this technique would work out on photos??? Have you tried this Cindy?
Can we skip right to Friday? Can’t wait for this one. Going to be hard getting through Thursday after seeing this.
Cindy, that is awesome! How do you come up with all these wonderful ideas? You amaze me.
I can’t wait for this tute! I have so many ideas! I don’t have any Bake and Bond so is TLS good to use? I just wonder if Bake and Bond is more transulcent. I got more questions but I’ll wait until after the video. I’m sure I’ll find the answers then! :)
This looks very interesting ,Cindy & Doug, and am really looking forward to the Friday video. I have seen stamps used on jewelry but wondered what the law was regarding their usage. Do they have a copyright ?
Thanks everyone for your comments! I think you are really going to have fun with this one. It will work on any paper embellishment so you can really get creative with this technique! Think scrapbook paper, stickers and magazine pictures…
@Elizabeth S.: Hehehe My perfect curves are being altered by this rich information as well!! Probably could use a few more rotations at my pasta machine. Better dig out some old clay to condition! (Remember that post about not having a motor so you can get more exercise? I linked to it by my name for anyone who has not seen it.) LOL
@Lawrence: That is an excellent question! Maybe a few of you guys could look into it to be sure. It has been my understanding that you can use any material in your artwork and not be in violation of copyright infringements, as long as it is the original. You just can’t use copies. For example, if you tore a piece of art out of a book and altered it, that would be OK, but if you made a photocopy of it, that would not be OK. This is where I believe the term ‘Altered Art’ comes from. But I could be wrong, so some research on the subject wouldn’t be a bad idea. And please come back to this post to report your findings so that everyone can benefit from the information.
Finally had time to watch the vid preview. I don’t even know how its done yet but can you imagine the possibilities? See ya Friday!
Off topic, sorta. Do you think there is any correlation between being a member of this site and my recent need to join weightwatchers online? I gotta blame someone folks and I do spend hours sitting in front of the computer trying to learn all this stuff and read what everyone has to say. I even gave up my glass of wine (sometimes two but don’t tell anybody), thinking my weight would just plummet, but no luck. Of course, I just discovered the joy of substituting vanilla ice cream mixed with peanut butter for my evening libation but that can’t be a factor, right? Right? I need help and support to figure this out-it’s gotta be the site. The ingestion of all this rich information is just wreaking havoc with my perfect curves. (Sigh)
@Elizabeth S.: Wow, so that’s why I’m so extra curvy? I thought it was the Nutella…or the lack of exercise. Still, I can’t give up this rich information. Guess I’ll stop eating the fresh vegetables. That’s 50 calories right there! (Then I’ll just order some pizza or something…) As for your peanut butter/ice cream — those are healthy! Protein and calcium, ya know? Give up something else…like salad~ ;D
@Phaedrakat: You are too funny! I think if you eat frozen custard instead of ice cream that would be better. It has eggs in it so you can eat it for breakfast!! Right? LOL!!
@Phaedrakat: I keep finding more and more reasons why you are one of my favorite people. Love the way you think-guess we are kindred spirits when it comes to redefining food groups.
How exciting! Cindy just keeps coming up with more & more interesting videos…don’t know how she does it, but we end up with the most worthwhile polymer membership EVER! That is one creative woman — you’re amazing, Cindy! And Doug…he films the videos so well, and makes sure this website runs smoothly (and all the other stuff these two do behind the scenes…Dream Team, indeed!) Wow, this is great!
Cindy, this looks cool… As usual I’m looking forward to Friday!
Peace, Love, & Clay,
~Lisa :)
Can’t wait for this one, Cindy! I have tons of vintage stamps…looking forward to it!
OOOH! Can’t wait to see this one as I’ve been trying to incorporate my graphic designs into polymer clay and I’ve been failing at it so far. I tried different things to waterproof my printed images, but I’m sure this tut will help with that part of it :) Thanks Cindy.
What a fabulous technique, can’t wait for this Friday. We have all kinds of stamps as well…sooo many possibilities with this lesson! I love the pretty pendants you’ve made too Cindy.
Wow! This is going to be another of those ‘amazing’ tutorials. I have tons of stamps in boxes so I can put some of them to good use. I have one collection though that I will be keeping- my dad collected and bought me over the years all the stamps you could get on musical instruments and composers; some of them are such beautiful stamps and from all around the world.
Who wood have thunk it ? What a cool idea. Can’t wait till Friday. Again the Dream Team has come up with something new ( at least to me!). Yeah team!!
Wow! Will this work with foreign money? (Bills, not coins!!) What a great idea. I have a stash of foreign stamps just begging to see daylight.
Something else I didn’t know I needed to learn and now I can’t wait to see how it’s done. [Did that make any sense?]
I love this, can’t wait till Friday! I imagine you could use this with pictures from magazines too. :)
Its another “Can’t wait for Friday” week. Looks to be really cool!
I love it too !!
Cool Beans!!! I love it!!!