Rainbow Teardrop Blend (Multicolored Skinner Blend)
Video #518: For those of you who need a bit more help going from a simple two color blend to a multi-color rainbow blend.
More...

IN THIS POST: — skinner blends — teardrop blends — rainbow blends — multi-color blends — ombre — color gradients — roygbiv — polymer clay canes — polymer clay extruder — extruded flowers — lietz blend — (Topics marked with an asterisk* are discussed in the Comments Section below).
Topics Covered In This Video:
- Teardrop Blends can be done with as many colors as you like.
- In previous a previous video, I have demonstrated how to do a simple 2 color Teardrop Blends.
- Today’s video focuses specifically on how to do a multicolor Rainbow Teardrop Blend.
- You can use a rainbow blend to make rainbow sheets, rainbow skinner blend canes, rainbow skinner blend plugs (square canes), beads, extrusions, and more.
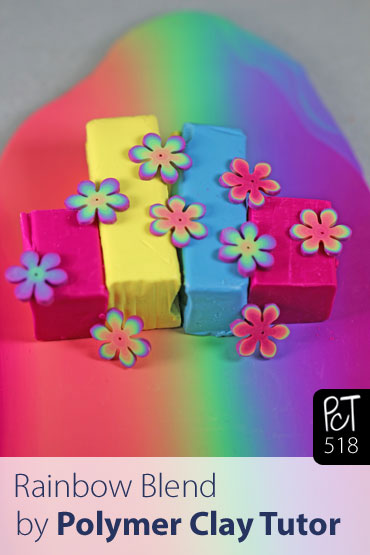
- You need three primary colors to make a rainbow. Red-Yellow-Blue.
- I used Premo Fuchsia, Sunshine Yellow and Turquoise for my primaries
- But you can use any red, yellow, or blue of your choosing.
- Colors blend from red-orange-yellow-green-blue-indigo-violet (ROYGBIV).
- You should have some red at the beginning and at the end of your rainbow blend.
- Fuchsia is a more dominant color than Sunshine Yellow and Turquoise.
- So I used 1/2 section of Fuchsia to begin; Then 1 section of Sunshine Yellow; Then 1 section of Turquoise; And finally 1/2 section of Fuchsia at the end.
- Warm up and condition each color and roll each one into teardrop shape.
- Set the teardrops beside each other (alternating direction) in order of red-yellow-blue-red.
- Flatten the teardrops into a sheet, and then run your clay through the pasta machine as directed in the video.
- Make sure that Red color is on each end… not at bottom and top.
00:00:03 –> 00:00:08 Hi guys, its Cindy Lietz, your Polymer Clay Tutor, and today’s PcT Mini Tute, I’m
00:00:08 –> 00:00:12 going to show you how to do a Rainbow Teardrop Blend.
00:00:12 –> 00:00:18 Now, in a previous video, I showed you how to do the Teardrop blend just using 2 colors,
00:00:18 –> 00:00:23 but…and then I talked about doing multiple colors, but apparently, it wasn’t super
00:00:23 –> 00:00:28 clear on how to actually do the Rainbow blend, so what I’m doing is going to do just the
00:00:28 –> 00:00:31 Rainbow blend specifically.
00:00:31 –> 00:00:35 Now, you can use a rainbow blend for all kinds of cool things, you can make a sheet…which
00:00:35 –> 00:00:42 I’m going to show you how to do today, and it just blends from your Reddish color, to
00:00:42 –> 00:00:50 your Orange, Yellow, Green, Blue to Purples…all the way through, you can use that to make
00:00:50 –> 00:00:59 things like a Rainbow blend cane, you can make a square cane which is also called a
00:00:59 –> 00:01:06 Skinner blend plug…so this is a Rainbow plug, you can use that to make beads and all
00:01:06 –> 00:01:08 sorts of cool things.
00:01:08 –> 00:01:09 And look at…
00:01:09 –> 00:01:15 I made just recently with my extruder, and a cool flower disc…I’ll show you how to
00:01:15 –> 00:01:20 do that sometime in the future, and this is done by putting the cane right in the extruder,
00:01:20 –> 00:01:25 so there’s some extremely cool things you can do with the Rainbow blend.
00:01:25 –> 00:01:32 Now all you need for a Rainbow is three colors…your primary colors of course, so you need a Red,
00:01:32 –> 00:01:39 Yellow, and Blue, now I’m using…I’m kinda doing a funky brighter pastel kind of
00:01:39 –> 00:01:47 blend, so I’m using…these are Premo colors, I’m using Fuchsia, Sunshine Yellow, and
00:01:47 –> 00:01:55 Turquoise, now you could use a different combination of a Red, Yellow and Blue, and now, the way
00:01:55 –> 00:02:02 a Rainbow works, is it…you know the ROY G BIV thing, where you’ve got Red, Orange,
00:02:02 –> 00:02:09 Yellow, Blue, Indigo, Violet…well, they keep repeating, so it would go from the Fuchsia
00:02:09 –> 00:02:13 color that we’re using as our Red, all the way through to the Purple, and then it would
00:02:13 –> 00:02:19 start as a Fuchsia again, so what I need, when I’m doing my blend, is I need to have
00:02:19 –> 00:02:24 some Fuchsia at the beginning of the blend, and as well at the end.
00:02:24 –> 00:02:29 Now I’ve got… for the amounts I’m using, now you can use whatever amounts you want,
00:02:29 –> 00:02:35 and each different color is gonna have a different strength to it, but for these particular colors,
00:02:35 –> 00:02:41 the Fuchsia’s pretty strong, and the Sunshine Yellow and the Turquoise aren’t quite as
00:02:41 –> 00:02:46 strong, so I’m gonna use twice as much of these 2 colors, than I am of the Fuchsia,
00:02:46 –> 00:02:51 so I’m using a half a block of the Fuchsia on each end, and then…I mean not block,
00:02:51 –> 00:02:53 section, of each one.
00:02:53 –> 00:03:01 Now, I’m going to shape those into teardrops, now I’ve warmed up this clay already a bit,
00:03:01 –> 00:03:06 and conditioned it, so I’m gonna take a Fuchsia ball here, warm it up in my hand,
00:03:06 –> 00:03:13 rolling it in a ball, and then turn it into a teardrop shape…now this is a much easier
00:03:13 –> 00:03:20 way to do a Rainbow blend than the traditional Skinner blend way, so I’ve got my teardrop
00:03:20 –> 00:03:21 sitting there for the Fuchsia.
00:03:21 –> 00:03:27 Next, I need my Yellow, so I’ve got Sunshine Yellow, you can see this ball is twice as
00:03:27 –> 00:03:32 big, and that’s the cool thing about this Teardrop blend, is if you have a weaker color,
00:03:32 –> 00:03:37 you just make a bigger ball of it and you can still do the blend just as easy, so I’m
00:03:37 –> 00:03:42 making it into a teardrop…make sure to have a good, decent point on the end there, you
00:03:42 –> 00:03:48 want it pointy so that it’s like a real triangle shape, laying it right next to it.
00:03:48 –> 00:03:56 Go to the Blue, which is Turquoise in this case, warming that up…if you have really
00:03:56 –> 00:04:00 soft clay, it’ll be easier to do, and if it’s really hard clay, then it’s gonna
00:04:00 –> 00:04:06 be harder to blend, but still doable, gonna lay this one right next to it.
00:04:06 –> 00:04:16 And the next one…like this…now I’m making…because these Fuchsia ones are less clay, I still
00:04:16 –> 00:04:21 have to make them tall…the same height, so they’re tall and skinny, let me just
00:04:21 –> 00:04:29 show you how that looks next to each other, like that, see?
00:04:29 –> 00:04:34 Now what we’re gonna do is we’re gonna flatten this out, gonna flatten it with my
00:04:34 –> 00:04:42 hands first, you wanna put it through the pasta machine, but you don’t wanna be hard
00:04:42 –> 00:04:45 on your pasta machine, you don’t wanna make it work too hard, so you gotta thin it out
00:04:45 –> 00:04:52 a bit…now I also have a video where I show you how to do a Teardrop blend without a pasta
00:04:52 –> 00:04:55 machine, so you can watch that if you don’t have a machine.
00:04:55 –> 00:04:59 Now…so I’ve got my colors lined up like this, and I’m gonna run them through the
00:04:59 –> 00:05:06 pasta machine at the thickest setting, like this, so that my colors are going…you’ve
00:05:06 –> 00:05:11 got the Fuchsia at the one end, Fuchsia at the other end, don’t turn it this way, don’t
00:05:11 –> 00:05:16 have your Fuchsia at the bottom, have Fuchsia at each end, then we’re gonna run it through
00:05:16 –> 00:05:20 the pasta machine like this.
00:05:20 –> 00:05:31 Now don’t worry if it looks like its kinda coming apart, once you’ve put those two
00:05:31 –> 00:05:34 ends together, it’ll all start working out.
00:05:34 –> 00:05:41 So I’ve just folded it in half, keeping everything going straight up and down, and
00:05:41 –> 00:05:50 then we’re blending it through like this, we’re gonna fold it in half, over and over
00:05:50 –> 00:05:52 until they start to blend together.
00:05:52 –> 00:05:59 Now one thing that we can do is we can speed up this process by rolling it, so I’m just
00:05:59 –> 00:06:06 gonna roll it at one end, and basically this is like folding it over and over and over,
00:06:06 –> 00:06:14 ‘cause each roll is another fold, and it just speeds up the whole process, I can tuck
00:06:14 –> 00:06:22 in any ends that are kinda gettin’ out of control, flatten it right down, and run it
00:06:22 –> 00:06:24 through the machine again.
00:06:24 –> 00:06:28 Now I like to put my fingers to the side, to keep it from getting too wide, now right
00:06:28 –> 00:06:38 now it doesn’t really look right at all, but as we continue to blend it over and over,
00:06:38 –> 00:06:44 you’ll start seeing the colors starting to blend, and they’ll start to make sense,
00:06:44 –> 00:06:46 and start looking like a Rainbow.
00:06:46 –> 00:06:49 So I don’t know, this is gonna take me a little while ‘cause there’s quite a bit
00:06:49 –> 00:06:57 of clay here, but let me go for a while longer and I’ll show you what it looks like a little
00:06:57 –> 00:06:59 further on down the road.
00:06:59 –> 00:07:05 Okay, so now we’re a little bit further along, we’re not quite done yet, I can see
00:07:05 –> 00:07:11 that my Yellow was a lot softer than my Fuchsia in this case, and so the Fuchsia is kinda
00:07:11 –> 00:07:16 getting lost along the edge here, I’ll keep going and see what happens, I can always add
00:07:16 –> 00:07:20 just a little strip of Fuchsia to this side if it looks like I’m losing it too much.
00:07:20 –> 00:07:25 But I’ll keep blending until it’s no longer streaky like this and you can see the Rainbow
00:07:25 –> 00:07:28 starting to happen, alright, so I’ll keep going.
00:07:28 –> 00:07:37 Okay, I was right, this Yellow is dominating, not because it’s a stronger color, just
00:07:37 –> 00:07:43 because it was a lot softer, anyways what I can do… and this is part of what you do
00:07:43 –> 00:07:49 with Polymer clay, is you learn to adjust a little, I can take a little snake of Magenta
00:07:49 –> 00:07:55 (Fuchsia) and just add that to the side here, and what that will do is just fix that up
00:07:55 –> 00:08:03 again as I blend it, so I’ll go and do that again, so you can just fold that right in
00:08:03 –> 00:08:05 there.
00:08:05 –> 00:08:09 Now another thing that can happen is…now this isn’t too bad, but these edges can
00:08:09 –> 00:08:15 come out of alignment, just kinda yank…oop, yank that one up a bit, and kinda pull up
00:08:15 –> 00:08:21 the corners and get them lined up a little bit more and that’ll help, so I’ll run
00:08:21 –> 00:08:24 that through a few more times and then we should be good.
00:08:24 –> 00:08:29 Alright, so we’re pretty close here now, and as you can see, the blend has gotten wider
00:08:29 –> 00:08:36 and wider, and I’ve done this in a previous video before, but what you can do when your
00:08:36 –> 00:08:43 blend gets too wide, you can either roll it or fold it up a couple times like this, and
00:08:43 –> 00:08:50 like that…try not to trap any air in there, and then we can just squish it up, pushing
00:08:50 –> 00:08:55 in from end to end and then that will control the width of your blend, so that you don’t
00:08:55 –> 00:08:58 have one coming off of the side of your machine.
00:08:58 –> 00:09:07 So, that’s how you do a Rainbow Teardrop blend, let me just run it through one last
00:09:07 –> 00:09:08 time here, I’ll show you…
00:09:08 –> 00:09:23 now that I’ve shortened it up, control it on the side, there you go, isn’t that cool?
00:09:23 –> 00:09:29 So I hope that was helpful for you, if it was, do let me know if you liked this video,
00:09:29 –> 00:09:31 and don’t forget to leave me a comment.
00:09:31 –> 00:09:37 If you have suggestions, if you have products you’d like me to test or if you are having
00:09:37 –> 00:09:42 trouble with any kind of technique that you’d like me to do a video on, do let me know in
00:09:42 –> 00:09:43 the comment section below, alright?
00:09:43 –> 00:09:46 So we’ll see you next time and bye for now.
Our goal is to translate these videos into as many languages as possible. If you are interested in helping with this initiative, then please do contact us and we will figure out a way to make it worth your while :)
Resource Links:
- Related Video: Lietz Teardrop Blend – Color Gradients Made Easy
- Related Video: Is Your Skinner Blend or Teardrop Blend Too Wide?
- Related Video: How To Make Long Skinner Blends or Teardrop Blends
- Related Video: Square Polymer Clay Rainbow Cane Skinner Blend Plug
- Related Video: Teardrop Blend – No Pasta Machine
Resources marked with a double ** asterisk are affiliate links. If you click on them and decide to buy something, we may receive some compensation. This does not affect the price you pay in any way. What it does do, however, is helps us to continue providing free videos for you, here at the PcT website. Using our links to purchase your tools and supplies, is always greatly appreciated.
Sponsored Ads & Special Promotions
Shareable Images


To share this full blog post anywhere on the web that allows links in comments, here's a shortened url to copy and paste...
>> https://mypct.ca/v518 <<
Want to chat about today’s post? That’s what the comment section below is for. Scroll Down… We’d love to hear from you!
Or... if you would like to request a topic for a future post, here is the link to do that… PcT Suggestion Box
Hi Cindy!
Have been immersing myself in your rainbow blend tvideos lately, though have not actually done one yet, But they brought to mind the way I learned to remember the sequence of colours in the rainbow. I thought it might give you and some other members a smile or a trip down memory lane. Here goes:
Richard Of York Goes Battling In Vain.
I don’t remember enough history to know whether Richard did go battling in vain….but I never get my rainbow order mixed up!
Today’s blending/shift is sooooo cool!
Do you have that video for the Rainbow Flowers yet?
I cannot wait to see this one!
Hi Christine, no I don’t have a tutorial for the extruded rainbow flowers yet, but I will be doing a free one fairly soon, so stay tuned for that!
I really like the mini tut. I was recently talking with a Calyer who said she sometimes takes the Skinner Blebd in the early stages, folds it over and twists it. She felt it shortened the process. Now I am ot a purist who measure or weighs clay for skinner blends. But , I also do not like mud and the concept make me a little nervous. I am all for short cuts but have never heard of this technique. Has anybody else tried this twisting during the Skinner or teardrop blend process?
Hi Anna, In theory that would work, but like you are worried, it is harder to control and to make sure your colors are moving out of alignment. If you were using just two colors and you weren’t that worried about having a perfect blend, then it might be one way to go. Though I think the Teardrop method is pretty quick and gives a perfect blend… so I don’t know if twisting it would be an improvement or not.
Glad to hear that this teardrop method, color blending info was helpful for you Cyndee. Thanks for letting me know :-)
Thank you 4000 times! I looked forever for blending techniques and when i finally found you i was ecstatic. I am independent earring designer and struggled with making good clay beads. You are my new hero!
Hi Joanne, if you are speaking of the small canes with several mini flowers… then yes I do have a tutorial here:
Super Easy Extruder Flower Cane
If you are referring to the rainbow flowers… then, not yet but soon!
Hi in your video about the extruders you show an extruded mini flower cane. Do you have a tutorial on this?
Jo
I would love to see how you made those extruded flowers using your teardrop blend.
Hi Deborah I’ll be showing you guys those extruded flowers soon.
wow ;that really helped me “see” what I was doing wrong, part not controlling the width and part not going long enough because it looked less then perfect and because sometimes my clay got to small. I guess I need to use more clay as I am still having a hard time figuring how much clay to use. Thank you so much I feel that was made just so I could understand it
You are more than welcome Beverly! Happy to help clarify things a bit for you! Just so you know, you don’t have to use much clay at all to do any blend. Just control the width and you can blend even tiny amounts of clay.