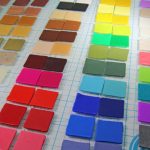
Raw vs Baked Color Shifts Premo Sculpey Polymer Clay
Video #692: For the most part, Premo colors are pretty good about not changing colors after they have been properly cured.
More...

IN THIS POST: — baked polymer clay — unbaked polymer clay — raw clay — color shift — color change — polyform — premo sculpey – translucent — transparency — opacity — opaque — raw vs baked — darkening — clarity — 2015 — new colors — premo — discontinued premo colors — (Topics marked with an asterisk* are discussed in the Comments Section below).
In this video, I will go through all the Premo Sculpey Polymer Clay Colors, and show you show the differences between raw versus baked samples.
Some polymer clay colors change when baked… we often refer to this as color shift. Each brand is different as to how much color shift can occur after baking, as well as each color within a brand.
I thought I would show you every single color in the current Premo Sculpey line, so you can see a side by side comparison of each color and how they look when cured.
You will see that some colors don’t shift at all, where others get darker or more translucent. Knowing this about the colors you use, will yield more predictable results with your polymer clay projects.
I hope to do similar videos of other polymer clay lines in the future.
00:00:03 –> 00:00:07 Hi guys, its Cindy Lietz, your Polymer Clay Tutor, and today’s Studio Tip, we’re talking
00:00:07 –> 00:00:14 about the color shifts that can happen between a raw piece of clay and a baked piece of clay,
00:00:14 –> 00:00:17 and we’re specifically talking about the brand Premo!
00:00:17 –> 00:00:23 Now, a little while ago, I introduced to you some of the new colors for Premo!
00:00:23 –> 00:00:30 Polymer Clay, and I had shown some baked and some raw samples comparing each other, and
00:00:30 –> 00:00:35 a lot of people appreciated that, so I thought I would do it for the whole Premo! line, and
00:00:35 –> 00:00:39 maybe in the future, I can do other lines as well, ‘cause there is a bit of a difference
00:00:39 –> 00:00:42 between some of the colors when they’re baked.
00:00:42 –> 00:00:46 Alright, so I have them all out here.
00:00:46 –> 00:00:51 Now, I had started putting them together in the center and ran out of space, and had to
00:00:51 –> 00:00:56 jump back, so I am gonna start in the middle which seems a little strange, but I wanted
00:00:56 –> 00:01:04 to start with these regular colors first, and I’ve got two rows of each color, the first
00:01:04 –> 00:01:08 row here is raw and the second row is baked.
00:01:08 –> 00:01:13 Now, I’m gonna name each color so that you know which color it is, and then you’ll be
00:01:13 –> 00:01:16 able to see whether there’s much of a color shift or not.
00:01:16 –> 00:01:23 Now, the first four colors here, there’s very little color shift, this is White, Black,
00:01:23 –> 00:01:32 Ecru and Raw Sienna, now with the Burnt Umber, you can see the baked sample is a little darker
00:01:32 –> 00:01:39 and there’s a lot of difference between…this is the color Beige, now Beige has a lot of
00:01:39 –> 00:01:44 Translucent in it, it was kinda meant for doll making, and you can see anything that
00:01:44 –> 00:01:49 has a lot of Translucent in it will have a milkier look when it’s raw than when it’s
00:01:49 –> 00:01:54 baked, and then when you hold it up to the light, you can see that there’s a lot of light
00:01:54 –> 00:01:59 that can shine through it, so you can tell it’s more Translucent in color, and Beige
00:01:59 –> 00:02:01 is very Translucent.
00:02:01 –> 00:02:06 Now the next two colors here have a bit of a color shift as well, they have both gone
00:02:06 –> 00:02:13 darker, this is Alizarin Crimson and this is Fuchsia, those two colors tend to do that,
00:02:13 –> 00:02:17 they tend to be a little…they tend do to a bit of a color shift.
00:02:17 –> 00:02:23 Now the next 4 colors have almost no color shift at all between the raw and the baked,
00:02:23 –> 00:02:31 so this is Cadmium Red, Pomegranate, Blush and Orange.
00:02:31 –> 00:02:37 Now we’ll go over here to this row, the two Yellows here at the top do have a bit of a
00:02:37 –> 00:02:43 color shift, this is Cadmium Yellow and Zinc Yellow, and you can see both of them have
00:02:43 –> 00:02:49 gotten a little bit darker, Cadmium Yellow is pretty close, but Zinc Yellow does go a
00:02:49 –> 00:02:50 little darker.
00:02:50 –> 00:02:58 The next three colors have almost zero shift, and this is Sunshine Yellow, Wasabi and Spanish
00:02:58 –> 00:02:59 Olive.
00:02:59 –> 00:03:06 Now there is quite a bit of a color shift here with the Green, it also has a fair amount
00:03:06 –> 00:03:13 of Translucent in it, and you can see that if you hold that up the light, it is more
00:03:13 –> 00:03:20 kind of a 50-50 kinda translucency to it, not as translucent as say the Beige was, but
00:03:20 –> 00:03:26 it does have a bit of a color shift there, so that’s…you’re gonna need to take that
00:03:26 –> 00:03:29 into consideration when you’re doing color mixing and that kind of thing.
00:03:29 –> 00:03:35 Now the next one has almost no color shift, and this is Jungle.
00:03:35 –> 00:03:41 The next one is Turquoise, and you can see here, it has shifted in color, it’s gotten
00:03:41 –> 00:03:47 a little bit darker and a little bit Greener, this one has a little bit more of a Baby Blue
00:03:47 –> 00:03:56 look to it, it’s really subtle, not a big difference, but I can see the difference,
00:03:56 –> 00:04:00 and this one’s very opaque, so it’s not a translucency issue with that one.
00:04:00 –> 00:04:06 Okay, the next one here is Ultramarine and it gets darker, and it’s another one like
00:04:06 –> 00:04:13 that Green one that has a bit of Translucency to it, kind of a 50-50 type thing.
00:04:13 –> 00:04:18 And the next one here is Cobalt Blue, and Cobalt Blue has very little shift.
00:04:18 –> 00:04:22 The next one is Periwinkle…I had to think about that for a second ‘cause that’s a
00:04:22 –> 00:04:27 brand new color, and there’s almost no shift of all.
00:04:27 –> 00:04:34 Purple is…gets darker, and it’s a little bit similar to the Ultramarine, it has a bit
00:04:34 –> 00:04:39 of translucency to it, not quite as much as the Ultramarine but a bit.
00:04:39 –> 00:04:45 Now let’s go back up here, this is the brand new Wisteria, now Wisteria has zero color
00:04:45 –> 00:04:46 shift at all, I don’t…
00:04:46 –> 00:04:52 really can’t see a difference other than it’s a little shinier when it’s raw.
00:04:52 –> 00:04:57 This is Rhino Gray and there’s also no shift there.
00:04:57 –> 00:05:03 Now these two are the Translucents, there used to be more Translucents…they’re down
00:05:03 –> 00:05:07 here, I’ll talk about them in a minute, but they’ve been discontinued, but the two Translucents
00:05:07 –> 00:05:14 that they still carry are Regular Translucent and White Translucent, when they are raw…and
00:05:14 –> 00:05:18 in a small chip like this, you can’t see a huge difference between the two, when they’re
00:05:18 –> 00:05:24 in a large one pound block, you can see it, the Regular Translucent is a little more Yellow
00:05:24 –> 00:05:29 and the White Translucent is more White, and I’ll show you that up here by the light, and
00:05:29 –> 00:05:34 hopefully you’ll be able to see that the Regular is a little more Yellow than the White, they’re
00:05:34 –> 00:05:42 about the same in translucency…and Translucent clay does not mean it’s see through, it just
00:05:42 –> 00:05:46 means that light can go through it…unless it’s like paper, paper thin and then you can
00:05:46 –> 00:05:48 see through it pretty good.
00:05:48 –> 00:05:54 Alright, so these next colors here are the Pearls, and there isn’t a huge difference
00:05:54 –> 00:05:59 at all between the color shifts, the only thing that you’ll notice a little bit of a
00:05:59 –> 00:06:05 difference on between a baked Pearl and a raw Pearl is that they seem a little bit more
00:06:05 –> 00:06:09 sparkly, I don’t know if it just brings out the sparkle a little bit more when they’re
00:06:09 –> 00:06:10 baked.
00:06:10 –> 00:06:19 This is Pearl, just plain old Pearl, this is the new Sunset Pearl, this is Bright Green
00:06:19 –> 00:06:24 Pearl, Peacock Pearl, Purple Pearl and Graphite Pearl…and this is the new Graphite Pearl
00:06:24 –> 00:06:28 and it’s quite a beauty, all the Pearls are lovely they have a lot of Mica powders and
00:06:28 –> 00:06:29 things in them.
00:06:29 –> 00:06:34 Now we’ll jump back over to this side, these are the Metallics.
00:06:34 –> 00:06:41 Now the Metallics are basically exactly like the Pearls, they have Mica powders in them,
00:06:41 –> 00:06:46 and they are very…there’s like basically no color shift other than they seem to get
00:06:46 –> 00:06:50 a tiny bit more sparkly when they are baked.
00:06:50 –> 00:07:00 This is Silver, Bronze, Copper, Gold, 18 Karat Gold and Antique Gold…so Golds are…there’s
00:07:00 –> 00:07:03 a lot of Golds in this line here.
00:07:03 –> 00:07:10 Now these are two specialty clays, they are…they have inclusions in them, so they have little
00:07:10 –> 00:07:17 bits of stuff in them, this is Gray Granite…and there used to be a White Granite and a Blue
00:07:17 –> 00:07:23 Granite as well, but those have been discontinued, the Gray Granite has a bit of translucency
00:07:23 –> 00:07:27 to it, but because there’s so many little particles in there, it’s not exactly see through,
00:07:27 –> 00:07:33 but there is a lightness that can get through it and it also helps show all those little
00:07:33 –> 00:07:37 bits when the translucency…when it’s baked.
00:07:37 –> 00:07:43 And then this is Opal, Opal has a very big difference between the two, this is raw and
00:07:43 –> 00:07:50 baked, Opal has much more translucency to it once it’s baked…I’ll lift it up here,
00:07:50 –> 00:07:56 you can see there’s a lot of light that can shine through it, but it also really helps
00:07:56 –> 00:07:59 with being able to show all those rainbow-y layers.
00:07:59 –> 00:08:10 Now the last row here is all the Glitters, now the Glitters are… some of these Glitters
00:08:10 –> 00:08:16 here seem to have a fair amount of translucency to them, but because they’re so full of glitter,
00:08:16 –> 00:08:24 they’re not really that transparent, but it does make the glitters really show…it makes
00:08:24 –> 00:08:30 the clay once it’s baked, it’s much more sparkly when it’s baked than when it’s raw.
00:08:30 –> 00:08:39 This color here is White Gold, this is Rose Gold and this is Yellow Gold, so White Gold
00:08:39 –> 00:08:42 Glitter, Rose Gold Glitter and Yellow Gold Glitter.
00:08:42 –> 00:08:49 And then this one is Red Glitter, Green Glitter, Blue Glitter and Twinkle Twinkle, now these
00:08:49 –> 00:08:55 ones here you can see are a little darker, especially the Green and the Blue, but the
00:08:55 –> 00:08:57 others are pretty close to the same color.
00:08:57 –> 00:09:04 Now, lastly, these are the most recent colors to be discontinued, I did mentioned in the
00:09:04 –> 00:09:13 previous video that Denim and Navy were discontinued, but at the time, I didn’t realized that the
00:09:13 –> 00:09:15 Translucents were also discontinued.
00:09:15 –> 00:09:21 So this is the Blue Translucent and the Green Translucent, of course, they really show light
00:09:21 –> 00:09:27 through them…let me just pick this one up, see that, and they’re all like that, the Blue,
00:09:27 –> 00:09:30 the Green, the Red and the Yellow.
00:09:30 –> 00:09:36 But you can make your own translucent tints if you like by just adding a little, tiny,
00:09:36 –> 00:09:44 tiny, tiny pinch of one of the opaque colors into one of the translucent colors.
00:09:44 –> 00:09:52 And then with the Navy, you can see, when it’s baked, it is very, very close to the
00:09:52 –> 00:10:00 Ultramarine, the only difference is it’s got a little bit more Black in it, so you can
00:10:00 –> 00:10:07 add a little pinch of Black to the Ultramarine to get them to match up pretty close to the
00:10:07 –> 00:10:15 same, in fact it’s about 20 parts of Ultramarine to one part Black, except for if you’re using
00:10:15 –> 00:10:19 it in a recipe and sometimes there’s more Black, and it can get more complicated when
00:10:19 –> 00:10:27 you try to change a color in a recipe that used to have one of the discontinued colors.
00:10:27 –> 00:10:34 And I do a lot of color mixing, and I found that just trying to change the recipes that
00:10:34 –> 00:10:41 had the different colors in it, Denim or Navy was much more difficult than you would think,
00:10:41 –> 00:10:46 so it’s easier for me if they don’t discontinue colors, but as you can see, there’s a lot
00:10:46 –> 00:10:52 of beautiful, beautiful colors with Premo! and most of the colors have very little color
00:10:52 –> 00:10:53 shifting.
00:10:53 –> 00:10:58 Now with some other brands, you’ll see a huge difference in color shifts between raw and
00:10:58 –> 00:11:04 baked, and hopefully I’ll be able to test some other brands as well in the future.
00:11:04 –> 00:11:10 Alright, so I hope that was helpful for you, and if it was, do let us know if you liked
00:11:10 –> 00:11:11 this video.
00:11:11 –> 00:11:17 And don’t forget, we have done tons and tons of videos, we’ve got all kinds of different
00:11:17 –> 00:11:23 subjects on Polymer Clay, so if you have a question that you…just a burning Polymer
00:11:23 –> 00:11:29 Clay question, make sure to search through our channel and all of our videos to see if
00:11:29 –> 00:11:34 we have already answered your question for you, ‘cause chances are, we probably have,
00:11:34 –> 00:11:40 and if not, make sure to leave in the comment section below your suggestion for another
00:11:40 –> 00:11:42 video, alright?
00:11:42 –> 00:11:45 So we’ll see you next time and bye for now.
Our goal is to translate these videos into as many languages as possible. If you are interested in helping with this initiative, then please do contact us and we will figure out a way to make it worth your while :)
Resource Links:
- Related Video: New 2015 Premo Sculpey Colors
- Related Video: Translucent Polymer Clay Brands Compared
- Related Video: Understanding Mica Shifts
- Related Video: Where to Buy Polymer Clay
- Amazon: Sculpey Premo Polymer Clay **
Resources marked with a double ** asterisk are affiliate links. If you click on them and decide to buy something, we may receive some compensation. This does not affect the price you pay in any way. What it does do, however, is helps us to continue providing free videos for you, here at the PcT website. Using our links to purchase your tools and supplies, is always greatly appreciated.
Sponsored Ads & Special Promotions
Shareable Images


To share this full blog post anywhere on the web that allows links in comments, here's a shortened url to copy and paste...
>> https://mypct.ca/v692 <<
Want to chat about today’s post? That’s what the comment section below is for. Scroll Down… We’d love to hear from you!
Or... if you would like to request a topic for a future post, here is the link to do that… PcT Suggestion Box
Hi Chrissie,
We’re up in the Carnarvon-Coral Bay region. No crocs yet fortunately!
Love that area! Have happy memories of holidays there in years gone by. Must get up there again before I’m too old and decrepit :-) Let the crocs stay up Broome way – we don’t need ’em further south!
Thanks for all that info girls! Yes, Chrissie, power could be an issue, as the town is on generators up here. I also think that instead of buying these little “cheapies”, that perhaps I should invest in the Sunbeam as well. And Cindy, while it is true we have a lot of beasties in the bush up here, unlike Canada with bears and big cats, atleast we can wander about for hours…..alone….without getting eaten! Came across 2 kangaroos having a boxing match one morning on my walk, they stopped to look at me, I apologized for the interuption, they resumed their boxing match, and I carried on with my 10km walk.
True about the beasties, Veronica :-) So long as you don’t walk near the salties LOL. Are you in the top end of WA or Qld? I’m in Bunbury, 180ks south of Perth.
The Sunbeam has worked well for a while and when it carks of old age I’ll buy another. They’re reasonably priced and reliable. I’ve only even burned one thing in it and that was when I first started and didn’t know about tenting.Or checking the temp with a thermometer for that matter :-)
I can just about see you out taking that walk in the bush and stopping to apologise for interrupting the roos LOL. Lucky you having the Outback on your doorstep.
Hi Cindy,
Thanks for all that info. I think you’re right about the oven temperature fluctuations. When the green light comes on, it goes down in temp about 5-10 degrees, then when the light goes off, it rises back up to 275 degrees. Which is why when I cook things for 1 1/2 hours, no matter what thickness, it comes out rock hard and fine. But if I only cook things for an hour, then I seem to have the problems. Must try with something thin like a leaf, to see if I get “bendy” after an 1 1/2 hours. I was letting the temp gauges rise to around 280 degrees at one stage, to ensure I hit the mark with the temps for long enough. Thus, then the burning or darkening of the clays started. These convection ovens are cheap, and you know what they say “you get what you pay for”, but this one is a different brand to my other previous “cheapys”. I used to use toaster ovens like you do, but I switched because of the mouse problems we have up here in the desert. They used to get on top of and inside the casing and phew! what a smell when the oven was on! These are little desert mice, cute little critters really, but most disconcerting when you are watching TV and their climbing up the curtains! Aaahh, the joys of living in the Aussie Outback! Mice, snakes, giant prehistoric lizards, and let’s not forget the “Redback under the toilet seat”. Cheers all.
Yikes Veronica! Great stories though… I have heard about the mouse and other pest issues in the Outback but I have never talked to anyone who lives with the problem. I bet it makes for some interesting adventures!!
Yeah the temp spiking is probably your baking problem then. Do watch those videos I mentioned and read the comments below them. There have been some good suggestions from other members who have figured out some good solutions. I have a memory of one member, Jocelyn I think, that lined her oven with small stones to help stabilize the temp. Maybe something like that would work for you? You could also bump up the temp a bit and bury everything in a bed of cornstarch or baking soda (there are videos on that as well). That would help protect your pieces from the highs and lows.
Sounds like you have a little more experimenting to do before you get the perfect results, but once you do,it should be smooth sailing from then on. Good luck! Do let us know how it goes…
Ah, didn’t realise you were out bush, Veronica. I saw your question and was looking for an answer as I didn’t know what could be causing it either.
Living in a remote area I wondered if this may affect the consistency of power supply and this, in turn, be affecting your oven’s temp? I know that when we lived in a small country town in WA with it’s own power station, the power used to fluctuate quite a lot. My husband worked for the State Electricity Commission so he borrowed a device that plugged into a power point and it registered the variations. They were a long way both sides of the 240V regular output. Is it possible that under power and over power could be affecting your oven and the poor little thing can’t cope? Anyway, just a thought. I now live in town and have power off the state grid so it’s stable and my little Sunbeam has no problems… but I use two thermometers all the time to be sure :-)
Sorry, but I don’t know what to say about your clay being brittle. I would like to hear the response to that part of your question.
I can help you with your whites and other colors darkening. Cindy has a discussion on bleaching baked polymer clay. It really works. Not only will your whites be white again but your colors will be brighter.
Thank you Susan for reminding everyone of this info!
Hi, There is a bit of confusion about Premo baking time. Some suggest going up with the temperature, but on Sculpey site they strongly advice against it due to health reasons. What is your take? What is the correct time and temperature to bake Premo?
Leanna, Cindy and Doug are quite busy building a new website so I popped in to try and answer your question. If I’m wrong they can pop in when they have time :-))
If you type “baking time” in the Search box near the top right of the page you will find several references to answer your question about baking time as this has been asked before.
As for baking temperature, always follow the manufacturer’s instructions written on the packet of clay. With Premo it is 275° F.
Hope this helps you,
Chrissie
Thank you for the help Chrissie!
Hi Leanna,
Snap! I too am having problems. Just finished baking some cornflowers. Not only has the clay darkened, but it is brittle. I baked at exactly 275, with 2 different brands of thermometers inside, and I baked for 1 hour and 10 minutes. Usually I bake everything (especially beads) for an 1 1/2, with no problems with things being brittle – they come out hard as a rock. I avoid whites because I can’t get white! They always burn, whether I tent or not. I baked yellow flowers the other day, and their came out a “dirty” yellow colour. I use a convection oven for my baking. I had heard that unless your oven reaches the desired temperature – 275, then it will break and will be brittle. But Cindy (hope you chime in here Cindy), quite often says “bake Premo between 265-275”. And in many of Cindy’s demos, you can see her bend these very thin pieces without them breaking. I have never been able to achieve this – they are either brittle or rock hard!
Hi Veronica, your baking issues sound strange. The brittle part doesn’t make sense when it sounds like you are doing the right things… maybe I better ask you a few questions?
Are you using all Premo or is there a mix of other brands?
What brand of oven are you using? Is it a small roster oven or a larger one?
Are you baking on an insulated surface with cardstock?
Are you tenting? Is your shelf too close to the element?
Where are your oven thermometers placed?
Is your oven dirty?
Hi Cindy,
I only use Premo. I have always used these turbo-type convection ovens and I use an MDF round mat on the floor of the oven, with baking paper on top. I burn whether I tent or no tent and always use 2 thermometers, one at the front and one at the back. Cleaning the oven each time so that I can read the temps thru the glass. This is a different brand of oven than my other one – which could be the problem. Or perhaps I do not condition the clay enough before I use it, or because some of my clay is a little old. I cooked leaves last nite for an hour and watched to make sure 275 degrees was achieved. Coming out brittle, I recooked and let the gauge tipple just over 275 degrees, and when they came out, they were “bendy” but bending too far still made them snap. I think I’ll have to just keep experimenting with this oven using “tester” pieces. Thanks Cindy.
Hi Veronica, the bendy is a good sign, but the fact that it is burning and still breaking means a couple of things to me. I think that your pieces may be burning because your oven is spiking in temp sometimes but that they are not quite curing because the temp doesn’t stay at 275F for long enough.
Basically I think it is going high then low, then high then low. Oven thermometers are notoriously slow to read the temp and yours are probably just reading the average temp and missing the highs and lows. An instant read thermometer would probably show this happening.
I have a video or two that talks about temp fluctuation. For an older toaster oven I had that did those highs and lows, I used to line the bottom and the shelves with ceramic tiles to keep the temp more stable.
If you use the search box you should be able to find those videos and fix your issue. Good luck! Let us know how it goes…
Thanks again for a great video Cindy and Doug.
Thank you Lawrence! Did you have a good time at Carol Simmons workshop?
Great info. Allways better when we see at least for us visual girls. Thank you a lot!
Can’t wait till Tuesdays they allways make my day!
You are so Welcome Hermine! Thanks for commenting!
The minimal colour change is another good reason to stay with Premo. Thanks for taking the time to make and bake all the colours, Cindy and thanks Doug for your usual excellent filming. No need to peer with nose on the screen when Doug’s on the job :-)
Thanks Chrissie! You are exactly right about Premo being a good place to be. I will be doing more color tests with other brands as well so everyone can see how different all the clay brands are.
Suggestion: I have a pantone color book. It looks a lot like paint strips in the hardware store. My book is held together with a simple ring which allows for adding or removing the color strips. Ever think of putting together a similar book for clay colors and final baked colors?
Hi Linda we are working on some new ways to work with our color recipes, stay tuned…
My thought while looking at the ones that were darker when baked is what to mix with the unbaked to make it look the same as the original after being baked. My first thought was add white, but wondered what a good color mixer like you would say.
Hi Freda, adding white can work but you have to be careful that you don’t turn the color pastel. It is a tricky balance. It is something that you have to play around with. That’s good thinking though.
Cindy, thank you so much for this very needed comparison, So appreciate you taking the time to do it and many of the little tips included.
Hi Jocelyn, I have missed you! How are you Sweetie? So good to see your comment.