Reducing Square Polymer Clay Canes (Mini Tutorial)
Video #476: You can make them as small as you need… right down to teeny tiny.
More...

IN THIS POST: —cane slicing — cutting — reducing — conditioning — scraps — waste — canes — canework — reducing canes — square canes — acrylic roller — reduce canes — millefiori — cane reduction — (Topics marked with an asterisk* are discussed in the Comments Section below).
Topics Covered In This Video:
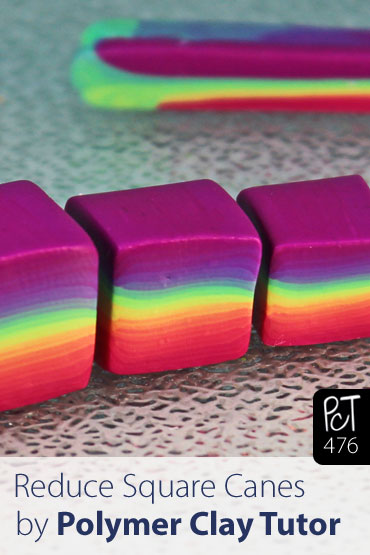
- Square polymer clay canes or Skinner Blend Plugs can be reduced to fit whatever size project you are working on.
- Polymer clay canes that have been sitting for a few days may be stiff and need to be warmed up and loosened a bit to avoid cracking when reducing.
- Wiggle, compress and warm cane in hands to help clay move better.
- An acrylic sheet and rollers will help with cane reduction.
- Press cane on sides with acrylic sheet, to square up cane sides.
- Gently and evenly roll each side, flipping on quarter turn after each roll.
- Cut sections of cane at various sizes.
00:00:03 –> 00:00:07 Hi guys, its Cindy Lietz, your Polymer Clay Tutor, and in today’s PcT Mini Tute, I’m
00:00:08 –> 00:00:13 gonna show you how to reduce a square Polymer clay cane.
00:00:13 –> 00:00:18 Now in a previous video, I showed you how you can make one of these Skinner blend plugs
00:00:18 –> 00:00:23 or canes, and in this video, I’m gonna show you how to reduce it to a smaller size and
00:00:23 –> 00:00:24 we can use it for other types of projects.
00:00:24 –> 00:00:28 That’s the cool thing about Polymer clay, is you can stretch it and do all sorts of
00:00:28 –> 00:00:29 cool things with it.
00:00:29 –> 00:00:34 So, I’ve done this a few days ago and it’s kinda stiff, so the first step is to just
00:00:34 –> 00:00:39 sorta wake up the cane, you can do this by kinda holding it in your hands, making sure
00:00:39 –> 00:00:45 that it’s warming up, you can also just kinda grab it by the ends and twist it a little
00:00:45 –> 00:00:46 bit.
00:00:46 –> 00:00:53 And all that does is kinda wakes up and gets those oils and things moving in the cane.
00:00:53 –> 00:00:57 So that it’s not so stiff and cold and hard to work with.
00:00:57 –> 00:01:01 Then what you can do…and you can do the whole process with your hands, but these tools
00:01:01 –> 00:01:07 here will really help, one thing you can use is a piece of acrylic…this just came with
00:01:07 –> 00:01:12 my bead rack, but a piece of really thick glass might work, or something along that
00:01:12 –> 00:01:18 line, and I like to be able to see through it ‘cause it helps to see your cane.
00:01:18 –> 00:01:26 But what I like to do is push right down, straight down and get this cane waking up
00:01:26 –> 00:01:32 and reducing in this way, you’re keeping the edges all square and then you can turn
00:01:32 –> 00:01:34 it again.
00:01:34 –> 00:01:40 And because I’m only pressing from the sides and not the ends, the cane will actually start
00:01:40 –> 00:01:47 to lengthen rather than…it’s just gonna start to lengthen ‘cause I’m going from
00:01:47 –> 00:01:52 each side like that, so that’s one way to get going with that.
00:01:52 –> 00:02:00 Another thing you can do is you can use a roller like an acrylic roller…rod, you can
00:02:00 –> 00:02:05 do a few things, if the cane is very, very stiff and cold you can actually hammer it
00:02:05 –> 00:02:09 with your rod, and just go down the length of the cane, so you’d go… and do it evenly,
00:02:09 –> 00:02:12 so: Tap, tap, tap, tap, tap.
00:02:12 –> 00:02:13 Tap, tap, tap, tap, tap.
00:02:13 –> 00:02:20 Tap, tap, tap, tap, tap, trying to keep the whole movement the same all the way down,
00:02:20 –> 00:02:25 this will also kind of jiggle things up and get it moving as well.
00:02:25 –> 00:02:30 Now, when it feels like it’s warm enough, and it feels like it’s a little bit looser,
00:02:30 –> 00:02:34 and it might start doing something for you without cracking, then what you can do is
00:02:34 –> 00:02:36 you can start to roll it.
00:02:36 –> 00:02:37 So…
00:02:37 –> 00:02:40 I’m just going to try not to get my hands in the way, but what you can do is roll it
00:02:40 –> 00:02:48 down the length that you want it to go, turn it a quarter turn, roll it down, trying to
00:02:48 –> 00:02:55 keep it even in your pressure and making sure that it’s even all the way.
00:02:55 –> 00:03:01 Now what can happen is, is nobody rolls perfectly even, so if you turn it around so that you’re
00:03:01 –> 00:03:06 rolling from this direction this time, it’ll be a little bit more even down the length
00:03:06 –> 00:03:14 of the cane, so you can do this, and keep going until you have the cane the size that
00:03:14 –> 00:03:19 you like, and then I would switch it around, keep going.
00:03:19 –> 00:03:25 If you find that it’s getting off square…it’s no longer square anymore, you can press it
00:03:25 –> 00:03:32 down again with your acrylic block, and just kinda make sure that it’s square and staying
00:03:32 –> 00:03:33 quite even.
00:03:33 –> 00:03:39 Sometimes the front will get a little bit off, you can square it up just like that,
00:03:39 –> 00:03:45 and just… the more often you do that, the more it’ll stay in line the whole time you’re
00:03:45 –> 00:03:50 workin’ on it, you can also use a brayer like this, this is an acrylic brayer, and
00:03:50 –> 00:03:59 you can work it the same sort of way, going down the full length.
00:03:59 –> 00:04:05 Or you can do this whole process just by hand, so you can kinda squeeze in from the sides
00:04:05 –> 00:04:12 evenly, pulling and twisting a little as you go, do it again here.
00:04:12 –> 00:04:20 Now I can feel that this Fuchsia clay was probably a little stiffer than some of the
00:04:20 –> 00:04:24 other colors at this end here, because it’s not moving as fast, and you can see it’s
00:04:24 –> 00:04:31 kinda holding in, it’s not stretching out as nicely, so I may want to focus on warming
00:04:31 –> 00:04:37 that side up a little bit more than some of the other sides ‘cause it doesn’t want
00:04:37 –> 00:04:44 to move quite as easily as the other ones, and that happens with age of clay and all
00:04:44 –> 00:04:50 that kind of stuff But as I keep going, I can pull it and twist it, continue to roll
00:04:50 –> 00:04:57 it, I can get it right down to a smaller size, so I’m gonna continue to do this for a few
00:04:57 –> 00:05:05 more minutes, and come back and show you how it has come down in size.
00:05:05 –> 00:05:10 Now before I go too much further along here, one tip I always recommend is to save a few
00:05:10 –> 00:05:17 different sizes of the same cane, so I’m gonna take a piece off here.
00:05:17 –> 00:05:22 And here’s this cane as it’s coming along, and I’m gonna continue to reduce this and
00:05:22 –> 00:05:27 show you all the different sizes and how tiny it can get down to, so I’ll go and come
00:05:27 –> 00:05:31 back, and I’ll be cutting off sections of the different sizes as I go along.
00:05:31 –> 00:05:37 Okay, I think I’ve got this down as small as I’m gonna go today, now isn’t this
00:05:37 –> 00:05:39 so cool about Polymer clay?
00:05:39 –> 00:05:44 We had a little bit larger cane to start off with, and I was able to reduce it down, and
00:05:44 –> 00:05:49 take a piece off each time I reduced it, until we got smaller and smaller and smaller and
00:05:49 –> 00:05:54 smaller all the way down to this teeny tiny little rainbow here, and the full pattern
00:05:54 –> 00:06:00 is still there, and I could possibly go even a little bit further.
00:06:00 –> 00:06:05 Now, because I was very even with the rolling and the pressing and everything of it, it
00:06:05 –> 00:06:13 stayed square and true, and I have very, very little waste at the end here, so all I have
00:06:13 –> 00:06:17 is less than an inch here where, if I was to slice through it, I’d be missing out
00:06:17 –> 00:06:22 on some of the Purple, as it sorta ran out on this end, and on the Fuchsia end here,
00:06:22 –> 00:06:29 it was starting to run out here too, so very, very little waste, and I could get just tons
00:06:29 –> 00:06:32 of beads out of this particular cane.
00:06:32 –> 00:06:38 So I hope you enjoyed that, I’d love to hear if you liked this video or not.
00:06:38 –> 00:06:43 And also, if you have any suggestions for future videos, or things that you would like
00:06:43 –> 00:06:48 me to teach you, make sure to let me know in the comment section below.
00:06:48 –> 00:06:50 So we’ll see you next time and bye for now.
Our goal is to translate these videos into as many languages as possible. If you are interested in helping with this initiative, then please do contact us and we will figure out a way to make it worth your while :)
Resource Links:
- Related Video: Square polymer clay canes
- Related Video: Making Long Skinner Blends & Round Skinner Blend Canes
- Related Video: Polymer Clay Skinner Blend Instructions
- Related Video: Lietz Teardrop Blend Color Gradients Made Easy
- Related Video: How To Reduce Polymer Clay Canes
Resources marked with a double ** asterisk are affiliate links. If you click on them and decide to buy something, we may receive some compensation. This does not affect the price you pay in any way. What it does do, however, is helps us to continue providing free videos for you, here at the PcT website. Using our links to purchase your tools and supplies, is always greatly appreciated.
Sponsored Ads & Special Promotions
Shareable Images


To share this full blog post anywhere on the web that allows links in comments, here's a shortened url to copy and paste...
>> https://mypct.ca/v476 <<
Want to chat about today’s post? That’s what the comment section below is for. Scroll Down… We’d love to hear from you!
Or... if you would like to request a topic for a future post, here is the link to do that… PcT Suggestion Box
I sliced some cane about a month or two ago but didn’t bake it or put holes in it at that point as I didn’t know what they wanted to be when they grew up. Now I want some buttons and some earrings but they crack when I try to put holes in them. what can I do, anything?
Thank you! Love your vids!
Lisa
Hi Lisa, you can drill holes for buttons after they are baked, which I prefer anyway since it leaves a cleaner hole. Try that and see if your problem is solved.
I hadn’t thought of that! Thank you! I will try it!
Your videos are really clear and helpful. There’s nothing like seeing the process in action!
I continue to enjoy your tips. Besides, you also teach us patience. Thank you.
Hi, Cindy.
Thanks for the video lesson. Question: what material are you using on top of your marble that you are rolling your polymer on? Why not just use the marble?
Hi Susie!
Think I can help you out. I went to the search box in the upper right corner and typed in “teflon mats” and found a number of helpful links here on this product, which Cindy profiled in an earlier blog.
Here is the link to the blog post:
Studio Work Surface Mats – 3 Brands Compared
Jan 14, 2013 … Video #335: Each of the different mat surface products has plus’s and … Walmart sells a mat for use in the oven, it’s called a teflon baking mat.
There are also more links to various surfaces throughout the blogs and comments which you can access by using the search facility using terms like “teflon mats” or “working surfaces” or like terms.
The site is loaded with helpful info, both from Cindy and others.
Hope this helps, have a great weekend.
Thanks for the info, Jocelyn! :-)
Jocelyn was right Susie about the mats! Also there are a couple of reasons why I don’t just use the marble directly…
First, the marble is porous and has veins on it that leave marks on the back of the clay and absorb any inks, paints, etc that I use on the clay. The mats make it easy to clean up.
Second, the marble has a very busy pattern that would make it difficult for you to see what I am doing in the videos. The mat makes a nice neutral and even backdrop so that you can focus on the clay.
Hope that helps!
Cindy, isn’t that beautiful stone surface in your work area puddingstone? We have some naturally nearby in Massachusetts. You have an awesome sample.
I don’t know if the stone is puddingstone or not Jocelyn. They are a couple of the extra tiles from when the previous owners of our house, put in a new fireplace surround. I always thought they were marble, but maybe they are puddingstone?
That’s funny that you should mention that stone on the very day I took it out of my studio. I ended up moving my new Convection oven off my desk and onto a metal cabinet across the room.
The fan was blowing stinky clay air in my face and the power cord was kicking off all the time. Then I read on the cord that it needed to be plugged directly into a wall socket and not into a power cord, which was why it kept kicking off. So I moved it to the only place close enough to a wall socket. Although it is not as close at hand as it used to be, I do like having it out of the way.
Then with all that extra room on my table, I just felt the tiles were in my way too and kind of made the space look busy. So I took them out.
(Bet you weren’t expecting such a long answer to such a short question! LOL)
I didn’t know how you all were doing the avatars, but I hadn’t slowed down long enough to find out! Thanks, Dixie Ann! I had to post to see how it looks. LOL Only thing is, it would never do the one I really wanted. I’m not sure what was up with that.
Cindy, your tutes are always so clear! Now, I need to make a square cane so I can reduce it!
Whoa!!! How ’bout that? There I am! :-D
Yes you are and just as cute as ever!
Cindy this video is amazing. It is always thrilling to watch how poly clay can morph from one shape to another just by using a few simple steps. But you have to know what steps and how to apply them, so this demo is perfect.
I agree with Dixie, the square rod technique is much harder than the method you’ve shown. At least for me.
I so appreciate the fact that you used clay that had rested for a day, so we could see how to make older canes move into the shapes needed. It’s always easier when the clay is fresh, it’s the warm up that’s tricky.
I also love the new hairstyle, it reminds me of the Dorothy Hamill bob.
I wore that style for years in the seventies and eighties. Looking at how well it complements you, I may change it up this spring. Then I can put the cloth scrunchies into storage, lol.
So now of course Doll you are going to post a picture of your before and after hair bob right? We need everyone to go to Gravatar.com sign up and upload their photo. It is so much nicer when you can “see” who your having a conversation with. So whether your a Library Member or just like visiting our blog, please take a moment and upload a photo. You know what they say……”a pictures worth a thousand words” So fluff that hair, put on that lipstick and have someone shoot a photo of you. Save it on your computer and then go to and sign up. Once you do click on the upload avatar button, find your photo in your computer and click on the photo. Bam! Now see how lovely you look! Gravatar also has lots of help for you also. Ok Jocelyn, I’m waiting…..LOL
Don’t hold your breath on that gravatar pic, Dixie, rofl. Though I did send you an email with a pic of me so you know how I looked, at least a couple of years ago. Add a little more gray and wrinkles and there you go.
I so wish I could go back to that style but MS (balance issues) prevents me from being able to keep my hands up to blow dry and style it properly when it’s in that style. And the “bed head” I suffer from would make you die laughing. It would be a last resort measure, but I adore the style.
For those interested in the cut, here is a good link that shows you how it’s done:
For me right now, the weight of the longer hair, banged, and held back with headbands, scrunchies and barrettes, is going to persevere. And I am lucky because Cindy’s tutes have focused on this topic, so I can display beautiful PCT member made poly clay holders.
Hey Doll, you have gorgeous hair. I would hate to see you get it cut off. I would think it is easier to care for. I was so happy you sent a pic, thanks for doing that. (((hugs)))
Jocelyn… just so you know… the Gravatar picture does not have to be a face photo. It can be an image of anything… like the blue mountains graphic that you use on Facebook, for example. Having a unique picture helps everyone to visually “see” that it is you talking… and not just another Sideways G.
BTW… I did a quick look-up on comment counts to date… Jocelyn you have shared nuggets of wisdom a total of 1441 times here at the blog. And Dixie Ann, you are going strong at 654. Jocelyn (circa 2008) got a 3 year jump on you Dixie Ann (circa 2011).
.
Thanks Doug, wow good to know, I’m just a yaking fool! LOL Got a ways to go to catch up to Jocelyn!
I’m OK with the sideways G, but thanks Doug. “Nuggets of wisdom” made me laugh, which was very needed, so thanks for that too.
I love your videos. I am fairly new to polymer clay. I love the skinner blends and will give the narrow skinner blend a go.
Hi Nicola, welcome to the blog. (love your name by the way)
Cindy has so much to offer and if your just starting Polymer Clay you should seriously consider her beginning tutorials. They are so worth the small investment and will put you on the right path of “learning the clay” For questions, please try using the search bar at the top of the blog. There are hundreds of helpful tips to help you with your venture. Good luck!
Thank you Dixie Ann
I always forget to do that first before I ask.
I appreciate your help.
Melodie
Hi Cindy
Good tutorial.
Love your new hair cut.
I would like to learn how to make round beads with texture. Maybe from a rubber stamp. I have tried different ways, but they look very unprofessional.
Thanks, Melodie
Hi Melodie, if you go to the search bar at the top of the blog here and type in textured beads or words pertaining to what you are looking for, I’m sure you will find links to help you. Cindy has some great videos on making textured beads. Good luck,
Thanks Dixie Ann for helping Melodie! And thanks Melodie for the compliment on the haircut! :)
Cindy, thank you so much for this video on reducing a square cane. It really helped me see how I can be successful doing this. My last attempt ended in really bad results and a lot of scrap clay. Now I have the tools thanks to you to be successful doing my next one. I have watched other videos but they require you to purchase all these expensive square rods and follow time consuming instructions. Your video was so simple and straight forward and didn’t require any extra expense. I feel confident that after watching your video I can become successful in just about any technique you care to teach and share! There going to start calling you the “One Video Wonder” LOL
LOL! Thanks Dixie Ann! This is video #476 from the ‘One Video Wonder’!