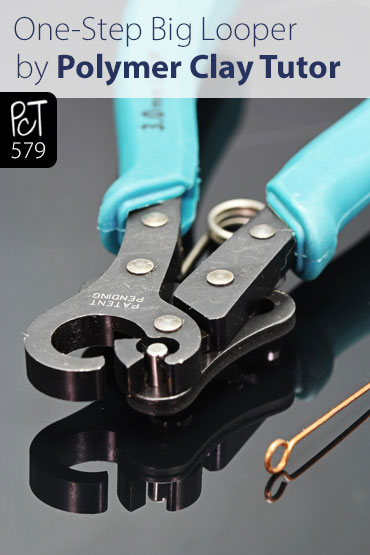
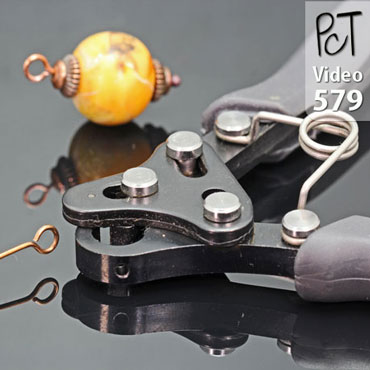
Review: 1-Step Looper (and Big Looper) from BeadSmith
Video #579: If you need a bunch of wire loops or eyepins done quickly, for your polymer clay jewelry… then this is the tool!
More...
IN THIS POST: — beadsmith — jewelry making tools — pliers — wire working — wire — eyepins — loops — charms — dangles — beads — shipwreck beads — (Topics marked with an asterisk* are discussed in the Comments Section below).
Topics Covered In This Video:
- Review of the 1-Step Looper and the 1-Step Big Looper from BeadSmith.
- Pliers style wire jewelry making tool for being able to quickly make wire loops and eyepins.
- Perfect tool for making polymer clay charms and dangles in one easy step.
- Last year I made a Mistletoe Bracelet with tons of time-consuming charms.
- I show you the process of making a wire loop for a charm using regular jewelry making tools.
- Two sizes available. 1-Step Looper makes a 1.5 mm loop and the 1-Step Big Looper makes a 3 mm loop.
- Small loop is suitable for small dangles and earrings, larger loop better for charms added to chain or for links.
- I show you how to use both tools for making a beaded charm using beads made from the Art Sheet Technique Tutorial.
- These Looper Tools will cut and shape wire from 26g to 18g. Though, for strength, I wouldn’t use wire any smaller than 20 gauge. Smaller wires may be too flimsy and open up in use.
- I purchased these tools at Shipwreck Beads.
00:00:03 –> 00:00:07 Hi guys, its Cindy Lietz, your Polymer Clay Tutor, and in today’s PcT Product Demo,
00:00:08 –> 00:00:16 I’m going to talk about the 1 Step Looper, and the 1 Step Big Looper by Beadsmith.
00:00:16 –> 00:00:23 And what they are are plier style tools that will make loops for your Polymer clay beads
00:00:23 –> 00:00:25 and charms and that kinda thing.
00:00:25 –> 00:00:32 Now I’ll show you how they work and everything in a second, but in…last year, when I was
00:00:32 –> 00:00:42 making this Mistletoe bracelet, I had to put all these little tiny charms on the end, and
00:00:42 –> 00:00:51 they can take quite a long time, and the whole process takes…you have to take a pair of
00:00:51 –> 00:00:56 pliers, you bend over your wire…I’m not gonna show you this very closely, but I’m
00:00:56 –> 00:01:02 just gonna show you how fast…or how long it takes, you have to bend it over, do another
00:01:02 –> 00:01:10 loop, you have to cut it, and you can see that it can take you quite a while to get
00:01:10 –> 00:01:17 the adjustments right if you’re working on it…on a whole bunch of them, and you
00:01:17 –> 00:01:20 know, to get it just right and the size that you want.
00:01:20 –> 00:01:26 Now the cool thing about the Loopers is that you can do it all in one step, I mean, hence
00:01:26 –> 00:01:33 the name ‘1 Step Looper’, now there’s 2 sizes, this is the original and it’s just
00:01:33 –> 00:01:43 called the 1 Step Looper, and it does a hole that is this little one here, which is 1.5
00:01:43 –> 00:01:45 millimeters size hole.
00:01:45 –> 00:01:53 The big looper has a little bit bigger hole here, and it is a 3 millimeter size hole,
00:01:53 –> 00:01:57 which is a lot bigger, and the small one is good for things like you know, the end of
00:01:57 –> 00:02:06 an earring and that kinda thing, but it’s very, very easy to use Now, okay I’m just
00:02:06 –> 00:02:11 gonna show you…I’ve got a head pin here, where…and I’ve put a bead cap, and a Polymer
00:02:11 –> 00:02:18 clay bead…this is from my Art Sheet technique, and then another bead cap, and all you have
00:02:18 –> 00:02:25 to do is slide everything down to the end of your pin, and then on the tool, the spring
00:02:25 –> 00:02:32 sits at the back side and this curve goes on the right hand side and you just slide
00:02:32 –> 00:02:38 your wire through, and there’s a hole at the back…and I’ll show you where that
00:02:38 –> 00:02:43 is in a second, see how it comes out a hole at the back here, you just wanna slide it
00:02:43 –> 00:02:50 right up until it’s…everything’s all butt up to the bottom of that little part
00:02:50 –> 00:02:59 there, then all you do is squeeze the handles, it cuts it, slowly bends it into its circle,
00:02:59 –> 00:03:04 and then if you tilt this back a bit it straightens the loop, and then you just…oops, you pop
00:03:04 –> 00:03:10 it off and you have a perfect loop on the end, and you can see that that’s super-fast.
00:03:10 –> 00:03:16 Now I’ll show you on the little bit bigger one, so it’s the same process, you butt
00:03:16 –> 00:03:27 everything down to the end, you slide it through…now these pliers, or these Loopers do wires that
00:03:27 –> 00:03:38 are sized 26-18, I wouldn’t go much smaller than a 20 or maybe a 21 gauge because…and
00:03:38 –> 00:03:43 I’ll show you in a sec, so now I’ve got it all slid in, butt right up, just squeeze
00:03:43 –> 00:03:48 it, it cuts it off, pinches it up, you can straighten it out, and there you’ve got
00:03:48 –> 00:03:50 your perfect loop.
00:03:50 –> 00:03:58 Now if you have… if you use a smaller gauge wire than say 20 gauge, then what happens
00:03:58 –> 00:04:03 is is this loop here… because it’s not a wrap loop, it might be a little too flimsy
00:04:03 –> 00:04:08 of a wire to have in there and it might open up on you, so I would just use 20 gauge or
00:04:08 –> 00:04:09 so.
00:04:09 –> 00:04:12 But as you can see, you can get these perfect little dangles, now I could turn that into
00:04:12 –> 00:04:21 an earring pretty much instantly by just sliding it on to an ear wire, and there you go, you
00:04:21 –> 00:04:25 can make…or you can use it on bracelets and things like that, but see how fast that
00:04:25 –> 00:04:26 is?
00:04:26 –> 00:04:30 I love this tool, it’s really neat, I got these at Shipwreck Beads, you can find them
00:04:30 –> 00:04:37 at lots of different locations, but that’s where I got these ones here, and I hope you
00:04:37 –> 00:04:43 enjoyed that, it’s a very handy tool for your Polymer clay jewelry making projects.
00:04:43 –> 00:04:47 If you liked this video, do let us know in the comment section below.
00:04:47 –> 00:04:53 And if you’ve got a tool, a technique, something that you’d like me to demo, leave your suggestions
00:04:53 –> 00:04:55 in the comment section below as well.
00:04:55 –> 00:05:02 And don’t forget we have a great resource over at polymerclaytutor.com where you can
00:05:02 –> 00:05:07 use the search box there and find all the answers to your Polymer clay questions.
00:05:07 –> 00:05:09 We’ll see you next time, and bye for now.
Our goal is to translate these videos into as many languages as possible. If you are interested in helping with this initiative, then please do contact us and we will figure out a way to make it worth your while :)
Resource Links:
- Amazon: 1-Step Looper **
- Related Video: Mistletoe Ornament Polymer Clay Tutorial
- Related Video: Art Sheet Polymer Clay Tutorial
- Related Article: Creating Your Loops and Links for Polymer Clay Jewelry
- Related Video: Embedded Wire Links and Loops
Resources marked with a double ** asterisk are affiliate links. If you click on them and decide to buy something, we may receive some compensation. This does not affect the price you pay in any way. What it does do, however, is helps us to continue providing free videos for you, here at the PcT website. Using our links to purchase your tools and supplies, is always greatly appreciated.
Sponsored Ads & Special Promotions

Shareable Images


To share this full blog post anywhere on the web that allows links in comments, here's a shortened url to copy and paste...
>> https://mypct.ca/v579 <<
Want to chat about today’s post? That’s what the comment section below is for. Scroll Down… We’d love to hear from you!
Or... if you would like to request a topic for a future post, here is the link to do that… PcT Suggestion Box

Hola estoy muy interesada en tener estas pinzas como podría yo vivo en Guadalajara , Jalisco México, me puedes ayudar
Hi Marisa, I am sorry but I really don’t have any recommendations for places to buy this tool in Mexico. You will need to do a Google search to see if you can find a local place, or find a place to purchase it online. Good luck!
Hola Marisa , lo siento , pero la verdad es que no tiene ningún recomendaciones de lugares para comprar esta herramienta en México . Usted tendrá que hacer una búsqueda en Google para ver si se puede encontrar un lugar local , o encontrar un lugar para comprar en línea . Buena suerte!
Cindy thank you for making this video and the one for the Glass Mat. I was looking for a Mat that will be easy for me to work with. I know for sure this one is the one I am looking for. I guess tomorrow I will go to Michaels to look for it. I love to have the 1 Step Loopers. I saw them for the first time in the internet but I wasn’t sure if I should buy them. Now I will order them. Soooo easy to do the loops. I love it.
Thanks for commenting Carmen! (My sister’s name is Carmen.) I think you will like both of those tools. I get a lot of use out of them!
Oops! back to Michaels!
Oh, I SO want this! My loops usually turn out wonky so I have to keep fiddling with them. Thanks for the demo, Cindy!
The large Looper is super fast. What a great tool. ( As if I NEED more-LOL)> I will put it on my Wish List…….Handy dandy!!!
I bought the small one about 18 months ago. I used it mostly for an earring challenge (100 Pairs 100 Days) but haven’t used it much since then. As you remarked, this tool makes the perfect size for earrings :)
I’m not sure I’ll buy the larger one as I tend to do mostly wrapped loops on bigger links. I’d love to see these engineered to have interchangeable center posts (for varying the loop size). Thanks for reviewing them, Cindy :)
Monique U. (A Half-Baked Notion)
Please, please, please stop showing cool tools Just kidding!!! Every time that you show a new one, I need to have it!!!!! I already bought the We-R Memory Keepers Glass Mat :) Thanks for all you do.