Scrap Polymer Clay Bargello Patterned Sheets
Video #738: After watching today’s video, you will never be able to complain about having too much scrap clay, ever again!
More...

IN THIS POST: — bargello — scrap clay — pattern sheet — surface techniques — silkscreening — silkscreened — silk screen sheets — (Topics marked with an asterick* are discussed in the Comments Section below).
In today’s video I am going to show you how to use scrap clay to make a patterned Bargello sheet. This technique is perfect for making earrings, pendants, frames, beads, or whatever you want.
A few weeks ago, I showed you how to make silk-screened sheets of polymer clay.
Then in a follow up video, I used those patterned sheets to make striped designs.
Today, the lesson will be about using up your scraps from those previous videos, to make an organic looking, Bargello pattern.
Actually, you can do this Bargello technique with any polymer clay scraps that you may have lying around.
In the video I demonstrate how to flatten and roll-out your scrap clay into a loosely striped, organic looking sheet of clay.
The next step is to cut that sheet into strips, and stack them in a chevron, or zig-zag fashion.
By slicing and lining up your clay strips in this manner you will end up with a Bargello patterned sheet of polymer clay.
You will need to watch the video to get a better idea of how this is all done.
I would also suggest you search Google Images for Bargello Patterns, to get inspiration for just how many variations you can create within a Bargello design. Alternating the number of strips, the widths and the distance you shift them up and down, can result in wonderfully complex design possibilities.
Perhaps if there is enough interest, I could do a more in depth tutorial on more complex Bargello patterns in the future…? If this is something you would like to see, let me know in the comment section below.
As you will see in today’s video, you should never have the need to complain about having too much scrap clay, ever again.
00:00:03 –> 00:00:09 Hi Guys! This is Cindy Lietz, your Polymer Clay Tutor, in today’s PcT mini tute, we’re going to be learning how to
00:00:09 –> 00:00:20 do a scrap clay Bargello technique. Now, this is a technique you can use your scrap polymer in, to get this very cool pattern design.
00:00:20 –> 00:00:31 Now, a few weeks ago, I showed you how to make some silkscreen sheets of polymer clay and I showed a bunch of different colors and things.
00:00:31 –> 00:00:42 Then a couple of weeks after that, I showed you how you can take those sheets and turn them into a patterned striped background sheet.
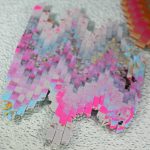
00:00:42 –> 00:00:51 Now, I also mentioned that if you cut it, shift it and do some other things with it, you can get a look that’s called a Bargello. This is a Bargello
00:00:51 –> 00:01:01 pattern here and I did this one using up the scrap bits of clay from this project here and some other ones that were sitting on my counter.
00:01:01 –> 00:01:12 It turned out so cool and I thought I’d show it to you. It’s a great way to use up your scrap clay. If you’ve never heard of Bargello, it is a technique
00:01:12 –> 00:01:21 that is done in needle work, in fabric, in all kinds of different things – quilting. I’ve Googled the word
00:01:21 –> 00:01:31 Bargello pattern or Bargello fabric and here’s just a huge amount of different types of patterns and things that you can do with it.
00:01:31 –> 00:01:44 So when I show you this neat little trick, you can take it wherever you want to take it. Here’s a concept here for today’s tutorial. I took some scrap clay,
00:01:44 –> 00:01:54 and I’m going to do this again with this piece. I took some scrap clay, turned it into a sheet of a random sheet of striped clay.
00:01:54 –> 00:02:04 The way that it happens, it ends up striped on both sides. They won’t be identical but they will both be striped and then I’ve cut it and stacked it in,
00:02:04 –> 00:02:15 kind of a Chevron pattern really, kind of an arrow, which is the Bargello pattern. Then you can also
00:02:15 –> 00:02:25 do something like this where you complete the pattern. It has no longer got a hole here, by just cutting off the top and slipping it underneath into this space here.
00:02:25 –> 00:02:33 That’s what I did with this little sample. So, I’ll show you how to do this. Any scrap clay will work. You can use whatever you want. I’m just going to
00:02:33 –> 00:02:42 this is kinda hard, so I’m just going to use my NEVERknead to flatten it out before I put it in the pasta machine. You can do this by hand.
00:02:42 –> 00:02:51 It just needs to be a bunch of different colors. You can chop it up if the colors are in too large of blocks but it doesn’t matter that much.
00:02:51 –> 00:03:06 I’m going to run it through the pasta machine at the thickest setting to get it going but everytime I run it through, I’m going to just keep going the same direction,
00:03:06 –> 00:03:18 so I’m gonna fold it in half and run it through again. You’ll see what’s happening is that all those colors are gonna start going in a striped pattern.
00:03:18 –> 00:03:29 You can check both sides and see what side you like the best, put the side you like the best to the outside. I’m gonna go down one setting so you can start getting this a little thinner.
00:03:29 –> 00:03:39 We’ve got some more interest happening here. This side looks like it’s gonna have more stripes, so I’m gonna make that to the outside.
00:03:39 –> 00:03:49 That’s good enough, I think. I’ve got stripes on both sides, it’s gonna look quite cool. So all we need to do now…
00:03:49 –> 00:03:53 Let’s get this out of the way…
00:03:53 –> 00:04:08 We need to start cutting little strips off of this sheet. I’m just gonna take a small piece here to square it up. I’m not gonna worry about the sides, it doesn’t matter that much.
00:04:08 –> 00:04:16 It can always get trimmed off and as you can see, you can always take your trimmings and do another one with it. The scrap clay is always useful.
00:04:16 –> 00:04:28 I’m gonna cut strips. I better cut from this other direction so you can see it better. I’m gonna cut strips and you can do them all exactly the same size if you want.
00:04:28 –> 00:04:41 That’s what I’m gonna do for now. I’m gonna set this to the side, put it there. Stick it down to my mat, nice and straight.
00:04:41 –> 00:04:53 Then I’m gonna cut another strip and this time, I’m gonna shift it up a bit, maybe a couple of millimeters
00:04:53 –> 00:05:02 like a quarter of an inch. You can decide what you want to do, how dramatic of a shift you want to do but I’m just gonna shift it up a bit.
00:05:02 –> 00:05:11 The first couple are a little hard to stick down because it gotta be stuck down to your mat. Then, take another cut, go up.
00:05:11 –> 00:05:27 Now, if you want it to be very well planned, then you would count these, so let’s do five going up. Take another cut…
00:05:27 –> 00:05:37 Now, if you look at some of the patterns that are online, you will see that they can get some very cool curved lines and all sorts of things happening,
00:05:37 –> 00:05:47 just by varying the width of the strips. Perhaps one day I’ll do a more in-depth tutorial on that.
00:05:47 –> 00:05:57 I have five strips going up this way. Now I’m going to do five strips going down.
00:05:57 –> 00:06:09 I’m gonna take the next one and shift it down, so that it’s gonna match up the other one straight across.
00:06:09 –> 00:06:19 Isn’t this very cool? It has a very organic look to it. Now if you had very controlled stripes,
00:06:19 –> 00:06:28 unlike the scrap clay cane… if you have a thing like this, then the lines would be very obvious.
00:06:28 –> 00:06:40 But I am really, really loving the organic part of this because it will shift a little, it won’t be exactly the same every time.
00:06:40 –> 00:06:48 If you’re gonna do this stack back and forth, do an odd number because then
00:06:48 –> 00:07:01 the last one, becomes the center for your next peak. If it’s an odd number, it works really well.
00:07:01 –> 00:07:09 If you have an even number, you’re gonna have issue with it not being proper, but you would just keep going zigzig back and forth.
00:07:09 –> 00:07:21 If you have trimmed up this lines first say, then when you shifted them back and forth, you would have a
00:07:21 –> 00:07:33 a squarer end on it. So for example, I’m gonna show you this one here. These ends are more square than the ends on this one.
00:07:33 –> 00:07:42 This one here would be very difficult to cut the top off of here and match it in the under side here just because they’re all ragged but this one, because it was properly
00:07:42 –> 00:07:53 trimmed on the under side, they’re more square and I could, if I wanted to, though this one looks like it’s a little distorted. If I cut this off at this point here,
00:07:53 –> 00:08:04 matched these two outside ones and then take it… it should match up inside there. I did run into a little bit of trouble because my ends weren’t perfect,
00:08:04 –> 00:08:14 and I found that there was a couple of little holes in there when I tried to match it up. But you can do it perfectly if that was what your plan was.
00:08:14 –> 00:08:25 You can make really large sheets of it and you can do much wider sheets than this skinny little one. You can use that Bargello sheet to make earrings, pendants,
00:08:25 –> 00:08:36 charms and all kinds of really cool things. You can even wrap these little pieces around barrel-shaped beads or whatever you want. I hope that was a helpful tip for you
00:08:36 –> 00:08:48 and a neat little technique to learn. Now we have more scrap clay just from the trimmings and we can make some more of these beads so you should never complain about having scrap clay again.
00:08:48 –> 00:08:58 If you like this video, do let us know and if you have a suggestion for a technique that you don’t know yet and you’d like me to demo it for you,
00:08:58 –> 00:09:09 do leave that in the comment section below. Also, if there are products, techniques, all kinds of stuff – books, whatever you need me to do a video on,
00:09:09 –> 00:09:16 leave those suggestions in the comment section below, as well. Alright? So, we’ll see you next time and bye for now!
Our goal is to translate these videos into as many languages as possible. If you are interested in helping with this initiative, then please do contact us and we will figure out a way to make it worth your while :)
Resource Links:
- Related Video: Silk Screen Stencils Create Along Brand
- Related Video: Striped Pattern Polymer Clay Sheets
- Related Vide0: Shoreline Bracelet Vol-072 Polymer Clay Tutorial
- Related Article: What To Do With Your Scraps of Polymer Clay
Resources marked with a double ** asterisk are affiliate links. If you click on them and decide to buy something, we may receive some compensation. This does not affect the price you pay in any way. What it does do, however, is helps us to continue providing free videos for you, here at the PcT website. Using our links to purchase your tools and supplies, is always greatly appreciated.
Sponsored Ads & Special Promotions
Shareable Images


To share this full blog post anywhere on the web that allows links in comments, here's a shortened url to copy and paste...
>> https://mypct.ca/v738 <<
Want to chat about today’s post? That’s what the comment section below is for. Scroll Down… We’d love to hear from you!
Or... if you would like to request a topic for a future post, here is the link to do that… PcT Suggestion Box
Hey, Cindy,
Another great video and idea especially for scraps! I noticed you have a special board you are using as a surface and measuring tool — looks like it’s called “We R” but I can’t really tell from the video. Can you tell us where you got that? It looks like a great tool to have. Currently I am using a Fiskar mat under my projects but it isn’t that precise for small measurements.
Thanks for sharing :)
Nancy
Hi Nancy,
I don’t know where Cindy bought her board but I do know it’s name :-)
It’s the Precision Glass Cutting Mat from We Are Memory Keepers. There are heaps of places that sell it so maybe do a search for the best value. I use one – it’s really, really good. I’d be lost without it!
Chrissie
Oops! It’s We R Memory Keepers, not We Are :-)
Old school spelling was drilled into me LOL.
Thank you for answering Nancy, Chrissie! I appreciate the help!
You’re welcome, Sunshine :-)
Hi Cindy,
really cool technique and as Dixie Ann said so easy up to now I’ve been using scrap clay just as the core piece of something that’s being covered. I can also see this technique being good for covering objects with at the moment I’m collecting some nice empty bottles to make into vases etc., covering them with different canes etc.,
You may recall 2 or 3 weeks back that I emailed you about the errors and problems I had with the Faux Labraordite technique well I squashed it all together, put it through the pasta machine and rolled it into sheets and it’s been sat in bags waiting, and I think this will be just the technique it’s been waiting for.
Thanks to you and Doug for all your hard work and interesting videos.
You’re very welcome Marie! There are actually lots of techniques that you can do using scrap clay, in addition to using it for bead cores. Just type scrap clay into the search box and you should find plenty of ideas.
Hi Cindy,
Quick question – I use Fimo but end up also using Premo because of the fantastic colors available for mixing. What should I be doing as far as baking? Fimo has a baking temp of 230 while Premo is 275 — I’ve been doing 230 and just baking for an hour or more depending on the size of what I’m working on. Any ideas? Thank you so much, I’m addicted to your tutorials and everything else you’ve got out there. Thanks!
Hi Julie, I don’tmix more than one brand in the same project, but the general rule of thumb is to bake at the temp that the majority of the clay is made of. So if the piece is mostly Fimo then bake at the 230F but if it is mostly Premo bake at 275F. The Fimo will darken at that higher temp but it should be ok.
Love this technique and so easy to do. It is amazing the designs you can create with just scrap clay! This is a great summer project and one even the kids can do! Can’t you just see the excitement on their faces, it would be just like them putting a puzzle together! Even while waiting for the new website to open I have gone back over all the old tutorials and picked out the ones I had the most difficulty with and decided to take a shot at doing them again just for my own satisfaction. Practice makes perfect right?
I will admit there were not a whole lot of them but it was exciting and now that I know I can produce beautiful sheets of bargellow from the scraps I have something to look forward to even if I goof up a few!
Yeah I bet kids would love this one Dixie Ann! That is cool about you going through the old tutorials and giving them a new shot. Which ones are you working on?
3 canes I had the most trouble with are the Johnny Jump Up, the Red Clover Flower, the Pirate Cane and the Spliced Flower Cane. I only tried them once and of course they looked nothing like yours especially the pirate cane which was actually kind of scary the way mine turned out….ugh! The Red clover was the hardest but I think it was because the clay got too soft and my hands too warm. That I can remedy now using ice pads to rest the cane on inbetween times. 3 canes I never tried were the snowy tree cane which if I remember was around the holidays and just didn’t have time. The anchor cane which at the time looked too time consuming and then the PC painting which I did get the little palettes to paint on but they are still sitting in my cabinet. Oh and I didn’t do the little camper cane. I don’t camp and I don’t know anyone who does so I lost interest in that one right away. Of course all of this has changed since these all came out and now I am finding it a challenge to go back and try these since I have gained a lot more confidence and patience in assembling canes. The easiest canes I found to do were the extruder ones and the kalidescope canes. I am so looking forward to the new website and getting new tutorials from you again. I have others ask me from time to time when you are going to be back with the new website so I hope it’s soon as it will be a year come August and we all miss you very much.
Thanks Dixie Ann for sharing that with me. It is helpful information to know which tutorials are the most challenging for people and which are the easiest. It is also good to hear that you are revisiting these past challenging ones… I am sure that it will be a much different experience the second time around… especially since your skills have developed significantly since you did them last. As far as the new website goes, we are working as fast as we can. We hope that it is finished soon too!