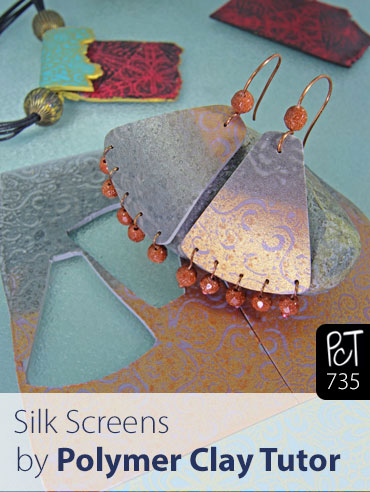
Silk Screen Stencils From Create Along Brand
Video #735: A quick demo and product review of some new silkscreens that work beautifully with polymer clay.
More...

IN THIS POST: — silkscreens — stencils — createalong — polymerclaytv — jacquard lumiere paints — souffle clay — earrings — pendant jewelry — kira slye — ilysa ginsberg — polymer clay tv — (Topics marked with an asterick* are discussed in the Comments Section below).
In today’s video I demonstrate some new Silk Screen Stencils (CreateAlong Brand), that Ilysa Ginsburg and Kira Sly from Polymer Clay TV, sent over to me.
If you are not familiar with silkscreens, they are fine decorative mesh stencils, with a polymer that is infused into the screen. They were originally created from silk, but are now made with nylon.
You can push paint through the open areas of the mesh stencil patterns, that will leave beautifully intricate designs on the surface of flat sheets of polymer clay.
I received six stencil designs that came packaged in a large organza bag (a nice touch). They are 100 mesh screens (100 threads per inch), which makes them relatively fine. The fine mica paints from Lumiere by Jacquard, work nicely with these stencils. I wouldn’t recommend using thicker texture pastes or glitter paints.
In the video I also show some examples of other silkscreens on the market, the Sculpey Silk Screens and the Art Screens by Heidi Swapp, both of which are much smaller than the Create Along Screens.
The patterns I received include… Lacey Vines, Squidley, Triple Tapestry, Dotty Stitches, Leaf Cyclone and Hex Flowers. There are some links to these products below the video.
I show samples of each of the designs printed onto different colors of raw Souffle Clay, as well as some completed projects using the sampler sheets.
You usually print silkscreen designs onto raw polymer clay with acrylic paints/inks. I used several different Jacquard paints including, Lumiere, Versatex Screen Printing Ink, Professional Screen Printing Ink and NeoOpaque. Let the paint dry before cutting, forming and baking into you finished pieces. This method will heat set the paint and make it permanent bond with the polymer clay for a very durable finish.
You can also rub dry products through the screen such as PearlEx Powders, Chalk Pastels, etc. Just be sure that the product is water based, so as to not damage the screen.
In the video I demo how to use the silk screens properly and show tips for taking care of your screens and not damaging them.
What I really like about these silkscreens is the variety of designs (around 40 right now). I believe Ilysa and/or Kira are actually drawing the designs themselves. I also like that the screens are quite large so you can use them on larger sheets of polymer clay if you wish. They are reasonably priced at around $15 US each.
00:00:03 –> 00:00:08 Hi Guys! This is Cindy Lietz, your Polymer Clay Tutor in today’s PcT Product Demo, I’m
00:00:08 –> 00:00:17 going to be demoing the brand new Silkscreens by Polymer Clay TV and you can get them at
00:00:17 –> 00:00:22 createalong.com. Alright, so I’m gonna show you the silkscreens. This is how they came
00:00:22 –> 00:00:27 packaged which is nice and they’re in these different packages. They sent me six of them
00:00:27 –> 00:00:36 to test out and if you are not familiar with silkscreens, basically, what they are are
00:00:36 –> 00:00:43 a fine screen, they used to be made with silk. I think now, it’s mostly made of nylon and
00:00:43 –> 00:00:52 that kind of thing but they have a polymer that’s infused into the screen and then a
00:00:52 –> 00:00:58 little blank spaces are left open where the screen is just a mesh and you can push paint
00:00:58 –> 00:01:03 through it, different types of materials. And silkscreen has gotten really popular in
00:01:03 –> 00:01:10 a lot of mixed media applications and specially with polymer clay. It’s gotten very popular
00:01:10 –> 00:01:15 lately. There are some other silkscreens out there that you may find. These are some ones
00:01:15 –> 00:01:21 by Sculpey and you can see they’re quite small but they’re very detailed and quite neat designs
00:01:21 –> 00:01:28 specially for jewelry. And then there’s other like Heidi Swapp does some art screens. Here
00:01:28 –> 00:01:34 screens are actually a little coarser than these screens here. The Polymer Clay TV ones
00:01:34 –> 00:01:43 are–they are called–the screen size is 100 which means that there’s a hundred threads
00:01:43 –> 00:01:52 per inch so it’s a relatively fine screen which has its different advantages and different
00:01:52 –> 00:01:57 disadvantages. OK, so the advantage to having the nice fine screen is that you can get some
00:01:57 –> 00:02:04 very nice detail, having a very coarse screen–but if the screen is a little bit too fine then
00:02:04 –> 00:02:11 you can’t get heavier glitter-type paints and things through it. There’s –you will
00:02:11 –> 00:02:17 use a different screens for different purposes but let me just show you the different patterns,
00:02:17 –> 00:02:26 the ones that I got sent to me were called The Lacey Vines, Squidly–that’s a cute name,
00:02:26 –> 00:02:34 Triple Tapestry, Dotty Stitches, Leaf Cyclone, and you can barely see the pattern through
00:02:34 –> 00:02:41 the package but I’ll show you how they look and Hex Flowers. And I have printed out some
00:02:41 –> 00:02:46 samples here and I’ve even made up a couple of projects. I’ll show you the projects a
00:02:46 –> 00:02:52 little bit in more detail when I–after I have put some paint on here and it needs to
00:02:52 –> 00:02:56 dry for a second so we’ll go into detail on those in a minute. But here are some of the
00:02:56 –> 00:03:02 patterns here and I have them on raw polymer clay. Now, you’d silkscreen onto raw polymer
00:03:02 –> 00:03:08 clay in most cases because then you can cut it out, shape it into different forms and
00:03:08 –> 00:03:14 when you bake it, the paint becomes heat set and permanent and it’s really great. This
00:03:14 –> 00:03:20 is a raw piece here. This is the one with the Lacey Vines pattern on it and I’ve got
00:03:20 –> 00:03:29 it on some Souffle clay and I’ve used a hot pink silk screen printing ink. This is made
00:03:29 –> 00:03:33 by Jacquard here and it’s quite a thick ink. I want to test that one out. And here are
00:03:33 –> 00:03:40 the samples baked up and you can see that the paint goes on there very permanently.
00:03:40 –> 00:03:47 It’s very very tough and you can do all sorts of really cool things. Here’s another sample
00:03:47 –> 00:03:52 here, this one I used two different colored paints, I used the Lumiere Paints which have
00:03:52 –> 00:03:56 a lot of sparkle in them, I want to test to make sure that the sparkle could go through
00:03:56 –> 00:04:04 these screens and it does a nice job. This is the Squidly pattern, I believe, yes it
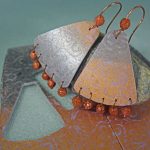
00:04:04 –> 00:04:12 is and I made a few pair of earrings once they were baked. It’s very pretty, we’ll take
00:04:12 –> 00:04:17 a better look at those in a minute. The next pattern here is called Triple Tapestry, I
00:04:17 –> 00:04:26 used two different colors on a–of Lumiere Paints onto a Souffle Clay and as you can
00:04:26 –> 00:04:35 see there’s some really lovely detail there. This next one is called Dotty Stitches and
00:04:35 –> 00:04:42 it has a very kind of fine detail but kind of graphic lacey kind of look to it. I really
00:04:42 –> 00:04:50 like it. I used that in a pendant I have back there which I’ll show better in a minute.
00:04:50 –> 00:04:56 Now, this one, oh and the paint I used for that one was Jacquard, let’s see, it’s this
00:04:56 –> 00:05:03 one here, it’s the NeoOpaque one and it worked beautifully on there, it’s a light body acrylic
00:05:03 –> 00:05:15 paint. And the next one is Leaf Cyclone and it’s a cute one. I used–which one, I used
00:05:15 –> 00:05:23 Lumiere Paint on some Pesto Souffle Clay and it has a cool effect. And then my favorite
00:05:23 –> 00:05:34 color combination I think here is used–I used the Hex Flower silkscreen, I used gold
00:05:34 –> 00:05:44 screen printing ink by Jacquard and I used the Robins Egg Blue Souffle Clay and I just
00:05:44 –> 00:05:49 love it has a kind of an Indian look to it and it’s just really stunning. Now, it’s really
00:05:49 –> 00:05:56 easy to do silkscreening, just so you know and I’m gonna use Souffle Clay again. I quite
00:05:56 –> 00:06:01 like to use it with the silkscreening ’cause it kinda has a matte finish on the back–on
00:06:01 –> 00:06:07 it and it looks great. And–but you can use whatever you want. And we’re just gonna grab
00:06:07 –> 00:06:17 any one of these. I’ll grab the Hex Flower one and what you need to do, you have to be
00:06:17 –> 00:06:23 set up, you wanna make sure you have a thing of water close by and–so that you can throw
00:06:23 –> 00:06:31 your stencil into it immediately after putting the paint on it. You–it has such a fine screen
00:06:31 –> 00:06:36 that any paints that dry in the screen may wreck the screen so you don’t want to let
00:06:36 –> 00:06:46 that get–let the paint dry in there. And there is a dull side and a shiny side and
00:06:46 –> 00:06:53 you wanna put the shiny side down and it helps some of these designs have their website written
00:06:53 –> 00:06:59 on the top so if the website looks correct, then it’s the right side to have facing you.
00:06:59 –> 00:07:03 And then you just wanna press it down. Now, I found with the Souffle Clay, because it’s
00:07:03 –> 00:07:11 kind of a dry clay, that it worked easier to press it down if I just use the bone folder.
00:07:11 –> 00:07:17 And you can see the color shifting a bit underneath, it’s getting darker so it’s really stuck down.
00:07:17 –> 00:07:25 You don’t want any air pockets, any kind of issues underneath. Make sure to get the edges
00:07:25 –> 00:07:30 but don’t kinda squish or leave lines in there or anything. You don’t wanna wreck the raw
00:07:30 –> 00:07:36 clay underneath. Now, it’s stuck down and all we have to do is take your paint and I’m
00:07:36 –> 00:07:43 gonna use two colors so that I can show you it’s a neat little trick. These are the Lumiere
00:07:43 –> 00:07:48 Paints. It’s so pretty. They’re made by the same company that makes PearlEx Powders and
00:07:48 –> 00:07:52 in fact, I think that’s PearlEx Powders that’s in it but anyways, I’m just gonna take a little
00:07:52 –> 00:08:04 paint and run some along the top here, you don’t need a ton and I’m gonna take some of
00:08:04 –> 00:08:10 the other color. Some along this side. That way, we’ll have two colors running along–throw
00:08:10 –> 00:08:19 that in there. OK so now what we have to do is to take the scraper, now whether you have–where
00:08:19 –> 00:08:27 is my scraper hiding? There it is, you can use a squeegee, a rubber one, don’t use metal,
00:08:27 –> 00:08:32 just use plastic and you can use this or you can just use like an old gift card. I kinda
00:08:32 –> 00:08:39 rounded the edges. This works great and you just have to press down and slide this paint
00:08:39 –> 00:08:48 along the surface and you’re just pressing it into those holes in the screen and I could
00:08:48 –> 00:08:57 use a little bit more–let me just wipe this off. I guess I didn’t need to get all my stuff
00:08:57 –> 00:09:07 all wet. I’m gonna add a little more so that I have enough in the hole on the whole screen
00:09:07 –> 00:09:16 and it’s really simple. And I don’t wanna forget this side over here so.–and, just
00:09:16 –> 00:09:23 run this across. Make sure that there’s paint on all the spots. Now, if you want, you can
00:09:23 –> 00:09:28 cross over the paint in the middle there and get kind of a Skinner Blend effect. There
00:09:28 –> 00:09:38 we go and all we have to do is peel this up carefully. You can check too, if you want,
00:09:38 –> 00:09:44 to make sure it’s going through and if it has gone through, then you can just continue
00:09:44 –> 00:09:47 on but if it hasn’t gone through the way you want it then you can actually lay it back
00:09:47 –> 00:09:56 down and continue squeegee-ing. There, let me just pull it up and you have a very cool
00:09:56 –> 00:10:03 design. Now, get it to the water immediately. Otherwise, you will have problems with it
00:10:03 –> 00:10:09 clogging it up and I have a little mushroom brush that I stole from my kitchen and I just
00:10:09 –> 00:10:13 like to use that, it’s nice and soft and I can scrub it up. You can use a soft toothbrush
00:10:13 –> 00:10:17 or something like that as well. And you can just clean it up. As long as it sits in the
00:10:17 –> 00:10:26 water, it’s good to go. And all you have to do is let that dry and when it’s dry, you
00:10:26 –> 00:10:34 can cut it out and do some cool things with it. So let me just show you the–this sample
00:10:34 –> 00:10:42 here, the earrings that I made. I had one of those two color blends on a sheet like
00:10:42 –> 00:10:52 this and then what I did was I cut out these little shapes. I actually used the Sculpey
00:10:52 –> 00:10:57 Template Shapes and I just flipped them over so that I had the golden color on one end
00:10:57 –> 00:11:03 and the gray on the other and the reverse on the other earring. And it makes for quite
00:11:03 –> 00:11:11 a lovely pair of earrings. They have a very Indian kind of look to them too and this set,
00:11:11 –> 00:11:19 I baked on one of these curved forms that I’ve made just out of a–you know like these
00:11:19 –> 00:11:25 cardboard tape rolls, I cut it up and just put some tape over, I mean, some paper over
00:11:25 –> 00:11:32 and tape and then just put the raw clay right on the top and bake the curve right into it.
00:11:32 –> 00:11:36 And that’s what I did here and then drilled some little holes, hung some gem stones and
00:11:36 –> 00:11:45 little goldstone gem stones from there. And made some ear wires. They’re really pretty.
00:11:45 –> 00:11:49 These are going to be earrings so I haven’t quite decided. In fact, that’s kind of why
00:11:49 –> 00:11:53 I chose some of these colors. I think something from this sheet would look really lovely with
00:11:53 –> 00:11:57 this set so I have to figure out what I’m gonna make those into, some sort of earrings
00:11:57 –> 00:12:07 or something. And here’s another pendant that I made using this particular piece here and
00:12:07 –> 00:12:15 the bottom edge of it looks so pretty. I decided to wrap that around a bead mandrel kind of
00:12:15 –> 00:12:23 like this so this goes down the center there and I wrapped it around and then added a–this
00:12:23 –> 00:12:27 other–a section of this other piece ’cause the color looks so pretty and contrast. And
00:12:27 –> 00:12:33 you can see kind of how it’s just rolled around on the back there and I just added little
00:12:33 –> 00:12:38 bits of gold around the edges and gave it a bit of distressed look. So that’s how I
00:12:38 –> 00:12:44 did that project there and I think it’s really quite cool. Now, I think this is almost dry.
00:12:44 –> 00:12:52 Yeah, it’s still damp in a few spots but when it dries, you can cut it out, bake it like
00:12:52 –> 00:12:57 you would normally bake any of your polymer clay projects, just make sure that you have
00:12:57 –> 00:13:02 the paint side up ’cause you don’t want the paint sticking to the paper if you’re baking
00:13:02 –> 00:13:10 something flat. And that is it. So what I really love about these is they’ve got absolutely
00:13:10 –> 00:13:16 tons and tons of designs. There are very nice large size. They’re perfect for doing a large
00:13:16 –> 00:13:25 sheet of polymer clay. The designs are quite unique, I believe either Ilysa or Kira are
00:13:25 –> 00:13:30 actually drawing the design themselves so they’re quite original. And they’re not very
00:13:30 –> 00:13:35 expensive. They’re about $15 so you might wanna check their site out, it’s createalong.com
00:13:35 –> 00:13:41 and they have some other products and things there too. So, I hope that was helpful for
00:13:41 –> 00:13:45 you and that you learned lots and if you did like this video, do let us know and if you’ve
00:13:45 –> 00:13:51 got a product that you’d like us to test, an idea that you don’t quite understand, anything
00:13:51 –> 00:13:56 to do with polymer clay that you need help with, make sure to leave your suggestions
00:13:56 –> 00:14:03 in the comment section below and we’ll see if we can make a video for you and if not,
00:14:03 –> 00:14:07 we may have already made a video so make sure to check those out as well. Alright, so we’ll
00:14:07 –> 00:14:09 see you next time and bye for now!
Our goal is to translate these videos into as many languages as possible. If you are interested in helping with this initiative, then please do contact us and we will figure out a way to make it worth your while :)
Resource Links:
- Amazon: CreateAlong Silkscreen Stencils **
- Related Video: Silk Screening Kit From Sculpey Product Review
- Related Video: Sculpey Souffle Polymer Clay Product Review
- Related Video: Applying Pearl Ex Pigments Onto Polymer Clay
- Related Video: Sculpey Design It Templates for Polymer Clay
- Related Video: Drilling Holes in Raw Polymer Clay Vs Baked Clay
Resources marked with a double ** asterisk are affiliate links. If you click on them and decide to buy something, we may receive some compensation. This does not affect the price you pay in any way. What it does do, however, is helps us to continue providing free videos for you, here at the PcT website. Using our links to purchase your tools and supplies, is always greatly appreciated.
Sponsored Ads & Special Promotions
Shareable Images


To share this full blog post anywhere on the web that allows links in comments, here's a shortened url to copy and paste...
>> https://mypct.ca/v735 <<
Want to chat about today’s post? That’s what the comment section below is for. Scroll Down… We’d love to hear from you!
Or... if you would like to request a topic for a future post, here is the link to do that… PcT Suggestion Box
Thank you for the tutorial, Cindy. I’ve been testing various acrylic paints on raw clay and they print and dry very nicely. The problem comes when I form them around a cylinder and pinch the clay to make a nice seam, the paint rubs off.
I’ve tried putting a thin layer of translucent clay over the paint, which works, but dulls the color. I’ve tried painting the silkscreen printing with Sculpey’s Satin Glaze, letting it dry and then powdering it with cornstarch because it’s kind of sticky, which works somewhat better. I read about putting plastic wrap over it while manipulating the clay. Do you know of any clay and paint/ink combo where the silkscreening really bites into the clay so it can take some handling without rubbing off? It’s quite frustrating.
Hi Phyllis, try rolling the seam with an acrylic roller instead of pinching it with your fingers, that should help keeping you from rubbing the paint off. Plastic wrap will just cling to the paint and pull it off. A piece of parchment paper should work though… did you see the video where I made the striped sheet, using the scrap pieces of silkscreened clay and then laid the parchment on top to burnish it? It didn’t stick to the clay there. Try those things and see if that helps. Comeback and let us know how it goes!
I’ve just been on over to their website, what beautiful designs. Thanks so much for sharing this find Cindy.
I have a favour, and am wondering if others could please let me know if it’s just me that cannot change their currency from USA to CA dollars on their site (none of their currencies other than USD works) aka It’s just defaulting to USD. I’ve made contact with them to clarify but appreciate if some one else could try their currency drop down … maybe I am going boingers at my end!
Thanks
You’re not going boingers, Lolla :-) I’ve just tried to change currency to Aussie dollars and it stays in US dollars. I even tried English pounds! I added a silkscreen to the cart and it still shows US currency. Must be their website that has a glitch if neither of us can change it to our currency. Otherwise I’d be going boingers too and I’ve never heard that word before LOL.
Hi Chrissie,
I sent an e-mail to CreateAlong in relation to that very problem and this is the response received:
“I had asked Kira if our shopping cart converted the price and she told me it was done in Paypal not in the shopping cart. So to my understanding when you go to pay, Paypal will convert it to Canadian dollars. We don’t have any way to change it within the shopping cart since we are in the USA. We have customers from all over the world and no one has had issue with the currency being converted so it must work when you pay”.
Now whilst I am technical, if that is the route they have chosen then so be it , but of course I know that there are many different merchant websites who are able to offer at the click of a mouse their site in different currency, as I am sure you know too.
So indeed I am not going boingers *phew*, nor you bonkers for want of a better Aussie phrase (btw, born in AU… from SA>VIC… now in CA)… Agree though that it would be nice to be able to change currency automatically instead of referring to XE.com, but even then… your payment method is dictated at the day/time/second your payment is obtained and based on what ever the exchange rate is, paypal for example are a world unto their own!…
As for Krithika’s reply below, Shades of Clay offer limited items from CreateAlong. I hate to think what you folk back in AU, let alone out west are paying for any of those items! Shipping alone to the west would be painful enough!
G’day Lolla, you”re a long way from home :-)
So a great relief for both of us to know we are not going bonkers. If that’s the way they have set up their site then we have to go with the flow.
Agree about PayPal being in a world of their own with exchange rates. The Aussie dollar is bad enough without their input :-) Much the same for Canadian dollars, I assume.
Way out west the postage rates are painful but we do have a very reasonably priced supplier in Over the Rainbow in VIC who charges fairly for postage.
Bet you have XE,com bookmarked like me LOL.
Hi Chrissie, Heather is awesome to deal with… I had the luxury of being able to collect my supplies as she was only a 5 minute drive from home, bit of a hike to do that now LOL!
I don’t know how much this will help, but for Canadian folks, Wendy at Shades of Clay is now carrying some of these silkscreens!
Good video guys!
Have done tons of silk screening on tshirts so I was really excited to see screens come out for polymer clay.
I have yet to purchase any or the paints but after reading the comments I’ll have a look at Blitsy. Always happy to help small business people.
Thank you Aims! I think you would enjoy doing the silkscreening on clay… it’s fun!
Hello Cindy!
I always looks forward to Friday mornings with you! Thanks so much for this one. I especially like the 2 color piece pendant you showed at the end! I am inclined to give screening a second look after this.
Happy weekend to you both. Marilyn
Thank you Marilyn! Thanks for stopping by!
Yes, I like the larger size, too! I could see me using these for boxes or frames. Those psints sound interesting as well. Where can you find them?
You can get the Lumiere Paints all kinds of places Catalina especially online. I believe they are having a huge sale on them and the NeoOpaque Paints at Blitsy. Use the link in the ad in the side bar and you’ll get $10 off your first order. (Plus we get credit for the sale as well.) You’ll see the prices are amazing there.
I always forget about the Blitsy site so I have bookmarked it. I was able to get the Lumiere paints at Dharma Trading for $3.75 ea this time but will definitely check the Blitzy site since you get a rebate back. :)
Yeah it is awesome. I have bought lots from there already at such great prices. Sometimes more than 50% off! When you do go there, make sure to come back here and use our link and not just your bookmarked link. I believe there is a time limit from when you click on the link and then buy something, as to whether or not it will get credited to us or not.
Love the large size silkscreens, will definitely have to pay those girls a visit. I don’t recall you showing the Lumiere paints before so those are also going on my list. Thanks so much for the great demo!
You’re welcome Dixie Ann! Yeah I’ll have to try and do a separate video on the Lumiere and NeoOpaque paints from Jacquard. They are beautiful paints!
Dixie Ann, those Lumiere paints colours are gorgeous and they are super good for silk screening.
For anyone who who has a supply of acrylic paint sitting around (like me did folk art back in the day) here’s a handy hint. I read that a heavy body paint is better for silk screening than a thin “runny” one. I tried some of my less than heavy body paints and it’s true :-) All is not lost though as we can add a thickening gel to the paint to make it heavy body. I bought the Liquitex Matte Gel so I can use the dozens of tubes of paint in my stash. There are other brands of gel like Golden that will do the job too.
I broke down and bought all the Pearlescent Lumiere Paints for a really great price and then got 4 of the large silk screens since they had a 20% off birthday sale this week. It’s like getting one free!
Which ones did you buy?when was the sale?
Natalie, their sale was a couple of weeks ago when they celebrated her birthday and had 20% off of everything in the store. If you sign up for their newsletter you would get their emails and sale items. I bought the 4 larger silk screens that Cindy demonstrated because I liked their large size. The Lumiere Paints I got from Dharma Trading and got the 6 basic colors since I can mix them if I want to. Congrats on your new Atlas with motor. Once you have a motor it’s hard to ever work without one. :)
I like those. So many pretty designs at their website too. I see silk screening polymer clay in my future. :-) Thanks for the demo.
You are more than welcome Dawn!