Sculpey Tool Organizer Review and Special Guest
Video #538: Polymer Clay Tutor Member Bertha Adamson sat in on this product demo session. She’s from Aurora, Colorado.
More...
IN THIS POST: — studio — organizer — sculpey — tool organizer — tool storage — bertha adamson — aurora colorado — polyform 2014 — product reviews — (Topics marked with an asterisk* are discussed in the Comments Section below).
Topics Covered In This Video:
- In the studio with PcT Member Bertha Adamson, from Aurora, Colorado, USA.
- Bertha was in the Vancouver area for a conference, and asked if it would be possible to come by for a visit. Doug and I were available, so it worked out for Bertha to swing by for a couple of hours before heading out to the airport to fly home again.
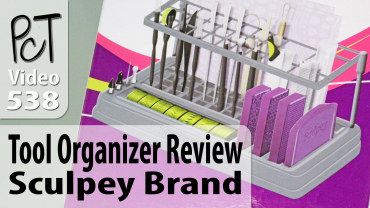
- In a previous video I showed a bunch of new products from Polyform, and one product you guys asked me to show in more detail was the Sculpey Tool Organizer.
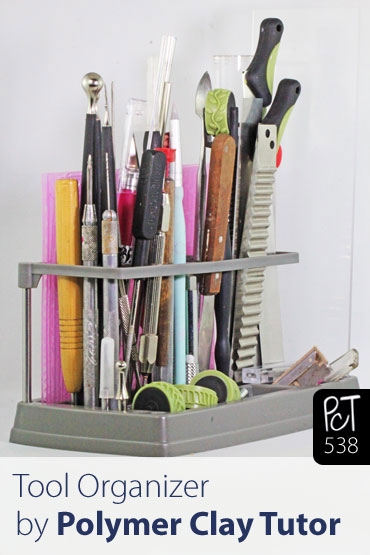
- It is a product that I initially thought was kind of neat, but then was even more impressed when I put my tools into it.
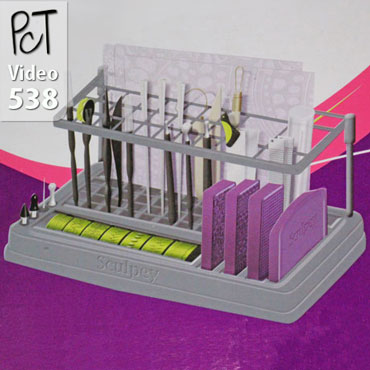
- Assembly of the tool organizer is a snap.
- Both Bertha and I were surprised by how many tools the organizer actually does hold.
- It’s a much better way to store sharp tools than putting them in a drawer.
- Sculpey Tool organizer holds tools like, acrylic roller, texture sheets, style and detail tools, pearl and etch tools, drills, bead reamers, mandrels, clay texture rollers and wheels, acrylic plate, Exacto Knife and Blades, Clay Blades, palette knife, awls, piercing tools, and so much more!
00:00:03 –> 00:00:08 Hi guys, its Cindy Lietz, your Polymer Clay Tutor, and I’m here in the studio today
00:00:08 –> 00:00:11 with Bertha Adamson.
00:00:11 –> 00:00:18 And she is one of our members from Aurora Colorado, and she had to come out to Vancouver
00:00:18 –> 00:00:23 for a conference and she asked if we were available, and we were, and so now we’re
00:00:23 –> 00:00:27 hanging out in the studio and we’ve been eating cookies, and drinking coffee and talking
00:00:27 –> 00:00:29 about Polymer clay.
00:00:29 –> 00:00:32 So it’s been very fun to have you here, welcome.
00:00:32 –> 00:00:33 (B)Great, thank you.
00:00:33 –> 00:00:39 (C)It’s been quite fun, we’ve been talking about lots of different things, one of the
00:00:39 –> 00:00:42 things…a few videos ago, I showed you a bunch of new products that we have from Sculpey
00:00:42 –> 00:00:47 that came out, and this is one of the ones that you guys asked if I could show you a
00:00:47 –> 00:00:50 demo on and it is the tool organizer.
00:00:50 –> 00:00:53 And I thought… since we were hanging out here in the studio, I might as well just show
00:00:53 –> 00:00:56 you this and how it works.
00:00:56 –> 00:01:00 And it’s kinda one of those things that I…you know I thought it was neat and everything,
00:01:00 –> 00:01:07 until I actually put it together, and I wanna show you…I’ve got a table here full of
00:01:07 –> 00:01:13 all kinds of tools, texture plates and a bunch of different things, and normally they’re
00:01:13 –> 00:01:20 just in a bucket or something laying to the side, and this little tool organizer is quite
00:01:20 –> 00:01:26 cool…if I can get this box open, alright.
00:01:26 –> 00:01:32 It’s really simple in design but it holds all kinds of stuff…what did I throw down…you
00:01:32 –> 00:01:33 got that?
00:01:33 –> 00:01:39 Now it’s got a couple of little pins that you pop in, thank you, and we’re just gonna
00:01:39 –> 00:01:46 pop it together, and it has obviously been designed for the clay artist, because everything
00:01:46 –> 00:01:51 fits in here, the roller fits in, all of these little tools.
00:01:51 –> 00:01:57 And I’ve got the…you recognize these, they’re just about in every tutorial, these
00:01:57 –> 00:02:01 are the style and detailing tools, there’s little slots for those.
00:02:01 –> 00:02:07 The clay blades…there’s sort of a rectangular spot up here at the front, and all the clay
00:02:07 –> 00:02:16 blades will fit in there really nicely, which is great because you don’t want these laying
00:02:16 –> 00:02:19 around, they’re sharp, they’re…you know, they’re dangerous, you wanna be able to
00:02:19 –> 00:02:24 grab them whenever you can and you wanna be able to see them…and so they all fit in
00:02:24 –> 00:02:25 here beautifully.
00:02:25 –> 00:02:28 I think you were sort of surprised how much stuff goes in here right?
00:02:28 –> 00:02:35 (B)Yes, well, as I’ve mentioned, a couple of people in my Polymer clay guild, the local
00:02:35 –> 00:02:40 one in Colorado, had received some of these items from Sculpey as well…they have a relationship,
00:02:40 –> 00:02:46 and they had them out, and I saw this, and I thought ‘oh yeah, another organizer’
00:02:46 –> 00:02:52 and I wasn’t quite sure what to do with it, and I thought, ‘we’ll see’, and
00:02:52 –> 00:02:58 when you know, you kind of showed me and told me how much it holds…I was just stunned,
00:02:58 –> 00:03:00 it’s like…it actually looks like it works.
00:03:00 –> 00:03:04 (C)Yeah, absolutely, I was surprised, because there’s all these little things that…like
00:03:04 –> 00:03:09 mandrills, you’ve got miles of them and little sculpting tools, and this one also
00:03:09 –> 00:03:10 holds…
00:03:10 –> 00:03:16 I was just actually quite surprised, it holds the little rollers for their…you know their
00:03:16 –> 00:03:20 little roller edger tool… thingy, I don’t know what the real name is, what is it, a
00:03:20 –> 00:03:21 roller edger?
00:03:21 –> 00:03:23 (B)I think I’ve used that name, if that’s the name…
00:03:23 –> 00:03:25 (C) That’s the name specifically?
00:03:25 –> 00:03:31 (B)It is really nice for these tools, because right now I have some of these in a drawer,
00:03:31 –> 00:03:32 where I’m storing clay…
00:03:32 –> 00:03:35 (C)Right (B)And you’re kind of looking for things, but a lot of these things are kinda
00:03:35 –> 00:03:36 sharp.
00:03:36 –> 00:03:37 (C)Yeah, yeah…
00:03:37 –> 00:03:40 (B)So I feel funny just rummaging through the drawer trying to find particular tools…
00:03:40 –> 00:03:41 (C)Well yeah…
00:03:41 –> 00:03:46 (B)You don’t wanna poke yourself.(C)I know…and it’s…and you want them on hand because
00:03:46 –> 00:03:50 you’re using them all the time…and like look at that, all the little texture plates
00:03:50 –> 00:03:58 fit in the back, it has a slot here, I actually… my acrylic plate that I have, that I use all
00:03:58 –> 00:04:03 the time, fits in here perfectly, but it also fits the new one that comes in the bead kit,
00:04:03 –> 00:04:08 so that’s where you would put your little acrylic piece…I like this one a little better
00:04:08 –> 00:04:17 ‘cause it’s bigger, but I’ve got bead reamers and all kinds of things, clay shapers.
00:04:17 –> 00:04:26 This tool here is one of their 5 in 1 tools, so it’s got the magnet in and it’s got
00:04:26 –> 00:04:35 the poker, but this also has the little…it’s got a ball stylus and an Exacto blade, but
00:04:35 –> 00:04:41 they have the little holes on the side here for that, to set those little parts in which
00:04:41 –> 00:04:43 is kinda cool.
00:04:43 –> 00:04:52 And then, it also has a spot…I put…you’re supposed to put those little design blocks…
00:04:52 –> 00:04:56 those purple design blocks for the Mokume gane set, they fit in there…I don’t use
00:04:56 –> 00:05:03 those very often, so I put in the…my razor blades, ‘cause that’s where I put those,
00:05:03 –> 00:05:06 and which is nice to have them handy, but you’re not worried about getting cut.
00:05:06 –> 00:05:13 So I just wanted to show you this, and show you how much stuff can fit in here, my ruler
00:05:13 –> 00:05:20 even fits in here somewhere…I figured it out, where did I put that, I don’t know,
00:05:20 –> 00:05:24 here maybe, and I’ve got palettes and everything.
00:05:24 –> 00:05:29 I just thought if I showed you all the stuff that would fit in here, it may look more interesting
00:05:29 –> 00:05:33 to you than when it was just on the shelf in the store.
00:05:33 –> 00:05:39 So I hope that was helpful for you, I hope you enjoyed meeting Bertha, we told lots of
00:05:39 –> 00:05:41 stories and talked about all kinds of stuff.
00:05:41 –> 00:05:46 And she went up to the…you got to see the Shannon Falls…and…
00:05:46 –> 00:05:52 (B)Yes, I did the Sea to Sky highway starting at Lighthouse Point…and yeah, Colorado,
00:05:52 –> 00:05:57 we have mountains, but we don’t really have oceans and bays, so it’s really nice to
00:05:57 –> 00:06:01 see it, and it’s beautiful up here and I highly recommend coming up here.
00:06:01 –> 00:06:05 (C)Yeah it’s really stunning, and you like to do photography and things like that too,
00:06:05 –> 00:06:06 right?
00:06:06 –> 00:06:10 So I’m sure now… with all your new photographs and things, you have some inspiration for
00:06:10 –> 00:06:14 some more jewelry and she got to sneak peek at what the next tutorial is…I’m not telling
00:06:14 –> 00:06:16 you, and…
00:06:16 –> 00:06:18 (B)It’s good, stay tuned.
00:06:18 –> 00:06:23 (C)It’s gonna be good, and we’ve had a lot of fun…she’s gotta get heading out
00:06:23 –> 00:06:27 to the airport…here, now I’m all done again, I had to finish, and she’s heading
00:06:27 –> 00:06:32 out to the airport and she’s heading back home, and it’s been a really nice visit
00:06:32 –> 00:06:33 with you.
00:06:33 –> 00:06:34 (B)Yes, I enjoyed it, thank you so much for inviting me in.
00:06:34 –> 00:06:37 (C)You’re very welcome, and you’re welcome anytime.
00:06:37 –> 00:06:42 Alright, so if you like this video, let us know, and if you have any suggestions for
00:06:42 –> 00:06:47 any future videos or…you know, if you’re up this way sometime, maybe you can give us
00:06:47 –> 00:06:51 a shout, and who knows, maybe we’ll get together and hang out.
00:06:51 –> 00:06:54 So, we’ll see you next time and bye for now.
00:06:55 –> 00:06:55 Bye.
00:06:55 –> 00:06:56 (B)Bye.
Our goal is to translate these videos into as many languages as possible. If you are interested in helping with this initiative, then please do contact us and we will figure out a way to make it worth your while :)
Resource Links:
- Related Video: Quick Overview of New 2014 Sculpey & Premo Products
- Related Video: Acrylic Roller An Essential Polymer Clay Tool
- Related Video: Sculpey Flexible Texture Sheets
- Related Article: Studio by Sculpey Style & Detail Tools
- Amazon: Sculpey Tool Organizer **
Resources marked with a double ** asterisk are affiliate links. If you click on them and decide to buy something, we may receive some compensation. This does not affect the price you pay in any way. What it does do, however, is helps us to continue providing free videos for you, here at the PcT website. Using our links to purchase your tools and supplies, is always greatly appreciated.
Sponsored Ads & Special Promotions

Shareable Images


To share this full blog post anywhere on the web that allows links in comments, here's a shortened url to copy and paste...
>> https://mypct.ca/v538 <<
Want to chat about today’s post? That’s what the comment section below is for. Scroll Down… We’d love to hear from you!
Or... if you would like to request a topic for a future post, here is the link to do that… PcT Suggestion Box

Cindy, just one more thing in this regard….In my area Varathane is not available…Instead of that, can I use Mod podge as a sealer cum finish after waxing? And it comes in a variety of finishes right? Any reactions for mod podge on PC? And can I use any water based sealer for finishing?
Hi Cindy,
A great thanx to you 4 the reply. Yes I was thinking about painting with acrylics, but do I need to coat it with a sealer varnish for protection? What about other normal beads?Do I need to cover them too?
Hi Sitara, no need to use a sealer with acrylic pain, unless you want to. it sticks very well to the polymer clay as well as other beads, as long as you use a good quality paint.
Its Sitara from India… I have a doubt to clear…
See, when I condition gold or 18K gold polyclay, I get some brownish shading intermittently and when I roll them into balls, I am not getting an even gold color all over…. Why is it so and how can I get rid of that? I have seen some people using gold color paints over it after baking. Is it good and if so, what type of paint to use?….acrylic?
Please help
Hi Sitara, those streaks you see in the clay are the mica particles that are all ‘mixed up’ in the clay. When the metallic clays are rolled through the pasta machine, the particles line up and look shiny from the top and dark from the sides. So when you try and roll a ball of it, you get some of the top and some of the sides mixed in. It is pretty tricky to make a ball without this happening. You can pain with acrylics if you wish.
I have heard people recommend Minwax Water Based Polyacrylic Gloss or Varathane Water Based Gloss. Not sure which is better. Could you do an objective comparison of the two. Which is thicker, shinier, tougher and any other qualities you can think of. Really enjoy your videos and product tests.
Thank -Liz Rees
HI Cindy! I must admit that as thrilled as I am to be in one of your videos I got a strong case of the bashfuls when I saw it was uploaded. It’s why I try to be behind the camera rather than in front of it. :-)
So I didn’t watch right away, but I enjoyed it once I did, and it reminded me how much I enjoyed our visit. And makes me appreciate even more what you do for us every week and month!
I can hardly believe almost a month has passed since my visit. (I can hardly believe it’s already July – where has 2014 gone?) I have been meaning to send you a little token of Colorado but I have discovered that mailing anything more than a letter to Canada from the USA is not as simple as you might think. Hopefully I will get it sent off this weekend.
Hi again Bertha, You are just the sweetest thing! We shoot so many videos that sometimes I forget that some people may be shy about seeing themselves on camera. Glad you got the courage to watch it. You did great! I too enjoyed your visit and I am really looking forward to seeing your token of Colorado! :)
Oh, someone asked you a question over on YouTube. If you go to the video above and click the little YouTube icon at the bottom of the video player you can go directly there to answer it.
So glad this was as fun for you as it was for me!
I don’t have enough tools to really benefit from this tool caddy…yet! Down the line, I’m sure it will be something that I will want.
It was fun to see Bertha!!
Hi Jill, Thanks, it was fun to participate in it! ;-)
Oh, how lucky you are Bertha! I have family in CO maybe next time I come out I can meet up with you! I’m really thinking this tool caddy is what I could use! Small but holds a lot. Just a sneak preview for you Cindy, my hubby and I are planning an Alaskan Cruise next year!!! Soooooo, I might be able to sneak a few moments to stop by and meet you!! I will let you know the dates we will be sailing soon.
I would love for you to visit us Catalina! Do let us know when you will be in town and hopefully we can get together when you’re here!
Hi, Catalina! I would love to meet up with you on your next visit to Colorado. (If you can make it the fourth Saturday maybe you could come to the Polymer Guild meeting and meet a lot of friendly and talented clayers!)
And make sure you include at least a couple of days in Vancouver as part of your cruise plans. (An afternoon is not enough – I could easily spend another week there.) The convention center and my hotel are right where the cruise ships dock and was I ever envious of all the people heading off to see the glory of Alaska.