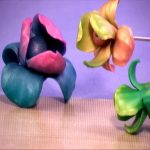
Vol-037-1 Sculpted Iris Flower Beads PcT Tutorial (Intro)
Video #206: “Cindy, I would like to ask for a tute on sculptural flowers! Your lessons give us so many AHA moments.” ~Tanya-L
More...

** This post is an introduction to one of our paid tutorials.
Have you ever had an idea that’s been sitting in the back of your head for a long time… just waiting for its moment to shine? Well, I could have smacked myself on the forehead for not creating this beautiful bead design sooner. Especially since I had already come up with the idea almost 20 years ago!
Let me explain…
Long before the kids were born (Willow is almost 15 now), along with a gazillion other crafts, I used to make Sculpted Iris Beeswax Candles. The idea was originally born by playing around with some Beeswax Sheets and a large Teardrop shaped cookie cutter, fabricated from a strip of aluminum sheet metal and a piece of double stick carpet tape.
I tell you this, because lately I have been reorganizing my studio space. After finally admitting there was no time to build a whole new studio in the larger room currently occupied by my daughter, I then settled for a bit of a makeover rather than a renovation.
During this ongoing organizing project, I came across the box of beeswax sheets and the teardrop cutter, which I had long forgotten about. Ding! Ding! Ding! Like a lightning bolt, the idea hit me… these would make awesome polymer clay beads!!
Now, since it won’t be long before the real Iris’ in my garden begin to bloom, I thought now would be the perfect time, to teach you all how to make these Sculpted Iris Beads. Before I forget, and another 20 years go by! LOL
“I love every new technique you come up with. Modeling is not my forte and seeing how you make the sculptural beads just pushes me to go beyond my abilities. I also enjoyed the calla lily beads and the variegated sculpted roses. Thank you, Cindy!” ~Squash
“
Cindy, love this tute! Flowers will be blooming on my work table! Mostly, what I make ends up in other homes. I think this one will be for me, at least until I have a visitor. I have come a long way learning from you, now I leave no fingerprints and the beads feel so soft and wonderful. Thanks for all of your lessons!
Karonkay C
“
This was an amazing video. I loved making the Iris flowers. I can't wait to see what you have planned for us next. You and Doug are the best, thanks for providing a place to get inspiration, support and fun!! Your tutorials are the best!
Jeanne C
“
Hi Cindy, well, these were just too dang fun to make :-) Thanks for this tutorial. I made earrings out of some smaller ones and I think I am going to go with bookmarks (Vol-038-1) for the bigger ones. I am not sure yet, but I am going to make more in different colors. What fun and so glad to be back claying.
Kriss J
Transcript coming soon...
Transcript coming soon...
Our goal is to translate these videos into as many languages as possible. If you are interested in helping with this initiative, then please do contact us and we will figure out a way to make it worth your while :)
Shareable Images


Want to chat about today’s post? That’s what the comment section below is for. Scroll Down… We’d love to hear from you!
Or... if you would like to request a topic for a future post, here is the link to do that… PcT Suggestion Box
Hi Cindy,
Well, these were just too dang fun to make. :-) Thanks for this tutorial. I made earrings out of some smaller ones and I think I am going to go with bookmarks for the bigger ones. I am not sure yet, but I am going to make more in different colors.
What fun and so glad to be back claying.
Kriss
Im kind of new to Cindy’s tutorials so am enjoying hte past issues as they are new to me. the iris beads are fantastic, i love to take close up pix of them in my yard so this really opens up some of the ideas I have for the irises. texture etc making fuzzys some how in teh middle. She is sooooo good. also the peacock feathers I cannot wait to make some and use as gifts. sigh. never ceases to amze me what this lady does. Thanks Cindy again
Cindy, think it would be great if you could do your multi-use magic wand trick with these, for the hair…a clip, but then also make it a focal bead on a necklace or something?
I like trying to use the clay to make other things besides jewelry, hair clips would be in that category, so I would like a tute on how to do that too.
The hair clip idea sounds like a tut to me. Does anyone else agree?
Just found out about the facebook page !!
A great way to share our ideas and work…How did I miss that??
Cindy,
When sculpting have you ever tried insects like bumble bees or dragon flies.. 3D like the iris beads?
I’d like to try a bumble bee….
@Mavis T: I haven’t tried sculpting bees but I have made a dragonfly or two. I made a dragonfly hair clip with polymerized fabric wings awhile back. It’s in the video preview clip at the link by my name. (I called it a butterfly instead of a dragonfly by mistake in the video. Doh!) I do really like insect beads though, so will add them to the list of ideas. Thanks for the input!
On a teeny note, love the clay mat, bought one and it’s incredible. No sliding, doesn’t get shmeary……love it. Another notch in your belt, Cindy for providing us with a great tool. Thank you!
Thanks for the suggestions, going to try them all. I thought maybe a little metal plate would solve this. I came across some round metal plates on one of the thousand sites i visited when i was searching for clay and accessories right at the beginning of this new hobby but didnt think about buying them then because i didnt come across this problem then ofcourse. And now i dont know which of these many sites it was. I tried “brochebacks”but that are only narrow plates, cant use them for that. I dont know how to call them, maybe they got another name?
My oh my, you guys are gonna swell my head with all your sweet comments… Thank you all so much! I am so glad that you are learning and growing as creative beings as a result of the tutorials. Keep up the great work!
@Sue F: Yes I think this design would make good fuchsias as well. Just a little tweaking here and there with the petal shapes and colors, plus the addition of some long stamens, and that would do it. And like you said, since they already dangle with their heads down, they would be perfect for making into jewelry. (One of these days we will soften you up a bit and get you liking sculpted flowers. ;) Could be difficult, but I’m gonna keep trying!)
@Elaine Faulks: Awesome Iris facts Elaine! Thank you for sharing them with us!!
@Karonkay: Thank you for saying that! It means so much to me that you are advancing your skills as an artist through what you are learning here, even though you have been working with polymer clay for 10 years already. I am so glad to have you along for the journey!
@pollyanna: Yes I was worried about some of these guys too. Glad to see a few have popped by to ease our worries. Thank you for caring about our little ‘clay family’ so much. It is a pleasure having caring people like you here!
@Ritzs: Just know we love you and are so proud of your strength and courage. With your strong attitude you will be healed and working those hands in the clay once again very soon!
@Laura R: I was thinking one of those flat backed clear marbles might look cool as your glass vase. Would be fairly easy to incorporate into your piece as well. Just an idea.
@Phaedrakat: Thank you so much for all your help with these questions that are coming in! As you may have noticed, I am getting overwhelmed with them all and am having trouble keeping up. Today we also had the comment gadget along the side of the blog break down. Doug is trying to figure out how to fix it, but in the mean time we will have to keep an eye out for questions, since the comments will be harder to track. We are looking to do some site upgrades, and this ‘breakage’ may just be the thing that pushes that job up the list! Sorry to hear you have been ill and are suffering more pain. I care very much about you and hope you can find relief soon.
@Marion K: I think what you are referring to is called a blank. Try typing the words like ‘copper pendant blank’, or ‘silver charm blanks’ into Google or a search box on your favorite jewelry supply site, and you should be able to find what you need.
@Everyone: Hopefully I didn’t miss anyone. It is getting so busy around here that I am having trouble keeping up. That is a good thing! But I may need your help. If you know an answer or can point someone in the right direction, please do. The more we can help each other, the better the resource this site will become. Thank you again, for all your support!
These are lovely…gonna start working on one shortly, but since someone mentioned making a floral boquet in this thread I thought that I would ask if anyone has any ideas on the following: I made some floral pins on a flat surface, much like the flowers in the mushroom bead tutorial. Anyhow, I am wondering if there is a way to make the vase that they sit in look as if it is glass? Does that make any sense? It is an oval flat piece of clay with various flowers all coming out of a glass vase…I was thinking of using TLC but have not tried this yet. Thought I would ask first…Would posting a picture (ha – if I can figure that out) help? TIA! Laura
@Laura R: Hi Laura, I can’t exactly picture your project, but perhaps resin is the answer…it might give the most “glass-like” effect(?) TLS isn’t super-translucent — if you decide to use liquid clay, you might want to choose Kato or Fimo, instead. Kato clear medium seems to be the most transparent (in my experience,) although I’d need to see your project… Perhaps you could post a picture in the Facebook gallery*?
That way, we could all see your project before offering ideas… ;D
*How to upload pictures in Facebook
@Phaedrakat: Resin…great idea, never thought of that. It will be perfect I think. I did post some unfinished pictures for anyone who would like to look. I had fun with these ‘flower pins’ and birdhouse beads…they are unfinished, but so very fun. Anyhow, the first picture is the one I am talking about that I would like to make it appear as if the flowers are in a glass vase. Thank you to everyone who has offered me advice on this. You guys are awesome!!!!!
@Laura R: Just re-read your comment, and got a better mental image of your project. I realize that resin wouldn’t work…perhaps you could try some clear embossing powder or UTEE? I haven’t tried the clear kind though, so I don’t know how well it would mimic glass…
@Marion K: In addition to the great ideas from DJ & Cindy, I wonder if you could “weight” the back of the flower in some way…so that it would hang the way you like?
I wonder if a heavy glass or metal bead at the back (or a magnet, or clay-covered nuts/hardware?) would work? You could use a decorative headpin to hold the heavy bead in place behind the flower. You’d have to pierce a second hole…for a 2nd headpin if making earrings, for stringing material if making a necklace… (I’m gonna have to play with this, too — see what works!)
@Catalina: THRILLED to hear this news! I’ve been checking Michael’s every couple weeks or so, but haven’t been out of the house for over a week! As soon as I’m able, ya know where I’ll be! :D
@Claycass: You’ve got a point! Especially as I get older, & time seems to fly by a little too fast anyway! :D
@Elaine Faulks: Love all the fun Iris facts you assembled! Thanks for that…educational and cute! ;D
@Isabel: Lucky friend…wanna be pals? ;D
oh so cute! I’ve done the little lilac bead, and its on its lonesome at the mo, so I will have a companion for it soon. will also have to have a go at the sculpted rose as it looks beautiful too. Thanks again Cindy.
LOVE the irises!
So simple, yet if I had had to figure this out on my own, I’m not so sure that I would have made the same discoveries as you!
WELL DONE, Cindy!!!
Nettonya
Another great tute!!! I’m learning so much. I am so far behind but hope to catch up soon.
Where are Kat, Ritzs, Ken and Laurence? Hope they are just busy and not ailing. Anyone hear from them?
Pollyanna thank you for your thoughts, I have not felt so good lately, more surgery im afraid on my left wrist and hand so now I have two hands that wont clay. But I wont give up as soon as I am healed I will be back.I get so frustrated when i see the vidio’s and cannot try them I love all of Cindy’s work what a wonderfull person she is Ritzs. @pollyanna:
@Ritzs: Gosh, I’m so sorry. Thanks for the update and prayers continue your way. We are all family after all. Hope the other MIA’s are okay. Please keep us updated and know you are in out thoughts.
@Ritzs: Good to hear from you! I hope the surgery goes well and you are back to claying soon!
I did a polymer clay demo at my store today. Of course I used the new colors! Everyone was amazed at the “cool” jelly roll canes I made!
@pollyanna: Hi there! Thanks so much for inquiring about me…you made my day! Means alot to have someone thinking of me. I’ve been pretty down, worse pain & other stuff (don’t worry, not gonna moan about it here!) Besides, I know that there are people all over the world with problems we can’t even imagine…I’m counting my blessings! For example, I’m grateful for fantastic clay friends — like you!
Hugs, & thanks again!
@Ritzs: Hi Rita, so sorry to hear more surgery’s needed. I’m so glad you’re such a fighter…I know you won’t let that frustration get to you. You’ll find a way to clay (and much more!) sometime soon…you are truly an inspiration! Sending positive energy & prayers your way… Hugs, Kat
@To all those who are “ailing”, we care! Peggy, Honey, haven’t seen your comments much, either. Hope you’re doing well…
@Cindy: Love these beautiful flowers! So simple, yet they look intricate. Funny, I was watching “Amazing Wedding Cakes” (a TV show on WE network, about — you guessed it!) When they make the sugar flowers, I always think, “THAT one would be cool in clay!” (I also think about the cake dec. tools, & how they’d work with clay…as long as they weren’t the plastic kind — those might react with the clay?) But I never make them…didn’t think about how cute they’d be as earrings! Now, I’ve got everything I need, inspiration and all. Thanks, Cindy…you guys did it again!
Thank you for the great tutorial. Can’t wait to make them. I have Irises in my garden and was just thinking that I wanted to make some. Thanks, Cindy.
Fun! Like Sue I’m not really into sculpted flower beads but these are cool. I like the idea of mounting a flower in a bezel and will definitely try that.
Ooooh Cindy, Love this tut. Flowers are going to be blooming everywhere on my work table! And yes, a lovely little flower arrangement with iris popping out – I can see it happening. Most everything I make ends up in other homes so I think this one will be for me especially, at least until I have a visitor and it goes to a new home- but out here in the woods I will have it longer than before when I lived in town! Another perk for moving out in the woodlands. I love flowers and this is going to be a favorite, all of my iris are just coming into bud, we are about two weeks behind everyone else, My daughters live in town and they always send me flowers home to enjoy before mine catch up to theirs. So now I will have some permanent ones for my table to make me smile.
You are awesome. Will try to send a picture of the necklace I just finished using the petal cane from your other video. I am so blessed to have you as my teacher. I have come a long way since I have been learning from you , and I have been playing for about ten years, only now I have no fingerprints and the beads feel so soft and wonderful. Thank you for all of your lessons!- Karonkay
Maybe it’s because irises are one of my favourite flower, or maybe it’s the colour combinations, but this is my favourite video so far. I already know how I’ll be incorporating these beads into a necklace for a friend.
The name Iris means RAINBOW in Greek (they certainly seem to come in all manner of colourful combinations.
The Iris shape is used as the fleur-de-lys symbol.
It is the State flower emblem of Tennessee.
The DOUGLAS Iris (Iris dougasiana) is found growing wild (Sounds about right ha ha) along the coasts of California and South Oregon.
The Yellow Flag (Iris pseudacorus) can be commonly found growing along riverbanks, marshland and even ditches here in the UK.
So now I expect, even in far away places Cindy’s poly versions will be blooming. Thankyou Cindy. Wonder how many different colours there will be!
While I’m not even the slightest bit into flower beads myself — particularly the sculpted kind! LOL — my immediate thought on seeing the examples in the preview video was that one should be able to make sculpted fuchsia beads in a very similar manner. Fuchsia flowers generally hang down, so when your polymer clay versions do so as well at least it will look correct! ;)
Oh, oh, oh!! I can’t decide which is the most beautiful, the shape of the flowers or the colors you used. I was looking at my newly-blossomed rhododendrum flowers today, wondering how I could make them in polymer clay. I think this tutorial might help me to figure it out. It just amazes me how my creativity just explodes with your tutorials.
I try not to wish time away. It just seems as, an unatural thing to do, because time is so precious. Can’t wait until Friday to see your tut. Wow, you just keep coming up with great ideas. Thanks in advance.
Another beautiful bead shape to add to our collection!!…these make a really pretty focal bead. Looking forward to tomorrow. = )
My irises are blooming now and I have one on the kitchen table. I’ll have one to use as an example.
Question about the torn watercolor beads. Will tumbling or sanding them take off the white and black parts that are showing since they are so thin?
They are so cute!! I love the colors. I can’t wait to make some. Thanks for another great tutorial. :)
Ohooooo! This looks sweeeeeet!! My Michaels just got the new colors of Premo in, so if you haven’t checked your Michaels near you yet, do so!
I had a feeling you were going to come up with a cool flower! Maybe we are on the same wave length :)
@Catalina: Oh I hope my Michaels has the new colors, I’ve been waiting forever!! Sick of paying shipping cost. :)
The Irises are just so beautiful. I love sculpted flowers. I’ve made sculpted paper flowers and tried a bit with wax too and plasticine. Can’t wait to watch this tutorial!
the colors are stunning!
Love these sculpted flowers…beautiful! Looking forward to Friday. Thanks, Cindy!
I really really love these, just as i do with your other flower beads. Its only sad that most flowerbeads hang down instead of showing the front of the flower. I still havent found a way to do that. Sometimes i succeed by putting a little piece of clay in the back and put an eyepin through there, but when i assemble the necklace the flowers start twisting and turning. So i guess flowerbeads like these are not really suitable for what i would like?
@Marion K: I’ve thought about that same thing too, Marion. I wonder if a chain in the middle like Cindy has shown – except have the flower flipped with the stem down would work somehow? Probably not so great for earrings…better as a pendant because it would have support from the back. Or maybe jump rings through petals on the right and left side – both attached to chain or cord? I think I’ll keep playing around, sometimes the ideas don’t actually cooperate with the way I picture them in my head!
Thank you everyone for the sweet comments! It will be fun to see what you guys make with these pretty flower beads!
@Marion K and DJ: Yeah, these style of flower beads can pose a bit of a design challenge, in regards to showing the full flower in it’s glory. If you remember the Variegated Rose Beads from awhile back, they have a similar challenge. One option would be to trim the back off a bit with a sharp blade after baking and preferably while still warm. (Baked clay is easier to cut when warm.) Then you can mount it in a bezel, similar to how I mounted the Iris Bead in the Ring Bezel. Another idea would be to try and drill a hole through the side of the bead, but that can be a little tricky to get right without wrecking the petals. You can also treat it like a link with wire, or string them on a thread like a flower lei. Search through Google images or beading magazines for flower bead jewelry designs for some more ideas.
@Freda K: About tumbling the watercolor beads… you can if you are careful and check them often to make sure that they haven’t been sanded too far. Checking every 1/2 hour to an hour will do.
Cindy -this is such a colorful tute. Can’t wait. I agree with Brenda -a full flower arrangement -how wonderful. I love flowers -so, with bated breath -we wait. Tap.tap,tap………….impatiently ;D
Very pretty. Looking forward to another Friday! Thanks Cindy.
Gosh these are pretty. Another great Friday coming up.
These are absolutly beautiful! If you keep going Cindy we will be able to make a full flower arrangement ;) Cute, cute, cute….
@Brenda: Flower arrangement!! Yes, that is a great idea! Maybe a corsage, too!
Wow, simply stunning, I think. I love the sculpted flowers; all kinds. Can’t wait to get my hands on this one! Love the bling ring!