Silicone Molds From The Bargain Rollback Company
Video #711: Although these molds are not made specifically for polymer clay, I was still able to find some creative uses for them.
More...

IN THIS POST: — silicone molds — rubber molds — bargainrollback.com — moulds — polymer clay molds — resin molds — liquid polymer clay — tls — liquid sculpey — heat safe — tpr molds — plastic molds — food safe — chocolate molds — candy — christmas — skull and cross bones — lego mold — soap mold — glitter — snowman mold — gelatine mold — uv resin — ultradome — epoxyjewelry — (Topics marked with an asterisk* are discussed in the Comments Section below).
In today’s demo, I am going to show you some silicone molds from BargainRollback… they were kind enough to send me some samples to demo for you.
I show samples of several Silicone Molds (Heat Safe), as well as Silicone and Rubber Molds (Not Heat Safe).
Direct links to the specific products are listed below the video on this page.
The Bargain Rollback company also carries Silicone and Plastic Molds that are not heat safe… more suited for use as (very fun) Ice Trays.
In this video I discuss the differences between the different silicone molds and some ideas for using them with polymer clay (liquid and solid), resin, ice, and chocolate.
I forgot to mention that these moulds can also be used for plaster, soap, ice cream, candy and probably a ton of other things if you put your mind to it.
ADDENDUM: Unfortunately, the Bargain Rollback company is no longer in business.
00:00:03 –> 00:00:08 Hi guys, its Cindy Lietz, your Polymer Clay Tutor, and today’s PcT Product Demo, I’m gonna
00:00:08 –> 00:00:16 show you some Silicone Molds from BargainRollback.com. Now, a little while ago I was contacted by
00:00:16 –> 00:00:21 BargainRollback.com to see if I wanted to test some of their Silicone Molds and I said
00:00:21 –> 00:00:29 sure, so I checked them out and I’ve picked out a few different patterns. Now, I’ll show
00:00:29 –> 00:00:32 you the patterns and then I’ll talk about the different types of Silicone molds that
00:00:32 –> 00:00:38 they have and how I used them. So this is a cute little… this is a Silicone Mold,
00:00:38 –> 00:00:48 and this one is of little Lego people, this one here is also a Silicone mold and it has
00:00:48 –> 00:00:54 quite deep cavities and it’s got like a Ladybug, Star, Butterfly, Hearts, Flowers, that kind
00:00:54 –> 00:00:58 of thing, this one here is also Silicone… and the reason why I keep bringing that up
00:00:58 –> 00:01:03 is ‘cause some of them are Silicone and rubber, but this one’s also Silicone and it’s
00:01:03 –> 00:01:10 got some Butterflies and different things in there. This one’s also Silicone and this
00:01:10 –> 00:01:15 one’s a little smaller, about the size of Christmas chocolates, that kind of thing,
00:01:15 –> 00:01:23 it’s all little Christmas patterns, and then these two molds here are called Silicone and
00:01:23 –> 00:01:30 rubber, and in brackets they have TPR, I forgot to ask what TPR actually stood for, I’m guessing
00:01:30 –> 00:01:36 it’s the type of rubber that it is, now they also have one more design that I didn’t get
00:01:36 –> 00:01:43 and it is Silicone and plastic combination. Now the reason why this is really important
00:01:43 –> 00:01:49 to know about… and this will be important to know about any of the Silicone molds or
00:01:49 –> 00:01:54 any kinds of molds that you get out in the internet and out in the world or wherever
00:01:54 –> 00:02:00 you’re getting them, there are different types and they can do different things. Now, these
00:02:00 –> 00:02:11 Silicone only molds can actually handle heat, so that means that you can actually put your
00:02:11 –> 00:02:16 Polymer Clay into these or Liquid Polymer Clay into them and you can bake them in the
00:02:16 –> 00:02:24 oven. The ones that have Silicone and rubber in them, they are not heat safe, so they cannot
00:02:24 –> 00:02:30 go in the oven, so if you’re going to use this for anything Polymer Clay related, you
00:02:30 –> 00:02:37 would need to mold it first and then remove it from the mold before you bake it, these
00:02:37 –> 00:02:44 ones are better suited for something like ice, and that’s what… or chocolates or some
00:02:44 –> 00:02:51 sort of food thing like a jelly, these are all food safe, and I actually made the ice
00:02:51 –> 00:02:55 cubes, they’re very cute, okay so they’re starting to melt fast ‘cause it’s quite
00:02:55 –> 00:03:03 warm in here, but the Blue mold there is a Titanic mold, so it’s got the Titanic and
00:03:03 –> 00:03:08 a little ice berg, which is really cute… so in your glass, but I tried to keep it…
00:03:08 –> 00:03:14 put it in a glass to show you and it started melting too fast. Then the Pirate one has
00:03:14 –> 00:03:20 a like a skull and… or a crossbones and a Pirate, and it’s really cute, so it makes
00:03:20 –> 00:03:28 for super cute ice… those molds. I found that they didn’t mold Polymer Clay very well
00:03:28 –> 00:03:34 because they’re a little too floppy, they’re different than some of the other Polymer Clay
00:03:34 –> 00:03:41 molds that are meant for putting clay into, they’re more supported at the back, so here
00:03:41 –> 00:03:48 when you try to press items into… especially such a deep, deep form, it gets a little distorted…
00:03:48 –> 00:03:54 it’s hard to pull it out without distorting it and it uses up a lot of clay to try to
00:03:54 –> 00:04:03 do something in these molds anyways, so they’re not the best really for Polymer Clay, but
00:04:03 –> 00:04:10 all these ones here are great for Polymer Clay. I found that… okay so I have a few
00:04:10 –> 00:04:17 little samples here, some stuff that I baked in some of the molds, in these super deep
00:04:17 –> 00:04:27 ones, they’re not really that suited for molding clay, like the solid clay, I did take out
00:04:27 –> 00:04:33 a small amount and press it in, so if you take… I mean who really wants like a half
00:04:33 –> 00:04:38 an inch thick boot out of Polymer Clay, but a smaller boot, you might wanna use, so I
00:04:38 –> 00:04:44 just took a small amount and pressed it in to the mold, it’s a little tricky to get in
00:04:44 –> 00:04:50 there. And because it’s floppy, you have to kinda reshape it after, ‘cause it wants
00:04:50 –> 00:04:58 to bulge out the sides, but it is possible to get this little mold out of it with the
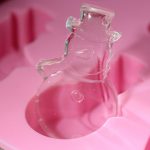
00:04:58 –> 00:05:04 solid clay, but with the liquid clay, there’s a lot more options that you can do. I have
00:05:04 –> 00:05:13 a few… oh, here for example in the same mold is a snowman mold, and… oh, actually,
00:05:13 –> 00:05:20 I just did that one in resin, but I poured some UV Resin into the snowman mold, just
00:05:20 –> 00:05:26 a little bit of it… I didn’t pour it very deep, and I got this cute little snowman that
00:05:26 –> 00:05:33 I could use for a charm, a… some sort of scrapbooking embellishment, some sort of thing
00:05:33 –> 00:05:40 like that. With the UV resin, you wanna make sure that light can get all the way through,
00:05:40 –> 00:05:46 so you don’t wanna add anything to the… like glitter or anything to the UV resin when
00:05:46 –> 00:05:51 you’re putting it in a mold like this, otherwise the light can’t get in there to cure it, but
00:05:51 –> 00:05:58 you can do the clear stuff really well that way. So I also took this mold here and I put
00:05:58 –> 00:06:02 some Liquid Polymer Clay in them… and I’m gonna show you the samples here and tell you
00:06:02 –> 00:06:11 how I did it in a sec, so I’ve got these little Lego guys that I did using Liquid Gold…
00:06:11 –> 00:06:19 the Liquid Sculpey, and I just talked about this in a previous video, and I also used
00:06:19 –> 00:06:27 the Silver on this guy here… of the Liquid Sculpey, and then for this guy, what I did
00:06:27 –> 00:06:35 was I took some TLS or Translucent Liquid Sculpey, so the regular kind, the clear kind,
00:06:35 –> 00:06:42 or semi-clear translucent kind, and I put a very thin layer in the bottom first, then
00:06:42 –> 00:06:50 I sprinkled in some eye lash glitter… the Silvery eye lash glitter, and then kinda mixed
00:06:50 –> 00:06:56 it together and added some more liquid Polymer Clay until I got it a reasonable depth in
00:06:56 –> 00:07:03 there, and got this kind of semi-translucent sparkly robot kind of thing going on, I think
00:07:03 –> 00:07:10 you could do some very, very fun things, I just took a quick playing around with it.
00:07:10 –> 00:07:17 Now, whenever you use something like a liquid Polymer Clay in a mold, I’m finding that you
00:07:17 –> 00:07:23 can get a lot of bubbles in it if you’re not careful, and one of the tips I had read about
00:07:23 –> 00:07:33 was to put your mold in the oven first to mold it… or I mean to warm it up first,
00:07:33 –> 00:07:40 and then when you add your clay to it, it will help prevent bubbles, I did that but
00:07:40 –> 00:07:47 really, really quickly, it started to cool off. So the Gold one, it was done in a really
00:07:47 –> 00:07:54 warm mold, and the Silver one was in a cool one, and there really isn’t much of a difference,
00:07:54 –> 00:08:01 though I do see the odd little bubble on the Silver one that doesn’t seem to be as much
00:08:01 –> 00:08:06 on the Gold, so I think I’ll have to play with that more to see if it makes any difference
00:08:06 –> 00:08:14 at all. As far as pricing goes, these molds are really inexpensive, I guess that’s why
00:08:14 –> 00:08:21 they’re called Bargain Rollback, but the Silicone molds here, the ones that are heat safe are
00:08:21 –> 00:08:31 like $4.49, American, at today’s prices, the Silicone and Rubber, which are not heat
00:08:31 –> 00:08:36 safe… there’s a bunch of different designs by the way, these ones are $2.99 and then
00:08:36 –> 00:08:42 the Silicone and plastic ones that I didn’t talk about, they’re like $3.49, those Silicone
00:08:42 –> 00:08:53 and plastic ones basically have a hard plastic frame here, and then Silicone, the mold parts,
00:08:53 –> 00:08:58 so you can easily pop them out, they’re more suited… they’re obviously not heat safe,
00:08:58 –> 00:09:04 because of the plastic edge, but they are more suited for ice cube trays, as you can
00:09:04 –> 00:09:10 imagine, with a floppy thing like this, trying to get it in, I found these a little tricky,
00:09:10 –> 00:09:15 if you had water in it and tried to put it in the freezer… and they do spill a little
00:09:15 –> 00:09:19 bit, so if you set them in a little tray first, then put the water and then in the freezer
00:09:19 –> 00:09:25 then you’re gonna have less spillage, but that’s what those plastic and Silicone ice
00:09:25 –> 00:09:32 trays are more suited for, ‘cause they have the rigid form. But anyways, there are some
00:09:32 –> 00:09:36 really, really cute designs, as you can see you can use them in a bunch of creative ways,
00:09:36 –> 00:09:41 just make sure you’re using only heat safe ones if you plan to put them in the oven,
00:09:41 –> 00:09:46 alright? So I hope that was helpful for you, and if it was, do let us know if you liked
00:09:46 –> 00:09:52 this video. And if you’ve got a product you’d like us to test or some ideas that you really
00:09:52 –> 00:09:57 don’t understand about Polymer Clay and you’d like us to do a video on it, please your suggestions
00:09:57 –> 00:10:02 in the comment section below. And we have done tons and tons and tons videos, so make
00:10:02 –> 00:10:05 sure to check through there and do a good search and see if there is the answer to your
00:10:05 –> 00:10:10 Polymer Clay question, alright? We’ll see you next time and bye for now.
Our goal is to translate these videos into as many languages as possible. If you are interested in helping with this initiative, then please do contact us and we will figure out a way to make it worth your while :)
Resource Links:
- Amazon: Silicone Molds **
- Related Video: Krafty Lady Art Moulds for Polymer Clay
- Related Video: Gold And Silver Tinted Liquid Sculpey Polymer Clay
- Related Video: Comparing Sculpey, Kato and Fimo Liquid Polymer Clay
- Related Article: Making Molds For Duplicating Polymer Clay Beads
Resources marked with a double ** asterisk are affiliate links. If you click on them and decide to buy something, we may receive some compensation. This does not affect the price you pay in any way. What it does do, however, is helps us to continue providing free videos for you, here at the PcT website. Using our links to purchase your tools and supplies, is always greatly appreciated.
Sponsored Ads & Special Promotions
Shareable Images


To share this full blog post anywhere on the web that allows links in comments, here's a shortened url to copy and paste...
>> https://mypct.ca/v711 <<
Want to chat about today’s post? That’s what the comment section below is for. Scroll Down… We’d love to hear from you!
Or... if you would like to request a topic for a future post, here is the link to do that… PcT Suggestion Box
When using the silicon mold and liquid clay, and we’ll use the snowmen for an example, do you need to put the cold scarf and hat and such in and bake that BEFORE pouring in the white for the body or can the white body be poured in on top of the colored scarf and then baked together? Will the colors run if different colored liquid clays come together?
I haven’t tried multiple colors in the same mold yet Paula, but I would imagine the colors would bleed or mix into each other if you tried to do more than one color at the same time. I would bake them (even if only a few minutes) in between adding each new color. Do let us know if you try it out yourself. I would be curious as to how well it turned out.
Can You tap or lightly drop the mold after you put the liquid clay in like you would a cake to help with the bubble problem? I haven’t worked with the liquid so I was just wondering.
Hi Patricia, you can try that, but the liquid polymer clay is pretty thick and gluey… I found when I dropped or banged the mold on the table the bubbles didn’t really come to the surface that well…. not like they do if you’re molding chocolate. But it probably helps to at least draw them away from the front surface of your piece a little more.
Cindy, thanks for the very thorough review of silicone molds.
Wonder if you would do another video on molds that would help producing identical shapes using polymer clay, like tiles, squares, rectangles, etc. Plenty of cabochon stuff out there, but I’m looking for molds that will reproduce many shapes at once, so they can be further laminated.
If anyone out there has suggestions or sources, would surely appreciate your sharing some links.
Think I just answered my own question, Wendy at Shades of Clay has the perfect types:
If anyone knows of sources with similar types of molds, sure appreciate a link,
Good demo Cindy, of the different silicon molds and clever ways to use them.
I mostly make my own after discovering the magic of silicon a few years ago. I find if I put the filled molds in the freezer for about ten mins to firm them up it is easy to pop them out for baking. I have to support them by placing on a tray or stiff piece of cardboard and also let them dry first before putting them in the oven.
My last Christmas market is this Saturday. It is being held in the new Woodland centre in support of British Wildlife. I have been very busy for the last three Saturdays but this is the last one until the New Year.
I have been making miniature Christmas trees, about 5 inches tall, also using my pyrography machine to personalise my wooden items. Then I will have to concentrate on getting my place clean and put the decoration up. My visitors arrive on the 19th so I will have to box up all my tools and polymer clay and find a place to store it all.
I wish everyone a wonderful holiday and a Happy New Year and look foreward to seeing what you have in store for us……..cheers xx……..
Merry Christmas Elaine and a Happy New Year to you too! Have a wonderful time with your company. Don’t let your clay supplies be stored for too long… they will miss you if you do! :)