Silk Screening Kit From Sculpey Product Review
Video #559: Besides reviewing what all is included in this silk screen kit, I also show you how to use it on polymer clay.
More...

IN THIS POST: — sculpey — silk screen — silk screening — paint — acrylic — texture — surface design — silkscreening — screen printing — (Topics marked with an asterisk* are discussed in the Comments Section below).
Topics Covered In This Video:
- New Polyform Sculpey Product for 2014.
- I had done a quick preview of this product in a previous video.
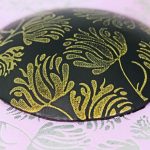
The kit comes with 2 acrylic paints (silver and gold), 4 silk screens with small designs well suited for jewelry, and a squeegee for spreading paint. - A silk screen is a fine screen where the patterned is ‘masked out’ in a rubber/silicone type material. Then in the open areas of the screen, paint is pushed through with a squeegee, leaving the painted pattern behind on the clay.
- I demo how the silk screens work using some Souffle clay called Royalty.
- The matte side of the silk screen lies on top of the clay.
- Make sure that there are no air bubbles under the screen.
- Squeeze out only a small amount of paint and use a squeegee to spread the paint through the pattern. You can always add more paint.
- Put screen into water right away… do not let paint dry in the screen.
- Rubbing alcohol will remove dried paint or liquid clay.
- I show samples of using Kato Liquid Polyclay (Glossy) on Souffle Clay (Matte) as an interesting alternative to using paint.
- New Circle cutters from Sculpey will match the circle silk screen patterns.
- Let paint dry first before manipulating the clay or adding to a hollow bead maker form.
- Test other paints, powders, glazes through silk screens to come up with your own unique uses for the Sculpey Clay Silk Screen Kit.!
00:00:03 –> 00:00:07 Hi guys, its Cindy Lietz, your Polymer Clay Tutor, and today’s PcT product Demo, I’m
00:00:08 –> 00:00:13 showing you the new Sculpey Clay Silk Screening Kit.
00:00:13 –> 00:00:19 So I introduced this to you a little bit ago in that video that had all the new products
00:00:19 –> 00:00:25 from Sculpey for 2014, and this is one that a bunch of you wanted to see how it worked.
00:00:25 –> 00:00:29 And the way…well first of all, here’s the kit here, it comes in a box and it comes
00:00:29 –> 00:00:32 with a few different things.
00:00:32 –> 00:00:39 First of all, it has a couple of paints in here, it’s got Silver and Gold, and then
00:00:39 –> 00:00:47 it’s got 4 silk screens and they are a few different patterns, and the patterns are quite
00:00:47 –> 00:00:48 neat.
00:00:48 –> 00:00:52 Here’s one that’s kind of a Mandala type pattern, this one has some circles on it with
00:00:52 –> 00:01:02 some graphic type patterns on it, this one is really pretty, it has a bunch of floral
00:01:02 –> 00:01:08 and birds and dragonflies and leaves and things on it, and then, this one is another circle
00:01:08 –> 00:01:11 one with a bunch of graphic patterns on it.
00:01:11 –> 00:01:19 Basically, what a silk screen is, is a fine screen that in this colored area… the pink
00:01:19 –> 00:01:26 area, is a kind of a silicone or rubberized type product that blocks the holes in the
00:01:26 –> 00:01:32 screen, and then when you put your color across it in the open areas… the screen is open
00:01:32 –> 00:01:39 and the color goes through, and it doesn’t go through where the pink area is, so, that’s
00:01:39 –> 00:01:43 kinda how it works, now I’ve got a bunch of samples and things I’ll talk about in
00:01:43 –> 00:01:44 a second.
00:01:44 –> 00:01:49 But basically, how they work is you need some clay, I’m just gonna grab some of this new
00:01:49 –> 00:01:56 Soufflé clay… ‘cause why not, and it is, this color is called Royalty and it’s
00:01:56 –> 00:02:02 a Purple color, and we’re just gonna run it through the pasta machine, I’ll just
00:02:02 –> 00:02:05 do it at the thickest setting but it really doesn’t matter that much, depending what
00:02:05 –> 00:02:11 your project you’re using it for, so I’m just gonna roll it out… and maybe we’ll
00:02:11 –> 00:02:17 go down a little smaller, and I’ve got a piece of clay here.
00:02:17 –> 00:02:26 Now, for the…all you need to do is, there’s kind of a matte side and a shiny side, the
00:02:26 –> 00:02:34 shiny side goes down and you can just lay it right on to the clay where you want it,
00:02:34 –> 00:02:39 and then, you just kinda press it down, make sure it’s sticking to the clay, this shiny
00:02:39 –> 00:02:42 side makes it help stick to the clay really well, you wanna make sure there’s no air
00:02:42 –> 00:02:44 pockets or bubbles or anything in there.
00:02:44 –> 00:02:49 And then you can just use whatever clay (*color) you want, I think if it’s royalty, might
00:02:49 –> 00:02:57 as well be the Gold color we’ll use on there, and I’m just gonna put a little bead of
00:02:57 –> 00:03:07 the paint on just above the design, and the box also comes with a little scraper, squeegee
00:03:07 –> 00:03:17 type thing, and we’re just going to spread this ink, or paint across, through the design,
00:03:17 –> 00:03:26 and you can see, if I spread it out, you can push it right into the areas where the open
00:03:26 –> 00:03:31 areas are on the screen…now I tend to go on the light side, I don’t like to waste
00:03:31 –> 00:03:36 paint, so I go light first, and then I can always add more.
00:03:36 –> 00:03:43 So you just wanna scrape it across, back and forth, make sure that all the areas are…
00:03:43 –> 00:03:50 that the paint has gone into…make sure there isn’t too much on there, so I’m just gonna
00:03:50 –> 00:03:53 scrape it back like that.
00:03:53 –> 00:03:59 So I don’t know if the camera can pick that up, but it’s all in the area nice and evenly,
00:03:59 –> 00:04:05 and then all you do is you just peel it up, and you have your pattern left behind, now
00:04:05 –> 00:04:09 any area that you don’t want the paint, make sure to get that off of there right away,
00:04:09 –> 00:04:11 you could use a little baby wipe or whatever.
00:04:11 –> 00:04:18 And then also, you want to make sure that you put this screen into water right away,
00:04:18 –> 00:04:27 because if you get any paint drying in those little screened areas, then it’s going to
00:04:27 –> 00:04:35 be…clog up those areas and it’s not gonna work properly, so that’s really important.
00:04:35 –> 00:04:38 If your paint is water based, then obviously it’s gonna wash off with water really well.
00:04:38 –> 00:04:46 If you use a different type of product on there that isn’t water based…
00:04:46 –> 00:04:50 I would just test it in a small area first to make sure it works, but then you can make
00:04:50 –> 00:04:52 sure to clean your screen really well.
00:04:52 –> 00:05:01 For example, I did these samples here, I used some of the Soufflé clay…what color was
00:05:01 –> 00:05:10 this, it’s called Turnip, and instead of using a paint, I actually used some Liquid
00:05:10 –> 00:05:18 Polyclay, and because the Soufflé clay has a matte finish to it and then the Liquid Polyclay
00:05:18 –> 00:05:25 has a shiny finish to it, what it did was it gave a dimensional shiny tone on tone kind
00:05:25 –> 00:05:28 of effect which I think is very cool.
00:05:28 –> 00:05:36 You have to be a little bit careful with touching it, ‘cause it won’t dry on the surface,
00:05:36 –> 00:05:39 so you have to…it has to be baked first, so you have to be careful with it once you’ve
00:05:39 –> 00:05:44 pulled it off, but when you…if you do use a Liquid Clay on your stencil, you’re gonna
00:05:44 –> 00:05:49 need rubbing alcohol to clean it off because it’s not water based, okay?
00:05:49 –> 00:05:57 So then what you do when you have your pattern on, you let it dry, and I’ve got some pieces
00:05:57 –> 00:06:03 here where I have silk screened on both the Silver and the Gold, and you can see they
00:06:03 –> 00:06:08 look great on the darker colors as well as the lighter colors, and then you can just
00:06:08 –> 00:06:16 use…you know, your cutters, actually this set is matching, this is the new set of round
00:06:16 –> 00:06:23 cutters… graduated cutters from Sculpey as well, and they happen to match…what a
00:06:23 –> 00:06:29 surprise, these circle patterns…just a sec here, make sure I have it lined up, and you
00:06:29 –> 00:06:31 can cut those out.
00:06:31 –> 00:06:38 And now that they are dry, you can actually touch them, but be careful, and you can bake
00:06:38 –> 00:06:46 them on something like this, I’ve got the hollow bead form thing here…these pieces
00:06:46 –> 00:06:52 are all baked, but you would be able to set it on there, and because the paint is dry,
00:06:52 –> 00:06:57 you can actually touch it if you’re gentle, and you can form it down to the hollow bead
00:06:57 –> 00:07:00 form, okay?
00:07:00 –> 00:07:09 So the…okay so what else did I want to tell you about, I’ve got some specific tutorials
00:07:09 –> 00:07:14 on using silk screens and on using the bead forms and stuff like that…because I can’t
00:07:14 –> 00:07:21 really go into it too much, but you can see that there’s a lot of design possibilities
00:07:21 –> 00:07:25 with these silk screens and they’re very easy to use.
00:07:25 –> 00:07:29 You can be quite creative with your finishes, you can use regular… you don’t have to
00:07:29 –> 00:07:34 use the stuff from the kit, you can use the Liquid Clay, like I said, or you can use regular
00:07:34 –> 00:07:44 acrylic craft paints, I also tested out the Martha Jewelry Glaze, it worked great…she’s
00:07:44 –> 00:07:49 getting out of this line, I believe, but you could try that if you have it.
00:07:49 –> 00:07:59 I also tried some perfect pearls, they looked pretty cool, other metallic paints and different
00:07:59 –> 00:08:05 products will work, you can experiment and come up with whatever design you like.
00:08:05 –> 00:08:10 So I hope that was helpful for you, and if it was, let me know if you liked this video
00:08:10 –> 00:08:12 in the comment section below.
00:08:12 –> 00:08:17 If you’ve got a product that you would like me to demo, you’ve got questions, that type
00:08:17 –> 00:08:20 of thing, do leave those in the comment section below.
00:08:20 –> 00:08:26 And also, don’t forget we have a great resource over at polymerclaytutor.com that you can
00:08:26 –> 00:08:31 use the search box there and get answers to all of your Polymer clay questions, alright?
00:08:31 –> 00:08:34 So we’ll see you next time and bye for now.
Our goal is to translate these videos into as many languages as possible. If you are interested in helping with this initiative, then please do contact us and we will figure out a way to make it worth your while :)
Resource Links:
- Related Video: Overview New 2014 Sculpey and Premo Products
- Related Video: Sculpey Souffle Polymer Clay Product Review
- Related Video: Hollow Lentil Bead Polymer Clay Tutorial
- Related Video: French Barrettes Polymer Clay Tutorial
- Amazon: Sculpey Silkscreens **
Resources marked with a double ** asterisk are affiliate links. If you click on them and decide to buy something, we may receive some compensation. This does not affect the price you pay in any way. What it does do, however, is helps us to continue providing free videos for you, here at the PcT website. Using our links to purchase your tools and supplies, is always greatly appreciated.
Sponsored Ads & Special Promotions
Shareable Images


To share this full blog post anywhere on the web that allows links in comments, here's a shortened url to copy and paste...
>> https://mypct.ca/v559 <<
Want to chat about today’s post? That’s what the comment section below is for. Scroll Down… We’d love to hear from you!
Or... if you would like to request a topic for a future post, here is the link to do that… PcT Suggestion Box
Hi Everyone,
I have a question, I’m about to bake some screen printed hollow beads, can they be buffed after baking? I suppose I can try it and find out :) But I thought I would ask you guys first because they are so pretty, I don’t want to ruin them . Thanks
Ginny M.
Hi Ginny, I just tested my black sample with the silver paint and buffed it on high with my fluffy buffing wheel on my JoolTool and it worked great! No paint came off. Of course testing would be a good idea first… other paints may not stick as well. But I was pleased to see that. It means that it won’t easily come off during normal (or even extreme) wear.
Thanks for the new product video Cindy on the silk screen kit. I did get mine but haven’t had time to use it. Now that I have seen the way you used the liquid clay for a tone on tone, that has gotten me excited to try this. I like that look so am gearing up to try that asap!
Hi Cindy:
This is such an exciting process!
I am especially interested in using the liquid clay for this technique. My question is: how do you transfer the sheet to the hollow bead form without distorting it since it has to bake to dry?
Maria
Maria, I’m just jumping in here, but after I cut out my circles that fit the domed form, I just used my slicer to remove them from my work surface (a piece of marble) to the form. They really weren’t that easy to distort, but I was being gentle with them.
Also, I found when applying the circles to the dome, just start very gently pressing with 2 fingers on opposite sides of your cut circle, then go around the perimeter; “gently” being the operative word. I sort of went around the edges tapping them with the pad of my finger and kind of rolling my finger off downward; thus helping make sure the warmth from my finger didn’t pull the circle back up.
Thank you Rebecca! So as long as the design does not reach the edge, this technique should work.
I bought the kit too. Now to use it. I tried some acrylic paint and it works very well. So that opens up a lot of creative possibilities. TY for showing how it worked. Looks easy enough. Today is my play day – so off to try some mad experiments, with the silk screen…………
Hi Cindy!
What a wonderful addition to polyclay!!
How long would you say it took for the paint to dry? The clay didn’t get too stiff to cut or shape? Do you think if the paint was on too thick, the ‘image’ would it crack if you manipulated the clay shape (as you did doming it)?
thanks so much!
I had just tried this kit this very morning, even before I saw this from Cindy! Cris, the paint dries very fast (I gave it maybe a minute to sit before cutting out), and the paint did not crack when I manipulated it on the doming form, but I was very gentle with it as I was trying to not distort the edges. I think, really, with using the silkscreen, it would be difficult to get the paint on too thick unless you just really went overboard with the paint. My pieces came out looking really great! I’m hooked!
Thank you for showing us the Sculpey Silk Screen Kit Cindy. This is so exciting! I’m looking forward to trying this out, if the product is available in the UK.