Square Polymer Clay Rainbow Cane Skinner Blend Plug
Video #475: You will use this type of cane a lot in more complex caning projects.
More...

IN THIS POST: — cane slicing — cutting — reducing — conditioning — scraps — waste — teardrop blends — skinner blends –gradients shifts — skinner blend plugs — skinner blend block — skinner blend cane — (Topics marked with an asterisk* are discussed in the Comments Section below).
Topics Covered In This Video:
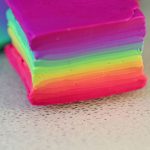
- A Skinner Blend Plug is a square cane where the blend goes from the bottom to the top rather than from the center out like in the Round Skinner Blend Cane.
- Roll out your blend in a long, skinny strip or tape.
- The thinner the tape, the smoother the blend.
- Fold the blend back and forth into a square stack.
- Avoid air pockets.
- Reduce cane.
00:00:03 –> 00:00:06 Hi guys, its Cindy Lietz, your Polymer Clay Tutor, and today’s Mini Tute, I’m gonna
00:00:07 –> 00:00:11 show you how to make a Skinner blend plug, or square cane.
00:00:11 –> 00:00:17 Now, in a previous video, I showed you how to make a Skinner blend or a Teardrop blend
00:00:17 –> 00:00:22 in a rainbow style like this, so you’ll wanna watch that.
00:00:22 –> 00:00:27 Then in another video, I showed you how to make it into a long, skinny strip that we
00:00:27 –> 00:00:32 could roll into a Skinner blend cane like this one here.
00:00:32 –> 00:00:37 Now I wanna show you how to take this long strip and build it into what’s called a
00:00:37 –> 00:00:43 plug, or a square cane, where the color…instead of going from the center out, it goes from
00:00:43 –> 00:00:45 the bottom to the top, okay?
00:00:45 –> 00:00:53 So, I’ve rolled it out…now one thing to keep in mind, the thinner your strip is, the
00:00:53 –> 00:01:01 more smooth the colors will be gradiated, so, when the tape gets really, really long
00:01:01 –> 00:01:06 like this though, it gets a little trickier, so I’m just gonna leave it at this thickness
00:01:06 –> 00:01:14 here which was about a 2 or 3 on my machine, which is about 3 playing cards thick.
00:01:14 –> 00:01:19 So I’m just gonna start off by taking one of the ends here, and I’m just gonna fold
00:01:19 –> 00:01:24 it over…and this is pretty simple, once you’ve rolled out your strip, I’m just
00:01:24 –> 00:01:30 gonna fold it over about an inch or so wide, and then fold it back, and go back and forth
00:01:30 –> 00:01:34 like this until I have run out of cane.
00:01:34 –> 00:01:40 So it’s pretty simple, you just don’t wanna have any air pockets left in there,
00:01:40 –> 00:01:49 if your strip is really thick, the color shift will be kinda clunky… which might be a look
00:01:49 –> 00:01:57 that you want, if it’s really thin, it’ll be smooth, so that is up to you and the style
00:01:57 –> 00:02:01 that you’re making, I’m just gonna go right along here… it gets a little easier
00:02:01 –> 00:02:05 to go as it gets thinner.
00:02:05 –> 00:02:13 Now, these types of Skinner blend plugs and square canes are used in more complex canes
00:02:13 –> 00:02:19 like kaleidoscope canes and picture canes and all kinds of stuff, so having this as
00:02:19 –> 00:02:25 a basic skill is really important if you’re going to be working with Polymer clay canes.
00:02:25 –> 00:02:32 So isn’t this neat, it’s turning into a rainbow, just like that.
00:02:32 –> 00:02:37 Now you wanna make sure you’re not getting any air pockets, like I said, so you just
00:02:37 –> 00:02:43 make sure it’s pressed down in between, and you just finish off like that.
00:02:43 –> 00:02:50 Now, if you’ve pressed it together really well, you’ve got a good cane here, and you
00:02:50 –> 00:02:54 can reduce it…I’ll show you how to reduce a square cane in another video.
00:02:54 –> 00:03:03 But let me just take a nice slice off the front and show you how nice this Skinner blend
00:03:03 –> 00:03:07 plug is, isn’t that cool?
00:03:07 –> 00:03:13 Now if you see any little air pockets, then that means it’s not compressed together
00:03:13 –> 00:03:18 well enough, and during the reducing process that… those would come out.
00:03:18 –> 00:03:20 So I hope you enjoyed that, and it was helpful for you.
00:03:20 –> 00:03:25 If it was, make sure to press that like button I really appreciate it.
00:03:25 –> 00:03:30 And my question for you today is, is there any particular technique that you would like
00:03:30 –> 00:03:31 to learn from me?
00:03:31 –> 00:03:35 Make sure to leave those comments in the comment section below, I’d love to hear from you.
00:03:35 –> 00:03:39 And don’t forget to subscribe to our channel, we have new videos that come out every week
00:03:39 –> 00:03:41 and you’re not gonna wanna miss a thing.
00:03:41 –> 00:03:44 We will see you next time and bye for now.
Our goal is to translate these videos into as many languages as possible. If you are interested in helping with this initiative, then please do contact us and we will figure out a way to make it worth your while :)
Resource Links:
- Related Video: Polymer Clay Skinner Blend Instructions.
- Related Video: Lietz Teardrop Blend Color Gradients Made Easy.
- Related Video: How To Reduce Polymer Clay Canes.
- Related Video: Long Skinner Blends & Round Skinner Blend Canes.
Resources marked with a double ** asterisk are affiliate links. If you click on them and decide to buy something, we may receive some compensation. This does not affect the price you pay in any way. What it does do, however, is helps us to continue providing free videos for you, here at the PcT website. Using our links to purchase your tools and supplies, is always greatly appreciated.
Sponsored Ads & Special Promotions
Shareable Images


To share this full blog post anywhere on the web that allows links in comments, here's a shortened url to copy and paste...
>> https://mypct.ca/v475 <<
Want to chat about today’s post? That’s what the comment section below is for. Scroll Down… We’d love to hear from you!
Or... if you would like to request a topic for a future post, here is the link to do that… PcT Suggestion Box
Hi Cindy……Once you get the skinner blend plug, how would you use it? Do you cut off a slice and run it through the pasta machine to make a blended sheet again? Thanks
Hi Linda, you could do that, but there are tons of other things you can do with a cane like this. You can make all kinds of complex canes with it. Use the slices to make beads. Put it into your extruder and make awesome rainbow extrusions. Just type Skinner Blend into the search box and you will see all kinds of uses for a skinner blend cane/plug like this.
I have been wanting to make a rainbow cane for quite some time but could never figure it out. THANK YOU for this wonderful video, I am running (when i finish this) to my clay room to do one,
THANK YOU THANK YOU THANK YOU!!!!!!!!!!!!!!!!!!!!!!!
This darn process for a rainbow Skinner Blend actually scared me, can you imagine, but since I saw how easy it was, I tried it and, wala! it’s beautiful, I love it!
Thanks again Cindy, you seem to be able to think I can do anything!
Take care,
Joy
Hi Cindy,
I’m having a problem with breakage. Most of my stuff is about 1/4 to 1/2 inch thick. I am baking for 30 minutes at 275. I use Premo clay. Any ideas? Should I just bake longer?
Can you give me ideas on how to use my new Dremel tool?
Thanks,
Cheryl
BTW, I am a new subscriber, but how to I access the library so I can see the rainbow bead video?
Hi Cheryl,
Yes I always recommend to bake for an hour. There is lots of info here at the blog that will be helpful for you… type “baking” into the search box at the top of the page to get a list of articles, videos and comments you can review.
And chances are that if you are having troubles with baking at this stage in your learning curve, it is likely that there are other beginner issues you should brush up on as well. So that you know, my $37 Polymer Clay Basics Course has everything wrapped up conveniently into a 39 part video series that will bring you up to speed quickly. Here is a link to where some of the course feedback comments have been posted. And here is the link to where you can purchase the course if you feel it is right for you…
Polymer Clay Beginners Course
Now in regards to your questions about Dremel Tools and rainbow beads… again the search feature will be your best friend for getting feedback quickly. Just type “dremel” and “rainbow” or “rainbow bead” into that little text dialog box at the top of every page at this blog site, and you will be presented with all kinds of relevant information to get you pointed in the right direction.
And if you can’t find what you are looking for, then type your comment directly into the comment section under a relevant article, and either myself and/or some other helpful member of the community here, will respond.
PS: If it is the Frosted Rainbow Flower Beads Tutorial that you are wanting to access, it is in the $9.95 Vol-044 Back Issue Package. Here is the direct link to where you can add that Volume to your paid members library account if you are interested… Frosted Rainbow Flower Beads
.
Not that you are busy enough, Cindy. But, I’d sure love to see you do a video tool segment on Dremels in the future. I’ll bet I could learn a lot about how to set it up more stably and use one more confidently. The recent vids on all the new tools and equipment makes me want to ask you to show all of it’s capacities in polymer clay.
That is a good suggestion Jocelyn! I’ll add it to the list.
I’ll add my “want” to the Dremel suggestion for future vid.
Not wanting to sound like an echo here but…
ditto on the Dremel :-)
Sounds like a good one to do guys… I’ll add it to the list!
Hi Cindy,
I’m new to cane making and I now see how to reduce them. Most of the people have shown me a rolling technique which causes distortion.
I would also like to know about clay mapping which is used in cane design. How is it used and exactly what is it?
Thanks for your help!
Cheryl
Hi Cheryl, welcome to our blog. At the top of our blog is a search bar and if you type in the words “how to reduce a cane”, you will find many links that should help you in that endeavor. It is a wealth of information. In regards to cane mapping, Barbara McGuire has an excellent tutorial showing you how to do this. Here is the download link for the PDF.
Thank you, have a great week.
Hi Cindy
Thank you for youe useful videos.
I need help I have a lot of canes but they became dry and I can’t use them. Is Is there a way to rascue them??????????????
thank you’
miriam
Hi Miriam, welcome to our blog. There are several ways to use dryed out canes and even to warm them up again. At the top of this blog is a search Bar. Type in restoring old canes or any words that are associated with what you are looking for. You will find many helpful tips on saving and using your old canes. Good luck, so nice to see you here.
Hi Cindy. Thanks so much for your wonderful videos. It is very gracious of you to share the information you have gathered in your work with polymer clay; you are very inspirational. Can you answer the following questions and perhaps do a video on one or more of them: 1) Can polymer clay be mixed with gouache paint either before or after curing? What about oil paints, acrylics or watercolor paints? 2) Can magic eraser be used as a good substitute for the different grades of sandpaper when trying to get a shine on a cured PC piece? I read about using magic eraser on clay on some other site and I was wondering what your opinion is. 3) What is the best way to make a whole for beading purposes in a very long bead (approximately 3 inches) without distorting its shape? Can you freeze the clay or cure it part way and then make the hole? I look forward to “hearing” your answers to these questions and thank you for taking the time to share all the info you do with your many fans.
Hi Petrina, those are some good suggestions! I’ll definitely add them to the list. I’ll do some test labs on adding different types of paints to polymer clay. And I’ll demo how a magic eraser works on polymer clay… (not very well btw). As far as putting holes in beads I do have videos on that already. Just type ‘bead holes’ and other variations into the search box at the top of the page and you sure be able to find your answers pretty quick!
I’ve also been wondering about the magic eraser. I played with it and got a matte finish but it did take out all my prints and scratches. Would love a test lab about it to get some details about how it works good and bad.
Hi Kate!
Love the effect you get with the Magic Eraser. My hands are hot, big (man hands, lol) and heavy handed. Wish a fingerprint texture was acceptable in the industry, but, instead, I am saving my pennies for Cindy’s tutes and the JoolTool, LOL!
Back in the olden days, folks used to recommend smearing the work with petroleum jelly for the final smooth down. It works fine if you need a surface ready to buff to a high gloss.
All best and good luck!
My hands seem hot too. The experiments are endless with so many product to mix and try! I want the JoolTool too, but I try to pick only one expensive thing per year to go all out on and I’m just about to buy that nice LC czextruder with all the accessories. This hobby is going to make me broke haha. Luck to you too :) and thank you!!
Cindy, thanks so much on the refresher video for the Skinner plug. I still have to look up the instructions when I want to make one of these! I would love to have you do a tutorial on how to do Bargello with PC. I love doing the Mosaics and this technique of Bargello really appeals to me. Could you put it on your list to do? Thanks Doll.
Sure Dixie Ann, I’ll put Bargello on the list!
Hi Cindy,
I appreciate all your videos. Is it possible to teach us how to make a nice polka dot cane.
Thank you to share your passion.
Joane
Hi Joane, thanks for the suggestion! I’ll put it on the list!
All those gorgeous color recipes……..
I have been neglectful of them, and don’t even know how to access them. I sort of stumble on them by accident.
Doug, is there a way that you could have someone write a short over all gather and print program, so that each one could be printed in a row down a page. If you did offer the report version, certainly, you and Cindy should be paid additionally, especially because of mailing costs.
Or maybe for a fee you could give us a link that could run a color report that would allow us to print them out in bulk at home?
I would love such a feature, slam it into a binder, then add all the color recipe modifications to make all discontinued colors right next to it from the Sculpy site. Then, on “neyt” days, in bed with heating pads, I could start doing some color mixing and experimenting, lol.
Plus, I would then have a lovely binder collection, like Cindy’s where I can keep my favorite colors in those plastic sleeves. What a winter project, yum.
Hi Jocelyn… coincidentally, Cindy and I just spent most of today planning out a new PDF design for the color palettes. You’ll be able to print the document(s) on standard size 8-1/2″ x 11″ paper, and then 3-hole punch the paper for archiving everything in a binder. This product will include the color inspiration photo, the color chips, the four recipe cards and the written description for the palette color names. It’s a huge project so, we have to “Job” it out… but the wheels are now in motion.
Yippie! Truly wonderful news, and I thank you both!
Ditto to Jocelyn’s comment :-))
Doug, this pdf printout sounds terrific. So long as we can access them later if needed. All my pdf’s were corrupted by a virus along with some of my other files so as long as I’m a member I would like to be able to re-print them if that should happen again.
Will keep that in mind Dixie Ann. Thanks for your input.
And just to let everyone know in advance… since we are having to contract this project out… it will be set up as a separate product in the shopping cart… and won’t be automatically included in the $3 per month membership. Not all of the details have been fleshed out yet, but as I said above, the wheels are now definitely in motion.
Thanks Cindy,
It is always good to watch you actually doing a technique instead of just reading about it – so much clearer.
I have a different question though as I’m “trying” to get organized. I love your color recipes, but I’m too lazy to cut them out in that very nice form. In other videos, I’ve seen your box of recipes and was in awe. Do you have a secret for printing and managing to get them cut out in that shape? You box looks so nice and the things I try don’t turn out so nice. But – bottom line, they work. I’d just like to see if there are any tips and techniques for that part too.
Thanks so much
Beth
Hey Beth, I actually printed mine out and cut them out by hand. But now since there are so many recipes, I realize that isn’t the most user friendly. We’ve got to do some updates on the cards here pretty soon, since some of the colors in the old recipes have been discontinued and the cards are starting to look dated. Have been thinking about it a bit and will come up with a more efficient way to print them (I like the idea of putting them on rolodex cards but am a little concerned rolodex won’t be around forever either). You can wait for the update, just print out sheets of them and not cut them out for now, or you could try printing them out onto cards. That’s up to you.
Cindy
I want to adhere rubber to baked polymer clay and I wanted to know what the best adhesive to use. Ie. scor-tape, crazy glue, E6000, etc?
Thanks Melodie
Hope you can help.
Hi Melodie, to tell you the truth, I am not sure which product would be best for you. I think the E6000 should work, but since I can’t remember if I ever have glued rubber to polymer clay before, I can’t be positive on that. Maybe someone else here has some experience with that?
Grew up on the shore, and spent many hours patching rubber boats and bike tires using the rubber patch system. As long as your rubber is stable and doesn’t stretch, I’d try the same approach to patch your art to the rubber.
First make sure your rubber surface is abraded, I’d use coarse sandpaper, so that when you apply the glue there is more surface area for it to adhere.
You also might have to build a platform system, first glue on a stable patch, maybe, a small tile, then, once that’s dried and stable, then use Kato’s Poly Paste (a thicker spackle like glue) to adhere the poly clay object on top of that.
I’d experiement first on a small scale before final attempt on your treasured art. Poly paste must be baked, so you have to watch that the rubber does not burn, I’d cover the rubber in a good layer of baking soda to give a buffer.
Wish you the best of luck.