Striped Pattern Polymer Clay Sheets
Video #736: Combining thin sliced strips from left-over silk screen sheets, to create a whole new and unique look.
More...

IN THIS POST: — striped sheet — pattern backgrounds — silkscreen — bargello — clay blade — glass mat — (Topics marked with an asterick* are discussed in the Comments Section below).
In today’s video, I am going to show you how to make a striped pattern polymer clay sheet.
I had some leftover sheets of silkscreened polymer clay from last weeks video, and thought I would show you a really neat little tip for taking sheets of clay (plain, silk screened, mokume gane, mica shift, cane slice sheets, striped sheets, blended sheets, anything you want), and turning them into striped sheets.
I show an example of one striped sheet that I made last week using a silk screened sheet of clay with two different colors of paint on one color of clay. This was cut and re-pieced together in alternating strips to create a striped sheet.
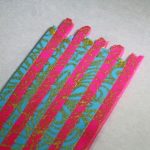
Next I show you how to create a striped sheet using two different colored clay sheets (pink and blue) that have both been silkscreened with the same pattern and gold paint.
What you need for this technique is two or more contrasting polymer clay sheets, a glass cutting board or ceramic tile to work on, a stiff clay blade and optionally… a piece of parchment paper, deli paper or office paper and a roller, spoon, or in my case a espresso tamper, to burnish the sheets together.
When you watch the video you will see that the technique is simple, but has a little trick to it, for picking up and aligning the strips of clay.
This technique can be used to do other more complicated techniques as well, like bargello, ikat, chevron, zig zag and checkerboard patterns.
Have fun, feel free to play with the widths, heights, patterns and angles to come up with a pattern that is uniquely your own!
00:00:03 –> 00:00:08 Hi Guys! This is Cindy Lietz, your Polymer Clay Tutor in today’s Studio Tip and I’m going
00:00:08 –> 00:00:16 to show you how to make a Striped Pattern Polymer Clay Sheet. Now, I have some leftover
00:00:16 –> 00:00:23 sheets of silk screened clay that I had done a tutorial on just last week and I thought
00:00:23 –> 00:00:29 I could show you a really neat little tip for taking–whether it’s silk screen sheets
00:00:29 –> 00:00:36 or different-colored polymer clay sheets or different techniques, say like Mokume Gane
00:00:36 –> 00:00:44 Sheets, even Mica Shift or patterned background sheets that have like rolled out cane slices.
00:00:44 –> 00:00:51 Any kind of sheet of clay can be made into a striped sheet that looks really unique and
00:00:51 –> 00:00:55 you have–and it’s not a whole lot of work. But there’s a really neat little tip, I will
00:00:55 –> 00:01:02 show you how to do it. So what I’m talking about is, here is a striped sheet that I have
00:01:02 –> 00:01:10 made using this sheet that I made last week and it had two different colors of paint on
00:01:10 –> 00:01:16 the same color of clay and they were silk screened on. And I have cut it and stacked
00:01:16 –> 00:01:23 it in a way where it looks like a striped sheet. Now, I’m going to show you this technique
00:01:23 –> 00:01:27 with these other colors of clay here because I think they’re so pretty and I wanted to
00:01:27 –> 00:01:33 use them in another project. And I’ll just show you how to do it. All you need is some
00:01:33 –> 00:01:40 sort of smooth, hard surface, a glass mat like this is perfect but a ceramic tile would
00:01:40 –> 00:01:49 be fine too. And you need a couple of different colors of clay sheets. Now, I’ve got a beautiful
00:01:49 –> 00:01:54 pink and gold silk screened sheet here that I’m gonna use and I think it’ll look really
00:01:54 –> 00:02:03 lovely with this Robins Egg blue and gold sheet here. What I’m gonna do first is I’m
00:02:03 –> 00:02:09 just going to trim up the front sides of these, just put these other ones away actually so
00:02:09 –> 00:02:18 I’ll have more room to work. OK, so I need a nice, straight edge on this sheet here and
00:02:18 –> 00:02:23 I’m just gonna cut it off with my blade. If you’ve got a clay blade that is stiff, it’s
00:02:23 –> 00:02:28 gonna work better than a really flimsy one but you can usually hold this–a flimsy one
00:02:28 –> 00:02:34 firm straight. And this one is already cut straight so that’s it. Now, all I’m gonna
00:02:34 –> 00:02:40 do, now you wanna make sure that they’re not stuck down to the surface too hard on these
00:02:40 –> 00:02:44 stages ’cause you wanna be able to lift them off and I’ll show you what I mean. So when
00:02:44 –> 00:02:49 I come in here and I’m gonna take a strip of this clay here and I can do whatever width
00:02:49 –> 00:02:55 I want depending on what style I’m doing but I’ll do kind of a skinny one and I’ll just
00:02:55 –> 00:03:01 cut it down and then pull the blade forward. And now the strip is stuck to my blade, just
00:03:01 –> 00:03:07 like that. And when I stick it down to my surface here, and make sure it’s kinda stuck
00:03:07 –> 00:03:15 down. Then I’m gonna do the same thing to my blue sheet. So, I’m just gonna take a stripe
00:03:15 –> 00:03:21 and I can do a thick one, a thin one, doesn’t really matter. Just gonna kinda pull it forward
00:03:21 –> 00:03:27 and then, see it’s a little loose there but that’s OK. Now, I’m gonna butt it right up
00:03:27 –> 00:03:34 next to the previous one that I did and stick it down. Now, if you kinda–the first kinda
00:03:34 –> 00:03:39 rows are not stuck down to the glass, that’s stiff yet but I’ll just start building up
00:03:39 –> 00:03:46 the rows, you can really push on it that way. And then I’ll just grab another one and I
00:03:46 –> 00:03:53 can alternate the thicknesses, I could alternate the–I can also do a neat little thing. Well
00:03:53 –> 00:03:59 here, these patterns are pretty simple but say this was a striped sheet of clay, you
00:03:59 –> 00:04:06 could take your next bit and you can shift them this way or shift them that way and that’s
00:04:06 –> 00:04:13 how you can do a really cool Bargello kinda style. So you just butt it up next to it and
00:04:13 –> 00:04:21 you keep going back and forth until you have a really cool sheet of clay. Now, I’m working
00:04:21 –> 00:04:29 with sheets of clay that are the same thickness but you could also do this technique with
00:04:29 –> 00:04:35 ones that were different thicknesses, it would have a very bumpy look on the front but it’s–it
00:04:35 –> 00:04:40 would be another look that you could get. So just do a couple more so I have a decent-sized
00:04:40 –> 00:04:52 sheet to make into something. You can make–cut these later into pendants, earrings, all kinds
00:04:52 –> 00:04:59 of cool techniques. Now, if I want this to become one good solid sheet, then what I’m
00:04:59 –> 00:05:06 gonna do is just grab a sheet of parchment paper. You could use a deli sheet or you could
00:05:06 –> 00:05:12 use plain paper. The nice thing about the parchment and the deli sheet is that it–you
00:05:12 –> 00:05:16 can see through it. You can rub it down with your fingers, you can use the back of the
00:05:16 –> 00:05:24 spoon, you could use a roller. Try not to stretch it unless you want to or you can also
00:05:24 –> 00:05:30 use–I love to use this–this is a burnishing tool. This is a little tamping tool for pressing
00:05:30 –> 00:05:36 espresso down into my espresso machine. It is really nice, you can get it really really
00:05:36 –> 00:05:40 clean so I can use them back and forth and not worried about that. But it’s got a lot
00:05:40 –> 00:05:45 of weight to it, it’s super flat and super smooth so it makes a great burnishing tool
00:05:45 –> 00:05:51 for pressing down the layers without distorting the clay underneath too much. That way, you
00:05:51 –> 00:05:58 can really bond those little strips of clay together. You can also continue to push it
00:05:58 –> 00:06:03 back and forth. You can cut it–I kinda like this jagged edge, it looks quite neat so you
00:06:03 –> 00:06:10 could do all that kind of thing with it and make some really cool striped pattern sheets
00:06:10 –> 00:06:16 using all kinds of leftover clays, patterned clays, like I said, any kind of–you can even
00:06:16 –> 00:06:20 use just plain clay if you wanted to. You don’t have to get all fancy but I think it
00:06:20 –> 00:06:24 looks really cool that way. So I hope that was a helpful tip and that you liked this
00:06:24 –> 00:06:30 video, do let us know if you did and if you have a suggestion for a technique that you
00:06:30 –> 00:06:36 don’t understand how to do, a product you’d like me to demo, a book you’d like me to review,
00:06:36 –> 00:06:42 any kind of thing you’d like me to do a video on, leave your comments in the comment section
00:06:42 –> 00:06:48 below and also, don’t forget to check out all of our tons and tons of videos we made
00:06:48 –> 00:06:54 just have the answer all ready for you. So we’ll you next time and bye for now!
Our goal is to translate these videos into as many languages as possible. If you are interested in helping with this initiative, then please do contact us and we will figure out a way to make it worth your while :)
Resource Links:
- Related Video: Silk Screen Stencils From Create Along Brand
- Related Video: We-R Memory Keepers Glass Mat
- Related Video: Must Have Polymer Clay Tool – Cutting Blades
- Related Video: A Million and One Polymer Clay Earring Designs
Resources marked with a double ** asterisk are affiliate links. If you click on them and decide to buy something, we may receive some compensation. This does not affect the price you pay in any way. What it does do, however, is helps us to continue providing free videos for you, here at the PcT website. Using our links to purchase your tools and supplies, is always greatly appreciated.
Sponsored Ads & Special Promotions
Shareable Images


To share this full blog post anywhere on the web that allows links in comments, here's a shortened url to copy and paste...
>> https://mypct.ca/v736 <<
Want to chat about today’s post? That’s what the comment section below is for. Scroll Down… We’d love to hear from you!
Or... if you would like to request a topic for a future post, here is the link to do that… PcT Suggestion Box
Hi Cindy! I’ve been wondering if Ranger’s Distress Glaze might be similar to Renaissance wax. I own the former but not the latter. Being fairly new to polymer clay I was wondering if this has a use with clay?
You know Laurie, I have been wondering the same thing. I will have to test it and find out!
That was a really cool idea using up odd sheets of clay. I think I will try that and see if I can get a Bargello effect. That idea really piqued my interest. I just spent the weekend trying out a different type of Batik effect so that might be something interesting to try.
Thanks Cindy!