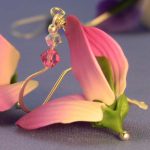
Vol-051 Sweet Pea Earrings PcT Tutorial (Intro)
Video #268: “A 50th birthday present for one of my best friends.” ~Cindy Lietz
More...

** This post is an introduction to one of our paid tutorials.
Today, I am excited to let you all know about the first set of monthly tutorial videos using our new wide-screen hi-definition filming format. If you are not yet up to speed with all the publishing changes that were announced last month, be sure to first watch this video: Polymer Clay Tutor News
“
Hi Cindy, I’ve just finished making the Sweet Pea earrings... WOW you are such a talented teacher... they came out perfect the first time because of your detailed step-by-step method of instruction. Cindy, this is the best thing I’ve done for myself in ages! Thank you so very much.
Donna S
“
My flowers have turned out so beautiful! I'm selling them at a craft show, and I will say they are handmade... but I will also have a sign that says they are from a design by Cindy Lietz. I am so glad I found your classes before I started this adventure. I've learned so much from this.
Mikki M
“
Cindy - I am having so much fun making these Sweet Pea flowers based on what you taught me. I’m now working on making them a little smaller for the earrings. Thank you for providing such great videos, I am understanding the size issue much better now.
Cindy P
Transcript coming soon...
Transcript coming soon...
Our goal is to translate these videos into as many languages as possible. If you are interested in helping with this initiative, then please do contact us and we will figure out a way to make it worth your while :)
Shareable Images


Want to chat about today’s post? That’s what the comment section below is for. Scroll Down… We’d love to hear from you!
Or... if you would like to request a topic for a future post, here is the link to do that… PcT Suggestion Box
Dear Cindy,
Wire working is still new to me, but I love the look of your handmade ear wires. I got a torch for Christmas to do the flame dipped headpins and that was fun! For these sweet pea earrings, I got that they were fine silver and 20 gauge but not if the wire was dead soft, half hard, etc. This will be my first time to order silver and I’d like to get the right thing. Thanks for all your attention to detail.
Lynn
Hi Cindy
Sorry to keep spouting, but my brain is just racing trying to make sense of what happened. I just checked the white fimo that I used in the blend and the package says to bake it at 230. Could that be why it burnt? I think I’ll do a test bake at the lower temperature and see what happens….Wow, nothing worse than making some beautiful beads and then turning them into charcoal!
Hi Karen, so sorry to hear you are having baking problems. The results you are referring to is definitely a problem of the temperature being to high for the clay and not an issue with the clay being thin. Like you just suggested, it is most likely due to using a mix of Premo and Fimo together. Although some people do mix their clays, I don’t because of these very issues. In the future, stick with only one brand and bake at the temp recommended for the brand. You did all the other things right… the tenting… the time… the oven thermometer. Try it again and let us know how it goes. Good luck!
Thanks Cindy. I’ll make another attempt and let you know how it goes.
Cindy
PS I used the same toaster oven and oven thermometer that I normally use. I am completely baffled.
KS
Hi Cindy
I just had my first clay disaster in a long time. I made two pairs of sweet pea earrings and they came out lovely. I used Premo translucent and pearl and fimo for the main colors. I baked them for an hour at 275, I should have realized something was wrong when I saw smoke coming out of the oven but I thought it was coming from the card stock that I tented with. When I took them out of the oven they were burnt to a crisp. They also sagged out of shape. What could I have done wrong?? The only thing that keeps me from feeling completely crushed is that it only happened to four beads this time. I will start over, but I need help. I’ve never baked clay that was this thin before. PLEASE HELP. Thanks
Hi Cindy!
I’m just about to start my second tutorial this one, the sweet pea earrings. I’ve got a question about the tear drop blend. If I only use two colors, two tear drops instead of three as pictured in the tute, do I need to adjust the amounts of translucent and pearl that I use? Thanks for all your help. I love your tutorials!
Hi Karen, you can either leave it the same, use a little less of the Trans and Pearl or add a little more of the other two colors if you wish. It doesn’t matter that much since all the versions will look great and it is just a matter of preference in this case. Have fun with the tutorial!
Thanks for your prompt reply, Cindy. Looking forward to doing the tutorial, just waiting for my supplies I ordered to arrive :) !
Hi Cindy,
I’ve just finished making the Sweet Pea earrings.. WOW you are such a talented teacher.. they came out perfect the first time because of your detailed step-by-step method of instruction. And camera work is so perfect!
Thank you for being there for me… I’m logged on often reviewing your videos to improve my skills. I’m also learning to use the search engine at the Blog – that’s amazing!
AND thank you for your introduction to the JoolTool.. I’m now using mine successfully and can’t wait to see more demos.
This membership, Cindy, is the best thing I’ve done for myself in ages! Thank you so very much.
Best Regards,
Donna Schnare
Airdrie, Alberta
Unfortunately, Michael’s doesn’t carry Premo clay, so I had to do my shopping at Hobby Lobby. But, I did get all the colors needed for the sweet pea flowers, and then some! How could I resist? Trouble is that my brain works faster than my fingers ever could! There aren’t enough hours in the day to do everything on my list!
Oh, and I ordered earring wires (both silver and gold), only to see that you’ve got tutorials on how to make these! That’ll teach me to stay away from ebay (at least for a week)!
Hi Sandy, that is the first Michaels I have heard of that doesn’t carry Premo polymer clay! Must be a smaller store or something. Can very much relate to the brain working faster than my hands… though if you ever noticed in the videos, sometimes my hands move faster than my brain! Glad to hear that you are enjoying yourself! And guess what? The next tutorial (April 2014) there will be another ear wire lesson included so you better pick up some 20 gauge half hard wire so you’re ready! ;)
Of all the YouTube videos I’ve watched, you are absolutely the best! I absolutely LOVE your work! Never thought I’d actually pay for a tutorial, given the fact that so much is available online for free, but 1) I decided that you, of all the experts I’ve seen, certainly deserve to make some money at what you’re doing so well, and 2) I especially love the sweet pea earring (bought this tutorial)!
I am an artist, specializing in miniatures, but I’ve just started playing with clay (both for my mini houses — makes fabulous stone or brick walls and roof shingles — and for jewelry that I hope to be able to sell!). Much like yourself, I’ve tried just about every craft, and have hundreds of stamps (and many, many other items) that I can use for my clay work. I’ve done Skinner Blends after following your tutorial, and will absolutely try the Lietz Teardrop Blend next!
I have several flower molds that are really very tiny and very deep in places (to accommodate the petals), such as these flower molds.
How do I get the clay to fill into all the tiny apertures in the mold? Is this where I would use liquid clay and, if so, what type of resist would be best… Armor All or cornstarch? Or is there a better way to do this? I tried using very soft clay, but it moves around so easily that it loses contact and thus the sharp outlines of the mold. While awaiting a reply, I’m going to try once again simply packing the clay by pressing really hard, using cornstarch dabbed on my fingers to help keep the clay from slipping out from under! Also… these molds can withstand oven heat up to 300 F; do you suggest that, once I get the clay impacted successfully, I freeze the mold for an hour and then remove the clay before baking, or cure the clay in the mold?
Thanks in advance for your help! Being handicapped, this (and my minis) are some of the things that I am still able to enjoy doing, and once I get started, I spend hours until I perfect a given technique! I sure wish you were giving classes at my local Michael’s store.
Sandy, until you receive a response from Cindy, have you tried the search function at the top of this page? I think you will find just about any answers to your questions regarding using molds and what to use as a resist. My experience has been in using the bakeable molds, I didn’t need any kind and they just popped out after baking. I also use a firmer clay such as premo or fimo. Good luck with your clay making. So glad to have you here at the blog!
Thanks Dixie Ann for answering Sandy so nicely!
Hi Sandy, thank you so much for your kind words! I appreciate the support and am so happy that your are enjoying the tutorials. Dixie Ann is right, a firmer clay should actually help rather than a soft one. You can roll your clay into a point where the deeper parts are, to get more clay into those parts. Most silicone molds don’t really need a release, especially if you bake it in the mold where you can. What I would do is bake the piece for ten minutes or so then pop it out… then bake it the rest of the hour outside of the mold. That way you can do many at a time and the heat gets deep into the molded piece.
This video should help with the molding…
Krafty Lady Art Moulds For Polymer Clay
Didn’t see your suggestions until quite late, but that’s fine. Now I know exactly what I’ll be doing tomorrow!!! Playing around, using both you and Dixie’s suggestions to make this work. Oh, and I realized that if I had dabbed some cornstarch on the tips of my fingers while trying to pack the clay into the mold, it might have helped stop it from slipping all over the place. I was really frustrated, but at the same time it was so funny that I couldn’t stop laughing! I decided that I could not deal with it any longer, and just went to bed! So… I’m really glad that you both had such good — and timely — advice!
Oh, and tomorrow afternoon I’m off to Michael’s (where they actually have those electric scooters!) for the right colors for the sweet pea earrings. I did order the molds from Amazon and, because I’m a Prime member, I should have them by Thursday. What a fun week this is turning out to be!!!
Hi Ruthie,
Glad to hear that you are enjoying the videos. Thanks for letting me know.
That green stuff is called Sugru and in newer videos you will see that it is red now. You are correct… it is how I keep the pins from twirling. Actually this “hack” works so well that I can now turn the rack right upside down without having to worry about my beads falling out.
Here is a video you can watch to learn more…
A Sugru Hack To Keep Amaco Bead Rack Pins in Place
.
Hi Cindy,
Love your tutorials! I was wondering what the green material is on your bead baking rack in this Sweet Pea Earring Tutorial? I am thinking it may be something to keep the pins from twirling. Could you tell me what it is?
Thanks in advance!
Ruth Marie
Hi Cindy
Just want to share that I sold a pair of yellow sweet pea earrings on etsy. I now have 3 sales on Etsy.
Congratulations Cindy P!! That is awesome!
I went and took a look at your sweet pea earrings on Etsy and they look great. You have definitely refined your skills and the flower petals look delicate and pretty. I see why they sold.
I do have a couple of suggestions that should help to increase your sales, if you are open to hearing them.
One is, that you should maybe get Duane to look at your photos when posting them. They are a little blurry. Not a ton… which is probably why you missed it since you do have very limited sight. Pictures and words are the only contact people have with your work when its online. So they need to be as good as you can possibly make them.
Another thing is that you may want to consider listing the materials you used in your piece, such as the crystals and what the ear wires are made of. Many people are hesitant to buy earrings when they don’t know what the metal is, since many are allergic to a lot of the metals that are out there.
And finally I would consider adding a little more to your story and your descriptions.
People like to buy from real people. It is nice that you are talking about your dog Meisha but I don’t think it would be such a bad thing to mention that you are legally blind.
Not for a sympathy thing, but as a way to share your true story. You could tell them that your blindness has made you put more attention into the tactile aspect of your work. That you love to design with bright colors and vibrant designs because that is what you see best with your limited vision and what makes your heart sing the most. Stuff like that.
The real you is what people will connect with. Don’t try and hide it. Celebrate it! :)
Hi Cindy!
Hope your Thanksgiving was awesome and blessed! I always check my Inbox every Friday to see what new videos you have put together. It make’s for a very fun week-end.
I recently did the sweet-Pea tutorial, a favorite flower of mine as well! It turned out so pretty and was a bit of a challenge which I enjoyed very much. I like to push the limits!! I made a pendant and a pair of earrings to match, very pretty ! Thank You!
And I would love to say that I really enjoy all the new changes you have made with the website and the way you are doing your tutorials. Great work on Doug’s part! You guy’s are a super team!
I wish you and your family and a Very Warm and Wonderful Christmas! Ok I’m out of here ! Take Care & God Bless
Debra Gibson , Claying in Cali
Cindy – I am having fun making these sweet peas, tulip beads, poinsettia flower earrings, etc. Based on what you taught me during our recent PcT Roadtrip visit, I’m now working on making the flowers a little smaller for the earrings. Thank you for providing such great videos, I am understanding the size issue much better now.
Hi everyone
wanted to pop in and say I LOVE my sweet pea earrings :D
I put a photo up at Cindy’s Facebook page
they are so light and they make up quickly
Your Sweet Pea Earrings are truly Gorgeous Sherry! Love the look you gave them by hanging them upside down. They look very frilly and delicate. Great to seeing you doing such a great job with the tutorial!
Thank you Cindy :)
yesterday was crazy – but I did read your kind words above
wanted to tell you that I said out loud (w/ just the kitties & me here) ‘I hung them upside down?’ laughing & smiling logged off and went to do the dishes —- not sure I ever remember smiling and doing dishes LOL so thanks for that too — just another reason I love it here <3
I thought I would pass along a tip of sorts that some might find handy. I always look for less expensive alternatives to different products and such (I am sure we all do), and I have found that cheap eye shadow provides a nice alternative to mica powders. Goodness, from what I understand, mica is a cosmetics ingredient that is often used to give eye shadow its pearl quality–so why not? I buy the most garish colors I can find and have endured some rather strange looks at the check-out counter, but oh well.
Anyway, I had been making the sweet peas, and I had just enough green left to make the little calyx. I was just about done, so I did not want to mix more. I made the pea pod out of the scraps of the purple tear drop blend I had made. Once on the bead pins, I took my handy eye shadow and applied green, yellow and orange using a small paint brush. You could also use the sponge applicator that comes with the eye shadow, but I find a brush gives more control. The brush also helps work out fingerprints. Because the underlying color was cousin to the flower petals, the pod, although now green, had an undertone of the flower color, and I believe it has, in a way, added to the realistic quality of the flowers.
Also, the eye shadow can add silver or gold tones to any non-pearled clay!
Thank you for your comments and tips Gina! Nice to see your lovely face in the gravatar too! Glad to see you figured it out. Love the sweet pea story and the mica eyeshadow tip. It is fantastic to see you getting involved and enjoying your polymer clay journey!