Vol-078 Faux Raku Macrame Bracelete PcT Tutorial (Intro)
Video #587: Learn how to recreate the look of real ceramic rainbow raku, using polymer clay and some simple supplies.
More...

** This post is an introduction to one of our paid tutorials.
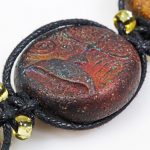
Way back in 2009, I published a couple of Faux Raku Tutorials. One called Faux Smooth Raku, and the other was Faux Deep Crackle Raku. The techniques were, and still are, very unique and fun to do.
Recently, when visiting the fabulous Shipwreck Beads, I found and purchased a couple of real Raku beads with a rainbow finish. I was immediately inspired to revisit the Raku concept, and create a new polymer clay tutorial. This one mimics the Rainbow Raku finish of the beads I just bought.
Gathering together a few other supplies, also purchased at Shipwreck Beads, I came up with a great looking unisex bracelet using the new Faux Rainbow Raku technique… some simple beaded macramé knots… and a lovely toggle clasp. I think you will really enjoy this one.
“
Love the color twist on the Faux Raku Beads. The macrame intrigues me also, as I have never done it. And learning to do it with a fantastic teacher (you Cindy), makes it even more exciting.
Dixie Ann S
“
Cindy, I don't comment often, but wanted to say, You're the Best! I have just started my polymer clay journey (1 yr into this wonderful medium). You gave me my start, I'd love to meet you at one of the conferences and certainly want to give you credit for covering all beginner bases and then some. Thank you!
Sarah S
“
Very cool! Off to the playroom now to have some fun.
Sandra J
Transcript coming soon...
Transcript coming soon...
Our goal is to translate these videos into as many languages as possible. If you are interested in helping with this initiative, then please do contact us and we will figure out a way to make it worth your while :)
Shareable Images


Want to chat about today’s post? That’s what the comment section below is for. Scroll Down… We’d love to hear from you!
Or... if you would like to request a topic for a future post, here is the link to do that… PcT Suggestion Box
Cindy, I just wanted to take a moment to say – you’re the Best! I have just started my polymer clay journey (1 year into this wonderful medium). I’m not one to continually blog or text but I just had to drop you a line. You gave me my start, I’d love to meet you at one of the conferences and certainly want to give you credit for covering all beginner bases and then some …………… thank you!
I’ve been hunting everywhere for the rubber stamps used in this tutorial… My husband loves this look and wants to make it. I found one place but they wanted an extra 30$ just to ship it to Canada. Shipwrecked beads has been out of it for a long time now. Anyone have any ideas for us? Thanks for your help!
Hi Neta, Patt W. in a comment up above said she found those rubber stamps on JTV for quite inexpensive. Maybe you should try there? Also there are probably tons of similar stamps that would look just as cool. Try Googling “rubber stamps primitive design” or “totem design stamps” or something like that. The possibilities are limitless!
Here I found the JTV link.
OH! I followed the link and they have FREE shipping the day you join their mailing list. A bunch of their mats were 50% off on clearance. I got 5 of them for $15, no shipping fees.
Thanks you for your great tutorials, I really enjoy them all!!! Greetings to Canada from Germany :-)
This has nothing to do with the post on this page but I wasn’t sure where I should post this.
Anyway, I had the idea to make magnets with polymer clay and picked up some Aleen’s Tacky Magnetic Adhesive Dots and was wondering if anyone has used these with polymer clay and knows if the adhesive is compatible. Or if anyone has any suggestions.
Thanks,
Sam
Hi Samantha, I have not tried those glue dots on polymer myself… perhaps someone else will chime in? In the meantime, it might be worth doing some tests on your own and see how it works for you. Do let us know how it goes.
Hi Cindy – loved your latest video series with an updated and improved version of Raku and wanted to add my thanks for the fantastic work you both do. In particular I love the way you not only demonstrate a new technique, with instructions for combining colours but also put it to use with several great ideas plus a wonderful project! What you offer is really amazing and after being with you for over 4 years now I still can’t believe how you keep coming up with new ideas! Amazing stuff, thank you Cindy.
Marion
Thank you so much Marion for your kind words!! It makes both Doug and I very happy to know that you are getting so much value from what you are learning here. Thanks for coming back to say that. Most people don’t go to the effort and we really appreciate it!
What a fun project this was! I used to make raku pieces so this was a really neat idea. All the fun colors without the welders outfit, heat, and danger! It’s the first time I’d actually played with the pastels on the clay. I love it!
I decided to make a necklace instead of a bracelet. And, I’d never done macrame before – so that was fun too. Although, I’m not sure macrame and I are ever going to be “good” friends. LOL. I didn’t have a board, but I clipped the end up high with a clamp and secured the other end between me and the counter top. Worked pretty well.
Here is a link to my finished necklace. Not perfect. But, I’m perfectly happy with it. I learned a lot!
Hi Lena, you did a great job on your necklace! The beads look really nice and as far as the knotting goes, you did all the right steps. You just needed to tighten the knots a little more. Pull snugly so that each knot sits up tight against the next knot, so there aren’t uneven loops at the side. Be careful not to pull so tight that it twists though. A little practice and macrame may just become your Best Friend! :)
Thank you for the tips Cindy!
I really screwed up with not enough cord and had to try to weave another length in without knowing what I was doing. Any tips on how to figure out how much you need? I figure there must be some formula. Practice makes perfect. (:
Hi Lena, I am not a macrame expert but generally you need about 3x or 4x the finished length, depending on the knots used. Doubled if you will be folding the cord in half. I can’t quite remember, but I think I said 56 inches for the bracelet. Which we folded in half =28 inches and ended up with a bracelet around 7 1/2 – 8 inches. That comes to 3.5 times the 8 inch bracelet before we started knotting, which we had a little left over. There is probably a formula or a chart out there. I just haven’t hunted it down yet. It is always best to err on the side of too much… Cord is cheap and you can always make earrings or tassels out of the leftovers. :)
Thanks for the extra tips!
Lena, you did a beautiful job on the beads!
Thank you Dixie. I did like the beads the best. Macrame? Eh. Good effort. LOL.
It looks great!
Your beads are BEAUTIFUL !! You did such a nice job. BE Proud!!!!
Thank you so very much. I am always telling people about what I have learned on your site and sent them the link to your site so they can join themselves.
Thank you for sending people this way Marilyn! We really appreciate your support!
Beautiful!
Great to see a type of beads that can be used for the chaps!
Cindy, I didn’t see where you purchased the Mini Macrame Board in the list of materials.
Please tell us where we can get one?
Dixie Ann I got my Mini-Macrame Board at Shipwreck Beads. I’ll also get Doug to add it to the supply list above.
Cool tute.!! I have everything but an appropriate rubber mat. ( Saw it on sale at JTV, for @2.99 + 15% off shipping…just saying)
I will definitely be making a bracelet, sometime soon. Bizzy right now making Christmas stuff……..
Cool! Thanks for the info on an alternative place to pick that stamp up Patt. This project would make a great Christmas present if you need something quick to make up. Have fun with all your Christmas prep… I need to get started on that myself!
Thanks, Patt. I jumped over to JTV and found that mat and a few other things I can use. Great price!
Bought the rubber mat –Love, love it. Distinct images………Good buy, right!!
OH YUCK – I used too much black pastel. I now have a string of black beads. Oh well, live and learn.. I brushed off a lot of the black, but it did stick to most of the colors. Next time , I will just barely dust with the black. After I scrubbed the beads, they could use some Mica powders. Not Raku, but got to save them somehow. LOL Re-cycle, huh??
Oh, that is too bad Patt! Maybe next time you could give your bead a gentle wipe with some rubbing alcohol to remove the chalk if you put too much on? Sounds like you figured out a solution on your own though. At least they weren’t that much work to make and you could find a new look for them.
Very cool! Off to the playroom now to have some fun
Glad you liked it Sandra! Have fun and let us know how yours turns out!
Love the color twist on the Faux Raku Beads. The macrame intrigues me also as I have never done it and learning to do it with a fantastic teacher is going to make it even more exciting.
Thanks Dixie Ann! I think you are really going to enjoy this project. Do make sure to take pictures of how yours turns out.