Foil Pan Lids Will Protect Your Polymer Clay In The Oven
Video #595: Watch this to see what can happen to polymer clay pieces that are not properly protected during the baking process.
More...

IN THIS POST: — baking polymer clay — burnt beads — burning — scorching — tenting — toaster oven — oven thermometer — foil pan lid — aluminum foil — roasting pan — (Topics marked with an asterisk* are discussed in the Comments Section below).
Topics Covered In This Video:
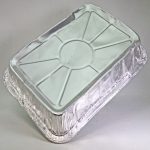
- How to use a foil pan lid to prevent burning your polymer clay when baking.
- I show two samples of small pink hearts cut from Premo polymer clay and baked for 1 hour at 275F.
- One heart was baked directly on the metal pan with no cover.
- One heart was baked on 4 layers of cardstock with a foil pan lid.
- The one on the pan without the lid got fried to a crisp, and the other was just fine.
- I have seen people on YouTube baking their pieces on a metal pan all the time.
- This means that their pieces are constantly burning… or, more likely, that they are baking for far less time than is required to prevent their pieces from becoming brittle.
- I found a BBQ Roasting pan that fit my metal pan perfectly.
- Line your pan with several layers of manila file folders cut to size.
- I like the heavy weight of the enameled metal pan because it holds the heat and keeps the temperature more even and constant.
- Tinfoil pans used as a base don’t hold the heat like a heavier metal pan will.
00:00:03 –> 00:00:08 Hi guys, its Cindy Lietz, your Polymer Clay Tutor, and today’s Studio Tip, I’m gonna talk
00:00:08 –> 00:00:16 about how you can use a foil pan lid to help prevent burning when you’re baking your Polymer
00:00:16 –> 00:00:17 Clay.
00:00:17 –> 00:00:24 Now let me just show you a little test I did here, I’ve got two pieces of Polymer Clay,
00:00:24 –> 00:00:31 they were little Pink hearts, and I baked one on okay, here’s a metal pan here that’s
00:00:31 –> 00:00:37 from my toaster oven, I put one straight on to the metal pan, and one on to a piece of
00:00:37 –> 00:00:44 card stock and put a little tin…or a tin lid on there…foil lid, now, I bake them
00:00:44 –> 00:00:49 both at the same temperature, I used my oven thermometer to make sure it was correct and
00:00:49 –> 00:00:54 I had it at 275F and I baked it for an hour, like I always do.
00:00:54 –> 00:01:00 Now this is what happened to one of the Pink hearts, the one that was directly on the metal
00:01:00 –> 00:01:08 pan, and it was even stuck on there, and you can see that it is absolutely fried, it’s
00:01:08 –> 00:01:16 bubbled and burnt to a crisp, and the other one, which was protected with a foil lid and
00:01:16 –> 00:01:25 the paper underneath is perfectly fine, and it is really nice and strong…this one got
00:01:25 –> 00:01:30 a little bit stuck to the paper, but that will wash off, and this makes a big difference.
00:01:30 –> 00:01:34 I see people recommending you know, I see people putting their clay items just right
00:01:34 –> 00:01:41 on a pan and throwing them in the oven on videos all the time, and what they’re probably
00:01:41 –> 00:01:45 doing…I mean if it’s even surviving that, is they’re probably really under- baking
00:01:45 –> 00:01:48 their clay by just putting it in for a couple of minutes.
00:01:48 –> 00:01:54 And what that does is…I mean it may not burn right away, but it will make it really
00:01:54 –> 00:01:59 brittle and the piece won’t be very strong, so that’s why we bake for the longer amount
00:01:59 –> 00:02:00 of time.
00:02:00 –> 00:02:06 But as you can see the metal pan will radiate the heat and cause the burning from the underside,
00:02:06 –> 00:02:10 and then the elements from the top will burn it.
00:02:10 –> 00:02:12 So what I like to do…
00:02:12 –> 00:02:21 I’ve found…I happened to find some barbecue baking…or roasting pans, these ones have
00:02:21 –> 00:02:27 the holes in the side, and there’s lots of different sizes, but when I found these this
00:02:27 –> 00:02:35 summer I had measured the…my pan here and took it to the store and made sure that I
00:02:35 –> 00:02:41 found the lid that would work out perfectly for my pan, and I just had to roll out the
00:02:41 –> 00:02:47 foil edges just a little bit so that it would fit on there and snap right on.
00:02:47 –> 00:02:51 Then what I do… so that’s what I always use, and this is instead of tenting, I also
00:02:51 –> 00:02:56 have done videos where I used a piece of paper to tent, but this is really nice ‘cause
00:02:56 –> 00:03:03 I don’t have to worry about it getting scorched in the oven.
00:03:03 –> 00:03:10 And then I also line my pan with some file folders, and I had to trim the corners a little
00:03:10 –> 00:03:15 bit just so that it would fit nicely in the bottom, and that’s gonna insulate the piece
00:03:15 –> 00:03:17 from the bottom side.
00:03:17 –> 00:03:23 Now I could a use a tile like I used to use, but this pan fits… came with my oven and
00:03:23 –> 00:03:32 it fits perfectly, I also like that, it is large and thick, it is…it will hold the
00:03:32 –> 00:03:38 heat, and it’s good if it holds the heat, because it’ll keep the heat even, as long
00:03:38 –> 00:03:43 as you’re insulating the bottom and keeping it from scorching, in fact, it’s a better
00:03:43 –> 00:03:50 use to have either a tile or a heavier pan like this than to just say use the bottom
00:03:50 –> 00:03:56 of a tin pan, ‘cause these tin pans will heat up and cool down super-fast, ‘cause
00:03:56 –> 00:04:02 they’re just a little aluminum pans, they don’t have much weight to them, so you’re
00:04:02 –> 00:04:06 better off just using those as lids and a different pan as your bottom.
00:04:06 –> 00:04:12 So I hope that was helpful for you, do let us know if you like this video.
00:04:12 –> 00:04:17 And if you have any suggestions for future videos, test you’d like me to do, products
00:04:17 –> 00:04:23 you like me to show you, make sure to leave those in the comment section below.
00:04:23 –> 00:04:28 And don’t forget we have a great resource over at PolymerClayTutor.com where you can
00:04:28 –> 00:04:33 use the search box and find answers to all of your Polymer Clay questions.
00:04:33 –> 00:04:35 We’ll see you next time and bye for now.
Our goal is to translate these videos into as many languages as possible. If you are interested in helping with this initiative, then please do contact us and we will figure out a way to make it worth your while :)
Resource Links:
- Related Video: Tent Polymer Clay While Baking To Avoid Scorching
- Related Article: How to Bake Polymer Clay in a Toaster Oven
- Related Video: Simple Tips To Avoid Burning Your Polymer Clay
- Related Article: Dirty And Discolored Polymer Clay
- Amazon: Foil Pans **
Resources marked with a double ** asterisk are affiliate links. If you click on them and decide to buy something, we may receive some compensation. This does not affect the price you pay in any way. What it does do, however, is helps us to continue providing free videos for you, here at the PcT website. Using our links to purchase your tools and supplies, is always greatly appreciated.
Sponsored Ads & Special Promotions
Shareable Images


To share this full blog post anywhere on the web that allows links in comments, here's a shortened url to copy and paste...
>> https://mypct.ca/v595 <<
Want to chat about today’s post? That’s what the comment section below is for. Scroll Down… We’d love to hear from you!
Or... if you would like to request a topic for a future post, here is the link to do that… PcT Suggestion Box
I have a question, as I am not baking clay yet.
Is it safe food wise to use my wall oven? I saw online if I use two aluminum pans that it traps everything inside. However I see Cindy uses a pan with holes. I am wondering how safe is it to bake clay in an oven that is used for food as well?
I am so confused, as I have read on blogs to never do this, and then on another blog I read that its safe to bake clay in the oven.
Thanks,
Sarah
Hi Sarah, polymer clay (at least the brands that are sold in North America) are certified non-toxic and safe to use in home ovens. If you burn your clay there may be a smoky residue on the inside of your oven that you will need to clean before using your oven for food so that you don’t impart the taste of the burnt clay to your food. If you have more concerns, you should go to the manufacturers sites.
I have ALWAYS covered my clay. I use aluminum foil, double folded. Been very lucky and no scorched or burned beads. Covering is definitely the answer to have pretty work. The pan covers are in the works, for a glass vase I want to cover. It is too tall the the convection oven. Your tips and techniques are always soooooooooo welcome.!!!!!!!!!!!! TY TY TY …………
Cindy, I started using the aluminum pan covers a few months back when I notice you were covering your tray with it. I couldn’t find the ones with holes in the sides so I took an awl and made my own. It was such a wonderful improvement, it was quick and easy and everything I bake comes out just perfect especially the translucents. Another thing I always check is the links you have under “You might also like” at the bottom of the page. I have run across things from way back when that I had not seen before or had forgotten about and it is always nice to review them.
Hi Dixie Ann, I don’t know if it makes that much difference to have the holes in the side… maybe it lets the warm air flow around better but maybe it doesn’t matter? The holes were in the pan that fit, so I used it. Works beautifully though!
I have my toaster oven set up in the bathroom so the fumes can be vented outdoors. I want to use my home oven, but I’m afraid that even with the aluminum covers, the smell will completely overwhelm the house and me… So when you use your kitchen oven and cover with aluminum pans, does it do a great job of concealing the fumes and can you still use your kitchen oven for food after using it for polymer clay?
I have baked in my kitchen oven with aluminum pans as a a cover a few times. I have a modest townhouse and fumes can travel to other rooms quickly. And I am quickly bothered by strong fumes. I have not had any problems with baking clay in my kitchen oven. I do pick up some faint fumes when I open the oven, but as I said I tend to notice these things more than many people. And they dissipate pretty quickly. I do run the fan above the stove/oven.
I think they might be a little strong if I was baking a large amount of clay for a very long time (e.g. several batches) but if I crack the patio door (even in cold weather), the brief infusion of fresh air should get rid of it. Seriously, the smell is stronger and lasts longer when I cook pancakes or bacon
I don’t detect any lingering fumes in the oven and feel fine about using it for food later. Just be careful about the temperature so you don’t burn the clay. My kitchen oven actually heats up about 25-40 degrees F hotter than the dial setting. The aluminum cover won’t stop the burning if the oven is that much hotter! So I check it with a couple of thermometers before I put in the clay. I have burned clay and THAT is not nice.
But I say try it once as Cindy describes and see how YOU feel about the smell. Your oven should be fine. I am one of those people who is suspicious about the impact of manmade chemicals on humans so I don’t take this lightly. But these clays are approved by the EU and they seem to have even stricter guidelines about toxins in crafts so I think being moderately cautious and careful should keep your oven safe. (At least as much as anything else in the average modern lifestyle!)
Thank you for your reply. I wanted to be sure I was not going to poison my family. Eventually I will get a toaster oven for clay, but now I wanted to be sure I could use the oven.
Sarah
I bought some foil pans after you had a video about them for covering and use them when I have bigger pieces that won’t fit into my little oven. I’ve never baked on metal but I have baked on tile with no lid and had no burning or scorching. That’s just when I’m in a hurry and forget to cover them.