How to Polish Polymer Clay Beads in a Rock Tumbler
Video #363: Introducing a new polishing substrate to use in your polymer clay rock tumbler.
More...

IN THIS POST: — rock tumblers — polishing — sanding — (Topics marked with an asterisk* are discussed in the Comments Section below).
Topics Covered In This Video:
- Small round beads can be a big pain to sand by hand, so a rock polisher can help out by polishing your beads while you do something else… like make more beads.
- In one of my previous tutorials about Rock Tumblers and Polymer Clay, I demonstrated how to use unpolished river rock as the substrate for polishing polymer beads. Since then, I started using a new plastic material in 3 different grits.
- The plastic substrate can be purchased at Otto Frei (coarse, medium, fine).
- How-to tips for this new substrate with polymer clay beads.
- The final step in the process uses small porcelain balls as a polishing/buffing substrate to get a nice soft sheen.
- I use a Lortone 3lb capacity Rotary Rock Tumbler/Polisher.
- Rock tumbling won’t remove larger flaws such as fingerprints or deep scratches, but it will create a smooth and lightly polished surface on your polymer clay beads.
- The information I share in the video can be used with any shaped bead, including sculpted ones. But they must be able to handle being tumbled around for several hours. Always test first, to see how your beads will fair.
- Don’t pack the barrel of the tumbler too tight. The beads, water and substrate need room to move around.
Do you use a rock tumbler to polish your round polymer clay beads? Or do you prefer using other methods?
I look forward to hearing from you.
00:00:03 –> 00:00:08 Hi guys, its Cindy Lietz, your Polymer Clay Tutor, and today’s studio tip is how to use
00:00:08 –> 00:00:12 a rock polisher for polishing Polymer clay beads.
00:00:12 –> 00:00:18 Now I’ve done a tutorial in the past on polishing Polymer Clay beads in a tumbler, but I’ve
00:00:18 –> 00:00:22 got a new substrate so I wanted to talk to you about that.
00:00:22 –> 00:00:28 Now, any of you that have made small, little round Polymer Clay beads, you know what a
00:00:28 –> 00:00:35 big pain in the butt it is to have to sand and polish them, they’re little, especially
00:00:35 –> 00:00:41 if they’re anything smaller than these ones here, and they’re round so they don’t…they’re
00:00:41 –> 00:00:43 not that easy to deal with.
00:00:43 –> 00:00:51 A rock polisher is a really, really great way to get around the issue of having to polish
00:00:51 –> 00:00:54 and sand each little tiny bead.
00:00:54 –> 00:01:01 The way you could do that is…the way we used to do it, in a previous tutorial I talked
00:01:01 –> 00:01:08 about using river rock as a substrate to put inside your rock polisher to polish the beads,
00:01:08 –> 00:01:15 we used the kind that you would get… the unpolished decorative stone that it was in
00:01:15 –> 00:01:19 floral departments, say like at Michaels or sometimes you could find them at the Dollar
00:01:19 –> 00:01:20 Store.
00:01:20 –> 00:01:25 But I found a product that works even better than the river rock, and I picked this up
00:01:25 –> 00:01:33 at a place called Otto Frei…or Otto Fray, I have been getting a few things there lately,
00:01:33 –> 00:01:39 and they’re a place online that has products that are good for jewelry makers and things…they
00:01:39 –> 00:01:42 have a lot of high end equipment.
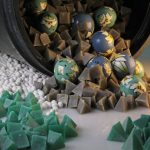
00:01:42 –> 00:01:54 But these little…they’re made of some sort of plastic, and they’re a little pyramid shape,
00:01:54 –> 00:02:01 they’re unique, they’re a little bit rough; like I’ve got them in coarse, medium and fine,
00:02:01 –> 00:02:09 and each grit is a different color, but they have kind of a rough surface on them and a
00:02:09 –> 00:02:11 unique shape.
00:02:11 –> 00:02:16 They’ve got a bit of a cup shape on the bottom side of each of these little pyramids that
00:02:16 –> 00:02:23 works really nicely against the surface of a round bead as it’s tumbling around in the
00:02:23 –> 00:02:28 tumbler, and then it’s got all these sort of other edges…a little pointy edge as well,
00:02:28 –> 00:02:33 and that really helps to kinda get into the crevices as it’s tumbling into the tumbler.
00:02:33 –> 00:02:36 And the way you use something like this is it comes in a…
00:02:36 –> 00:02:44 I believe this is a 1 pound bag and it was about $8.50 when I bought it, and what you
00:02:44 –> 00:02:52 do is you just take the substrate and you dump it in to your rock tumbler, the whole
00:02:52 –> 00:03:00 pound, then you put in your beads and you put in some water and some soap, and then
00:03:00 –> 00:03:06 you just fill it up until it’s just a little bit above…or you know, around the top of
00:03:06 –> 00:03:13 your beads and substrate, then you put it in your rock tumbler, seal it all up and turn
00:03:13 –> 00:03:15 it on and let it tumble for…
00:03:15 –> 00:03:20 I’m now doing it for about a full day, I find that, that gives it enough time to tumble
00:03:20 –> 00:03:25 around in there and work through each of the grits.
00:03:25 –> 00:03:31 Then I dump it out, rinse it, pull my beads out and move to the next grit, and in this
00:03:31 –> 00:03:39 case, it’s the medium grit and it’s a dark Green little pyramid shape, and then they
00:03:39 –> 00:03:46 also carry a fine grit which is a lighter Green, and then as a final…and each one
00:03:46 –> 00:03:54 of these I do for about a day, and then on the last one, what I do is I use this little…they’re
00:03:54 –> 00:04:01 called Porcelain Balls, and they are just what they say they are, they’re little balls
00:04:01 –> 00:04:10 made of Porcelain, and when your beads tumble around in there, they give it a light buffing.
00:04:10 –> 00:04:17 They work really well, these beads here were all put through the tumbler, so I didn’t do
00:04:17 –> 00:04:25 any sanding or anything on them, and they give a fairly nice sheen.
00:04:25 –> 00:04:31 You can add a little added buff to them by using a power buffer like my JoolTool or something
00:04:31 –> 00:04:38 along that line, or your Dremel, but they do a pretty nice job of doing that without
00:04:38 –> 00:04:39 all the work.
00:04:39 –> 00:04:47 Now, you’re not going to remove something like fingerprints with the rock tumbler, it’s
00:04:47 –> 00:04:54 just too…that’s just too much material for it to remove, so make sure before you
00:04:54 –> 00:04:59 put the beads in there…obviously they’re baked, you can’t put an unbaked bead in, otherwise,
00:04:59 –> 00:05:06 it’ll be pulverized, but make sure they’re as perfect as you can get them before you
00:05:06 –> 00:05:13 bake them, and then when you buff them…or, put them through the tumbler, you’ll get a
00:05:13 –> 00:05:15 nice finish.
00:05:15 –> 00:05:23 But they…you can put dimensional type beads in there too as long as they can handle being
00:05:23 –> 00:05:29 tumbled around and sloshed around, so you’ll just have to experiment, always do a few test
00:05:29 –> 00:05:32 ones first to see how they fare in the tumbler.
00:05:32 –> 00:05:38 But I think you’re gonna really enjoy the lack of effort it takes to do a whole great
00:05:38 –> 00:05:47 big amount, I would do a lot more than this, maybe 50 or even, I don’t know, up to a 100
00:05:47 –> 00:05:52 depending on the size, in there at the same time, you wanna have enough room in your…in
00:05:52 –> 00:05:58 the top that it still has room to tumble around, you don’t wanna pack it tightly otherwise
00:05:58 –> 00:06:01 it’s not gonna move and get that jostling thing going on.
00:06:01 –> 00:06:07 Anyways, I hope that you enjoyed that, that you can pick up some of this substrate for
00:06:07 –> 00:06:14 your rock tumbler if you have one, and I’ve got the…an older version of the… which
00:06:14 –> 00:06:19 one is this, it’s a Lortone Tumbler, I think they’re now Blue, this has been going for
00:06:19 –> 00:06:25 years and years since Doug was a little kid actually, it was his when he was a kid, so
00:06:25 –> 00:06:28 polish up your beads, that’s a great way of doing it.
00:06:28 –> 00:06:34 And if this was helpful for you make sure to press that like button; that would be great.
00:06:34 –> 00:06:41 And my question for you is, would you like to use a rock tumbler for your round Polymer
00:06:41 –> 00:06:43 Clay beads?
00:06:43 –> 00:06:45 Or do you have another method that you prefer?
00:06:45 –> 00:06:48 Leave that in the comment section below, I’d love to hear from you.
00:06:48 –> 00:06:50 We will see you at another time.
00:06:51 –> 00:06:52 Bye for now.
Our goal is to translate these videos into as many languages as possible. If you are interested in helping with this initiative, then please do contact us and we will figure out a way to make it worth your while :)
Resource Links:
- Amazon: Pyramid Plastic Substrate **
- Otto Frei: Website
- Related Video: Rock Tumblers and Polymer Clay
- Related Article: Rock Tumblers for Polishing Polymer Clay Beads
- Related Article: Rock Tumbler for More Professional Polymer Clay Beads
- Related Article: Gravity to Help Lortone Tumbler Perform Better
- Related Video: Polishing Papers For Sanding Polymer Clay Beads
- Related Video: Using Wet/Dry Sandpaper For Sanding Polymer Clay
- Amazon: Rock Tumblers **
- Amazon: Ceramic Polishing Balls **
Resources marked with a double ** asterisk are affiliate links. If you click on them and decide to buy something, we may receive some compensation. This does not affect the price you pay in any way. What it does do, however, is helps us to continue providing free videos for you, here at the PcT website. Using our links to purchase your tools and supplies, is always greatly appreciated.
Sponsored Ads & Special Promotions
Shareable Images


To share this full blog post anywhere on the web that allows links in comments, here's a shortened url to copy and paste...
>> https://mypct.ca/v363 <<
Want to chat about today’s post? That’s what the comment section below is for. Scroll Down… We’d love to hear from you!
Or... if you would like to request a topic for a future post, here is the link to do that… PcT Suggestion Box
I have bought and tried your Otto Frei
recommendations, and used them several times. I
believe I have followed your instructions to the
letter. However, this happens: The beads come out
nice and smooth – but have turned into a pastel
version of themselves. If I wet them, the original
color reappears. But the moment they dry, they go
pastel/cloudy again. There is no way to buff it
off, jeans-material or normal dremel use. I once
spent 45 minutes dremelling a bead, and even then
it was not quite back to where it should be. What
am I doing wrong, and how do I fix it (I used Fimo)?
Thanks for your input on this!
By the way, I am really pleased with your
PDF-project!
Hi Mette, Fimo is the problem. I had some old beads where I had used a mix of Premo and Fimo and found the parts that had the Fimo were all white. I think the Fimo is absorbing the water somehow. You could try breaking them to see if the water will dry out and the color will return. Another thing that can cause a whitish film is if you don’t wash your porcelain balls first. See this comment.
You may also want to read through the comments above. There are many helpful hint from other that should help you. Good luck, let us know how it goes!
How many times can you use the plastic before having to purchase more?
Unless you do an enormous amount of bead tumbling, you probably won’t need to buy anymore. These last an extemely long time since they are made from hard plastic.
Thank you, that is good to know!
Thanks for all your input on Otto Frei people. Clayers are always a helpful community. :-)
Cindy,
I want to start using my husbands vibratory case cleaner to sand and polish my clay projects and I am interested in using this media.
I always try to source materials in Canada first, but this material is proving to be difficult to find in any batch smaller than 5 lbs and I can’t find any of the porcelain media at any Canadian source.
So my question to you is what type of company is Otto Frei to deal with? Are their shipping costs reasonable? Did you received your order in a timely manner? Did you have any issues with the order at all?
I guess I have been burned to many times with out of country companies and I am gun shy.
Hi Kathy;
I live in the Chicagoland area, so I’m not sure about Canada. The shipment arrived promptly–no problems.
As far as shipping costs, you can type in your order up til the payment info. It should tell you the shipping costs before you type in your credit card info. Then you can decide if you want to place your order or if shipping is more than you wanted to pay, you can always back out of the site without placing an order.
I tried to check other sources also before I placed my order, but Otto Frei seemed to have the best price when shipping was added.
Just a suggestion for you. Good Luck.
Mari
Kathy, Otto Frei is a great company, reliable, but I got a better deal on the tumbler stuff at Rio Grande. Anything shipped to Canada is going to cost more from the states but both of these companies charge the going rate.
Hi Kathy, we have ordered from them a couple times and found them great to work with. Their shipping to Canada at the time was really high (a couple years ago?) and so we had them shipped to the US and we went down and picked it up ourselves. On one of the orders there was a product that was back ordered and they were wonderful about sending that product to our Canadian address free of charge when it came in. It is kind of a pain to have to ship to Canada with specialty products sometimes, but that is the price we pay for living in a smaller market. One thing about this product… you won’t have to replace it anytime soon. :)
Hi Elizabeth, I don’t know what kind of soap Cindy uses but I use Ivory liquid and have had no problems. I do however run all of my triangles through several hours of tumbling before doing my beads the first time. Hope that helps.
Thanks for passing that tip along Dixie Ann. This was something I did not know about when I did this video, but something that was suggested by the company that sells the substrate. Perhaps it is something with the plastic manufacturing process that causes this? Who knows? Having ‘clean’ triangle to start with could never hurt though!
Hi, Cindy, I use your rock tumbler with little pyramid shapes tumbler medium etc. works great but I think promolive soap bleaches the clay. What soap do you recommend?
Hi Elizabeth, I use Dawn dish soap. Are you using Fimo by any chance? I had some of my Fimo beads turn white in the tumbler. I think perhaps it was an issue with the water rather than the soap, but you could be right.
I was about to ask whether the beads were Fimo or not, since I reported this problem earlier in the thread.
I have been using the plastic substrate and porcelain beads a lot (with Premo beads, Palmolive soap and filtered water,) so the plastic and porcelain are quite clean by now, I threw in a few Fimo beads recently to see if the problem remained and they still turned considerably lighter, while my Premo beads were fine.
But other people’s mileage may vary.
I shared this video with Brenda Sue’s Creative group on FB which is a closed group. I think as they are now getting into Polymer cay and working with Christie Friesen too., that you should join the party too. You have all kinds of tips they can apply to jewelry making which is the main focus of the group. Contact Brenda. Love you a lot and all that you do. Paula Gaskill and I are still spreading the word. Paula made your Owls and they and feel like your. She used the tumbler with them. Talk to you again. Oh! and by the way the Ocean technique is a hit as people think I painted them, LOL
The other Cindy
Thank you so much Cindy P! I saw that Brenda was dabbling a little more with polymer clay. Have had a little contact with her, but not too much yet. Don’t know if we’ll be able to work together the same way that Christie did (Not as easy for us to visit each other’s studios.) But maybe? It is always good when artists and business people can collaborate. I might be able to demo some of her products on our channel though. If you talk with her, you can offer that suggestion. Happy to see you doing so well with the Shoreline tutorial. Keep up the great work!
Hi Cindi,
Concerning the porcelain polishing balls from Otto Frei, how many 1 lb. bags do you use in the rocktumbler? I got one bag thinking it looked like a larger quantity.
but it seems like more is needed.
Hope all is well with you and yours. Liz
Hi Liz, for my tumbler (I believe it is the 3lb barrel size) 1 bag of porcelain balls was just fine. If you read some of the comments above you will see that there have been a few people with larger vibratory tumblers, that needed more substrate than what my tumbler used. What you will need will depend on what size tumbler you have. You should not have more than about 2/3 to 3/4 of your tumbler filled with substrate… you still need room for the actual beads, a little water and some space to move around. Hope that helps!
Hi Cindy –
I bought the Otto Frei substrates – – all 4 of ’em – coarse, med, fine and porcelain balls and tumbled my oval (lozenge) beads in my rotary tumbler (Bulldog from Rio Grande). I did each substrate, starting with the coarse and worked down to the porcelain balls for approx 8 hours – I used a drop or so of liquid dish detergent each time with the substrate and water. When I took my beads out of the porcelain bead tumble, rinsed and dried them, they were completely scratched and cloudy – – totally unusable. Any ideas?
Thanks!
Rose
Hi Rose, since you can see scratches after tumbling, it sounds like you needed to run your medium grit and fine grits for longer before going to the porcelain balls. I would toss them in again and start with the medium grit… run it for 24 hours to see if you can remove the scratches. Then go to the fine grit for another day. Then if all the scratches are gone, then move on to the porcelain balls.
Abrasives generally work by scratching off little bits of material and smooth the surface. The course grits remove more material so the scratches are deeper. The medium grits take out the scratches of the coarser grits but still leave scratches only a little finer this time. Then the fine grits remove the scratches of the medium grit but leave such fine scratches that they become hardly noticeable. The finer the scratches get, the less grooves that the light can get stuck in… so the light bounces off, making it look more shiny. Buffing and waxing help to fill those micro-scratches even more and that is why they make the pieces even shinier.
Whenever there are scratches at the end, it means that one of the steps wasn’t doing it’s job. Hopefully that makes sense.
This is a good product that works very well… it just needs to be used correctly. Let us know if you get it figured out. Good luck!
Hi Cindy –
My new batch turned out beautifully!
Rose
Wonderful news Rose! Thank you so much for coming back and letting me know!
Hi Cindy..
What is your experience on vibratory tumbler..I hear that it is faster and quieter too..will the same plastic substrate work over there? I am more looking for sanding round beads and flat pendants
Hi Suguna, I haven’t personally used a vibratory tumbler, but many others on this blog have. If you type ‘vibratory tumbler’ into the search box at the top of the page, you should be able to find the comments where they have been discussed. I do know a lot of people really love them!
Hi Suguna, regardless of what tumbler I am using, I use the following formula for both.
1/3 substrate (little triangles) 1/3 beads (any size) fill tumbler with water up to just the top of the beads. You should have approximately 1/3 space left for the tumbler to work with. I ran all my substrates and polishing beads each through their own tumbling first to get rid of the coating they come in. Fill your container 3/4 full of substrate and fill in water just up to the top of the substrate. don’t forget to add a drop of liquid soap. Let the substrate tumble for a good 12 hrs. Rinse and clean, lay it out on a nice old bath towel and when it’s dry you can then store it in a plastic container.
I’ve used Premo, Fimo and Pardo beads and all turned out fine. I have not used Kato or any other brands. I hope this helps. Happy Claying.
Dixie Ann, I just noticed this post, and I am thinking you may have solved a mystery for me. I have a good sized tumbler, and I have used it without a lot of success. After reading this, I am thinking my ratio (beads to substrate) is off. Will have to try that and report back.
THANKS!
Gina, glad I could be of help. Good Luck.
I have been using my rock polisher with the little plastic triangles and it has worked great. Here is the question, when using the porcaline (sp?) beads was I supposed to use water and a drop of soap too? I did, and I am having a heck of a time dealing with them after the process….they are flying everywhere after I strained them out. I am guess maybe water was a mistake. Everything is drying out now as I head to work.
Thanks for any advice.
Hi Lisa, I use a small amount of water with the porcelain balls as well as a small drop of soap. Strain them through a large sized, fine screen sifter/strainer and then dump every thing into a shallow container. If you kind of shake the container the beads rise to the top and are easy to pick out. That way the balls aren’t flying all over the place!
Just wondering if anyone has tried buffing/polishing cabochons with this type of substrate? I don’t care to gloss coat my beads or cabs and really like the results I get with just lots and lots and lots of buffing and polishing, but wow, my arm muscles can really hurt after a dozen pieces. I don’t mind if the flat backs aren’t buffed because they don’t show in the settings I use, just the front of the cab is visible. I’m really interested in the substrates and buffing beads and how well they would work with a vibratory tumbler on cabochons. Thanks for any opinions or advise.
Hi Diana, any shaped bead, or cabochon buffs up quite well after going through the different grits of this substrate. I find a nice coating of Renaissance Wax will bring it up even further, and give it a lovely hand feel. I don’t care much for glazes either, but do love the look of the ren wax after coming out of the tumbler. Way less work then doing it all by hand as well. To learn more about Renaissance wax, just type it into the search box at the top of the page and some info will pop up. Have fun!
Hi Cindy,
Sorry, I think I’m misunderstanding! Do you mean that you coat the beads with Ren Wax first, then put them into the tumbler to shine them up, or you put on the Ren Wax after they come out of the tumbler the last time?
Thanks!
Good Morning DeShawn, I use the Ren Wax after all the tumbler steps:) But Cindy is really great about reading each question and comments – that way she can pop in and fix any ‘wrong advice’ before it gets “out there” :)
Have you tried out the search box at the top right of each page yet? It will lead you to some good advice too
Thanks for clarifying. I was hoping there was another neat trick to using the tumbler so I wouldn’t have to do the buffing by hand at all!
Hi DeShawn, Tante Sherry’s advice to you was correct. You do put the Ren wax on after baking and tumbling. Thanks Sherry for coming in to the rescue! :)
Cindy,
Thanks so much for the tutorials, I am just starting to play with polymer clay and its great to tap into your experience and knowledge.
I watched your video above, on polishing polymer clay beads with the plastic substrate. My beads were made using the 3 shape roller thing, so they aren’t round balls, oval and kinda diamond. I bought the substrate and started tumbling. I followed your instructions, I think. I filled the tumbler with the substrate, added the beads, maybe 10 or 15, and some soapy water just to cover them. After the 2nd substrate, the water was black. So before doing the third round, I rinsed the plastic pellets. I let it tumble for a day, when I took it out, my beads were black. I rinsed them, wiped them and still black. So I said “what the hay” and went ahead and tumbled them with the porcelain beads. Once again the water was black, but the beads were clean.
Is this all normal? What did I do wrong? Also, my beads don’t look at all shiny.
If anything, they actually look like they have a milky coloring. What the heck did I do wrong? Do you think it is because they aren’t balls? Any insight you can give me would be greatly appreciated.
Cindy Rodina
Hi Cindy Rodina, Did you tumble your porcelain by it’s self for 3 days before you added the beads? The shop that I bought my porcelain from said I needed to tumble the porcelain, with water & a little liquid soap, for 3 days without any beads added. He said it was very important. If you didn’t do this, maybe that is why your beads finish looking milky. When I did it for 3 days, the tumbler’s water was very dirty looking. If it was me, I would try the separate tumbling of the porcelain for 3 days, this should fix the milky look problem. For the black dirty beads & water problem, I always pour my tumbler contents (beads & water), into a strainer & rinse them under running water after every tumbling stage. Then add fresh water, liquid dish detergent, next stage of medium & the beads. I never have any dirty beads doing it this way. Hope it helps.
Cindy,
Thanks, I will try tumbling the porcelain and retumble the beads. I did rinse and change the water after each stage, I’m hoping the substrate just needed to be rinsed better before the first use. I may try tumbling the plastic pyramids separately also just to be sure before doing my next batch.
Thanks, I appreciate the quick response
Hi Cindy, is your tumbler brand new? A new barrel needs to be seasoned a bit (tumble several days with substrate and soapy water and no beads) so that the rubber isn’t coming off into the water anymore. Make sure to wipe out the barrel well afterwards to make sure there is no residue left behind. Also, were your beads made with Fimo by chance? I have noticed that Fimo tends to absorb water differently than Premo, Sculpey and Kato clay beads. (I had a batch of beads with Fimo translucent turn white after tumbling.) These things, along with Cynthia Ryan’s advice should help. DO make sure and come back here to let us know how it goes. It is always best to share your findings, because it helps everyone here. Thanks for commenting!