New 2014 Sculpey Clay Bead Baking Rack Review
Video #557: A very compact polymer clay bead backing rack… perfect if you don’t have a lot of space for storing bulky tools.
More...

IN THIS POST: — sculpey bead baking rack — sculpey — 2014 new products — bead rack — baking beads — bead making — review — tools — baking — (Topics marked with an asterisk* are discussed in the Comments Section below).
Topics Covered In This Video:
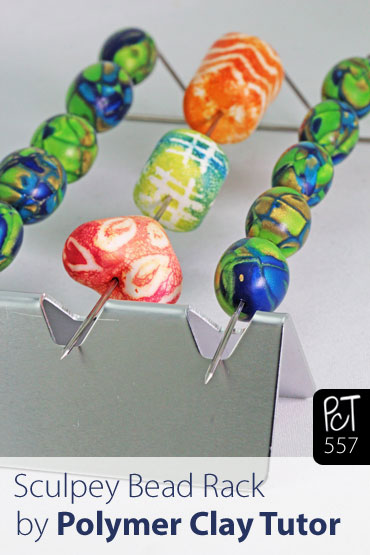
- Sculpey Clay Bead Baking Rack.
- Mentioned it before in the Sculpey Storage Update video.
- Hard to tell what it is from the packaging, so I thought I’d show you how it works.
- Basically is a triangular metal rack with notches down the length of it… plus 12 bead piercing pins.
- The Piercing pins are very sharp and about the size of an 18 gauge wire.
- You add the beads to the wires and then set the ends of the wires into the notches of the rack.
- Design is very compact.
- I find the bead wires fall off the rack too easily.
- I do actually prefer using the Amaco Bead Rack with my Sugru Hack, which prevents the pins from slipping off the rack.
- However, I still do use my Sculpey Bead Baking rack a lot because, it is sitting close by in my Sculpey Tool Organizer.
- The Sculpey Clay Bead Baking Rack is good for baking larger beads!
00:00:03 –> 00:00:08 Hi guys, its Cindy Lietz, your Polymer Clay Tutor, and today’s Product Demo I’m talking
00:00:08 –> 00:00:12 about the new Sculpey Clay Bead Baking Rack.
00:00:12 –> 00:00:19 Now it comes in a little box like this one here, and from the picture it’s kinda hard
00:00:19 –> 00:00:24 to tell what it is and I thought I would show it to you, I had mentioned it in a previous
00:00:24 –> 00:00:30 video where I showed it fit into the back of my storage rack, but I wanted to show you
00:00:30 –> 00:00:31 how it works.
00:00:31 –> 00:00:39 Now inside this pack was a little rack like this, with some notches in it… it’s a
00:00:39 –> 00:00:44 triangular shape, and then these bead baking pins…they actually all fit into the box
00:00:44 –> 00:00:47 quite nicely because of the triangular shape.
00:00:47 –> 00:00:55 Now the way they work is you string your beads on to the piercing needle…and it’s very
00:00:55 –> 00:01:02 sharp, so be careful of that, and then all you do is you set this in your baking pan,
00:01:02 –> 00:01:08 and you sit the rack like this, so you fill up all of your beads like this…and if you
00:01:08 –> 00:01:14 have filled up all of them, you can actually alternate them like this, so that you’ve
00:01:14 –> 00:01:23 got pins coming all this way and that way if you get what I mean.
00:01:23 –> 00:01:27 Now, the needle itself is a little on the large side, it’s a little bit bigger than
00:01:27 –> 00:01:34 a 20 gauge pin…which actually is nice for… you don’t usually have to drill out the
00:01:34 –> 00:01:36 hole afterward.
00:01:36 –> 00:01:44 I find the design is neat in some ways, because it’s so small I can fit it all on my bead
00:01:44 –> 00:01:53 rack, it doesn’t take up any space, but it’s kind of strange too, I find… if I’ve
00:01:53 –> 00:01:59 got these all loaded up, all these pins loaded up with fresh clay, and then I’ve gotta
00:01:59 –> 00:02:05 transfer them over to my oven…you know I’ve got to put them on the rack, I find that they
00:02:05 –> 00:02:13 kinda fall off when I’m moving the rack around and stuff like that, it is a little
00:02:13 –> 00:02:15 interesting…it’s hard for me…
00:02:15 –> 00:02:21 I guess maybe because I’ve been using the Amaco rack for so long, and then I had the
00:02:21 –> 00:02:27 Sugru little holders in there to keep the pins from falling out…you can check out
00:02:27 –> 00:02:30 that video, I’ve done a video on that as well, it’s called ‘Sugru hack for the
00:02:30 –> 00:02:36 Amaco bead rack’, but I’ve been using that for so many years, that I find that actually
00:02:36 –> 00:02:44 quite useful, but this is quite flexible in a lot of ways, if you had really large pieces
00:02:44 –> 00:02:53 they can be quite wide, you could put them on here, and I mean it’s quite an interesting
00:02:53 –> 00:02:55 design, it’s very compact.
00:02:55 –> 00:03:01 And it’s going to be very handy for a lot of you that don’t have a lot of space, and
00:03:01 –> 00:03:08 I do find that I am using it a lot, and… because it’s right there, I am using it,
00:03:08 –> 00:03:11 so it’s just taking me a little bit to get used to this new design.
00:03:11 –> 00:03:16 But I thought I’d show that to you, because you may not have understood from the outside
00:03:16 –> 00:03:19 of the package, how this works.
00:03:19 –> 00:03:23 So I hope that was helpful for you, let me know if you like this video.
00:03:23 –> 00:03:29 And if you have any products you would like me to demo, or there’s Test Labs, things
00:03:29 –> 00:03:33 you don’t know if they work with Polymer clay or not, and you’d like me to test that
00:03:33 –> 00:03:38 out, do let me know in the comment section below, and if you’ve tried this rack, let
00:03:38 –> 00:03:40 me know what you think of it.
00:03:40 –> 00:03:42 And we will see you next time, and bye for now.
Our goal is to translate these videos into as many languages as possible. If you are interested in helping with this initiative, then please do contact us and we will figure out a way to make it worth your while :)
Resource Links:
- Related Video: Updated Review of the Sculpey Tool Organizer
- Related Video: Sugru Hack for your Amaco Bead Rack
- Related Video: Amaco Bead Baking Rack A Must Have Polymer Clay Tool
Resources marked with a double ** asterisk are affiliate links. If you click on them and decide to buy something, we may receive some compensation. This does not affect the price you pay in any way. What it does do, however, is helps us to continue providing free videos for you, here at the PcT website. Using our links to purchase your tools and supplies, is always greatly appreciated.
Sponsored Ads & Special Promotions
Shareable Images


To share this full blog post anywhere on the web that allows links in comments, here's a shortened url to copy and paste...
>> https://mypct.ca/v557 <<
Want to chat about today’s post? That’s what the comment section below is for. Scroll Down… We’d love to hear from you!
Or... if you would like to request a topic for a future post, here is the link to do that… PcT Suggestion Box
Hi Cindy,
I like the look of the Sculpey bead rack and after reading Doreen N’s comment about using bulldog clips to bake on got me thinking. My stationery shop sells mini bulldog clips. Might be an idea to clip one of these to very end of pin after you have past the notch in the rack. I looked for my bead stopper clips but they have plastic on them, so we need someone to invent a removable clip (all metal). I like the idea that the pins are bigger as well as longer, so will be buying the mini bulldog clips before I purchase on of these compact baking triangles.
Well done to Sculpey for another idea, but think I will wait for the Mark II version which no doubt they would have figured this out
Another idea is to use earring stoppers (the all metal ones I think they are called butterflies) not the ones with a plastic disc. I will probably embedd a few spare earring backs in polymer clay and try this idea, so they can be picked up easier and spotted when dropped. Now where is my glow-in-the-dark polymer clay?…..cheers…xx
Let us know Elaine how your bead rack ‘hacks’ go… always interested in different approaches to things. Just so you know the Sculpey pins in this set are too big for earring backs. Most earrings are around a 20 gauge wire and these bead pins are more like 16 gauge… which as far as wire goes… quite a bit bigger. I like the glow in the dark idea… great for finding when you drop the pins behind your desk! :)
I just found this idea on Pinterest, for holding beads for baking on piercing pins, when you don’t have a rack.
Basically, the person used 2 bulldog clips (those metal ones with legs that you squeeze together to open the bent metal clip part). They set them upside down on the legs and put the pins or skewers into the bent metal clip part.
Hope that this makes baking a bit easier for someone!
Happy claying.
Excellent idea, Doreen. Thanks for the share!
I am new to polymer clay and I understand you can use Premo clay in the same project as Kato liquid clay. But, in reading the curing directions, the Premo is 275 F and the Kato liquid is 300F. Do you under-bake the liquid clay, bake it longer, or what? If I bake the Premo hotter wouldn’t I be risking burning it?
Thanks for your help! I have subscribed to your videos and have picked up lots of invaluable pointers without having to go the trial and error route–a time saver, clay saver, AND a frustration saver! Your advise is wonderful!
Hi Beth,that is a great question! Bump up the heat a touch to 280F,make sure that it is protected underneath with some layers of cardstock and protected on top by tenting it. Then bake for the full hour. If the Kato Liquid isn’t as clear as you would like it to be, then use a heat gun (carefully) to heat the liquid a little hotter while avoiding the Premo. Hope that helps!
What adhesive should I use to adhere small pieces to glass? The clay is a small but critical element of a larger glass piece so I don’t want to encase the glass, just add it to the surface in a particular spot..
Thanks, I just started You Tubing during this last rough winter and now I’m hooked, especially to your Polymer Clay Tutor Channel. Thanks for making my life better :)
Thanks Barb! You’ll want to use something that is clear, so it doesn’t show too much through the glass. E6000 or a 2 part epoxy will probably be your best bet. Let us know how it goes!
Thanks Cindy, we are all such visual learners , that this was very helpful. Especially for space constraints, this would work well.
Being as I already have a bead rack, probably won’t buy this one. But for those who are just getting started, this would do nicely.
.
Hi Cindy,
I was wondering, could the sugru not work on this rack too??? I know you have already asked that question yourself. Is it worth a try, or have you tried and not been successful? Please enlighten me,
Thank You,
Marianne
Hi Marianne, Sugru might work, but the holes are a lot bigger and there really isn’t much support underneath where the pins go. I did throw that idea around, but didn’t want to waste my tiny bit of Sugru I have left, when I have a perfectly good Amaco Rack with the Sugru already. Nice to see you were thinking about that fix.
Hi Cindy – I agree with you, I’d stick to the Amaco bead rack. This one looks very ungainly, plus with all the pins on it’s too wide to fit into my toaster oven. Reluctant to use it in our domestic oven because it’s much bigger, it’s gas and costs a lot to heat the large area, so I stick to my little oven which is perfect. Grateful to you for showing us both the cons as well as the pros!
Marion