Sculpey Design It Templates for Polymer Clay
Video #700: In this video, I also show how those cardboard toilet paper
rolls, can come in handy when baking your clay.
More...

IN THIS POST: — polyform — sculpey — design it templates — stencil — shapes — cutouts — jewelry — home decor — accents — earrings — pendants — mokume gane — scrap clay — straight pin — exacto knife — blade — dental tool — baking curved form — toilet paper roll — michaels — supplies — tools — (Topics marked with an asterisk* are discussed in the Comments Section below).
In this video, I will show you the new Sculpey Design It Templates for polymer clay.
Basically, these sets are plastic shape templates similar to a stencil, that you can use to cut out consistent shapes out of polymer clay.
The two sets that are currently available, are the Jewelry Shapes set of 40 different designs… and the General Shapes set of 22 shapes.
The jewelry shapes set are suited for jewelry projects and have graduated sizes that can be layered or stacked quite nicely.
The General Shapes Set, has more frames, labels, and motifs such as leaves, hearts, keys, a flower, butterfly and bird… and are well suited for home decor pieces.
Both the positive and negative forms of the design can be used to cut out these shapes from polymer clay. The frosted plastic can be seen through for easy placement on your polymer clay sheets, but won’t get stuck to the clay or leave any flaws on the surface. Nice!
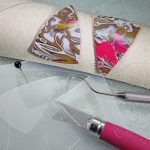
I show different options for cutting out the shapes using an Exacto Knife, a Dental Tool and a Straight Pin. Plus, I show you how a toilet paper roll cut in half, makes the perfect form for baking your cutouts into a curved shape.
These templates can be found at Michaels, in many other craft stores and online.
00:00:03 –> 00:00:07 Hi guys, its Cindy Lietz, your Polymer Clay Tutor, and today’s PcT Product Demo, I’m gonna
00:00:07 –> 00:00:11 show you the new Sculpey design it templates.
00:00:11 –> 00:00:20 Now these are the templates here, and Sculpey has come out with two different design packages,
00:00:20 –> 00:00:24 and basically what they are, are a stencil or shape cutting tool.
00:00:24 –> 00:00:32 And one package is called jewelry shapes, and it has 40 different shapes that are perfect
00:00:32 –> 00:00:39 for clay and other types of crafting projects, and these are the shapes in the jewelry package,
00:00:39 –> 00:00:46 and these are all appropriately sized for jewelry, they’ve got the shield type shapes…and
00:00:46 –> 00:00:52 they’re graduated sizes so you can stack them together really nicely, they also have
00:00:52 –> 00:01:01 triangles, rectangles, obelisks and different kinda half-moon shapes and a Chevron and semicircle
00:01:01 –> 00:01:06 and swirly kinda shapes in there, it’s very versatile.
00:01:06 –> 00:01:13 And the other pack that they have is more general shapes, and there are 22 shapes in
00:01:13 –> 00:01:19 this particular pack, and they are… even though you could use them for jewelry, especially
00:01:19 –> 00:01:24 these kinda shapes down in the bottom here, they’re a little bit more suited for home
00:01:24 –> 00:01:27 decor type projects and that kind of thing.
00:01:27 –> 00:01:31 And let me just show you how they… what they look like, and then, I’m gonna show you
00:01:31 –> 00:01:38 some really cool ways to cut out these templates… out of Polymer Clay, and a couple of tools
00:01:38 –> 00:01:39 that you might not have thought of.
00:01:39 –> 00:01:44 Okay, now one thing I would do, is I’d probably keep the packaging or find another Ziploc
00:01:44 –> 00:01:51 bag or something to keep them in because all the little pieces will start falling out….well
00:01:51 –> 00:01:56 when they first come…I mean when you first open it up, they are you know, without any
00:01:56 –> 00:02:03 of the pieces punched out…and you will wanna keep the positive and the negative, ‘cause
00:02:03 –> 00:02:09 depending on what you’re working on, you may want to use either the outside shape or the
00:02:09 –> 00:02:13 inside of the shape, and you can see they’re a plastic that’s very similar to stencil plastic,
00:02:13 –> 00:02:19 now I just pop that out and I can either lay this on the clay and trace around it or I
00:02:19 –> 00:02:22 can lay this part of the clay and trace around it.
00:02:22 –> 00:02:27 Now, right where I popped it out, there was some little spots where they were slightly
00:02:27 –> 00:02:36 attached, really tiny little spots, but what you can do is take like a nail file and just
00:02:36 –> 00:02:41 smooth those out so that they’re not catching when you’re cutting around them, and you can
00:02:41 –> 00:02:47 do the same thing for the inside…they are very, very subtle, so they’re not a big problem,
00:02:47 –> 00:02:53 but I would file those down and make them smooth.
00:02:53 –> 00:02:59 And then you can see that there’s a bunch of different shapes, and like I said, you
00:02:59 –> 00:03:02 can save the positive and the negative.
00:03:02 –> 00:03:09 Now, the one that…the other set… let me just show you the other set before I get too
00:03:09 –> 00:03:14 far into this, because they’re quite neat to use.
00:03:14 –> 00:03:23 This set here is more like keys and hearts…oh, and it probably shows here better, and I haven’t
00:03:23 –> 00:03:27 used all of this yet, there’s so many things for me to be working on so I haven’t tried
00:03:27 –> 00:03:32 all of the shapes yet, but they’re really unique shapes and great to work with.
00:03:32 –> 00:03:40 These ones would make really nice little labels or frames, things on a box, that kind of thing,
00:03:40 –> 00:03:44 and same with these ones here.
00:03:44 –> 00:03:49 And then the way to use them is you get your Polymer Clay technique out…now I’ve got
00:03:49 –> 00:03:56 some pieces here that are baked already, and done in like a scrap clay Mokume Gane type
00:03:56 –> 00:04:03 technique, and I’ve got the pair of earrings here that I’ve made using the technique, and
00:04:03 –> 00:04:09 you can see that, I’ve used two shapes that are different sizes and they stack together
00:04:09 –> 00:04:15 quite nicely, and you can get quite a cool look with them, I also made the ear wires
00:04:15 –> 00:04:26 here, I did some…torched some Argentium…or yeah Argentium Silver wire, and made the little
00:04:26 –> 00:04:32 ear wire there, so I stacked them together, but they are really easy to use.
00:04:32 –> 00:04:36 Now, what I’m gonna do is I’ve got some…I’ve got a piece of scrap clay and I’ll show
00:04:36 –> 00:04:41 you 3 different ways of cutting them out.
00:04:41 –> 00:04:47 One way is to use an Exacto Knife, and this is pretty typical, what most people would
00:04:47 –> 00:04:51 probably use for cutting out these shapes, and like I said, you could either lay the
00:04:51 –> 00:05:00 shape on top of the clay, or you could use the negative…or the opening, if you wanted
00:05:00 –> 00:05:05 to, so if I was gonna use this one here, what I would do is lay it down…and the nice thing
00:05:05 –> 00:05:12 about these particular stencils is you can see through them, so the pattern will show
00:05:12 –> 00:05:18 really nicely underneath…so I just rolled out a sheet of scrap clay, kinda blended it
00:05:18 –> 00:05:22 a little, ran it through the pasta machine, and ran it out at about, oh I don’t know,
00:05:22 –> 00:05:26 3 playing cards thick, so this isn’t a particularly thick piece, but you could cut out whatever
00:05:26 –> 00:05:35 you want, and then you just run your Exacto Knife around the edges, like this, and just
00:05:35 –> 00:05:42 go along, try not to cut into the stencil, and just try to make it as clean as you can
00:05:42 –> 00:05:45 with your cuts, like that.
00:05:45 –> 00:05:49 And when you come into the corners, you know, you’ve gotta make sure you go around them
00:05:49 –> 00:05:55 nicely, and that is quite simple to do, then you’ve got your little shape that you can
00:05:55 –> 00:06:00 use for whatever you want, earrings or whatever.
00:06:00 –> 00:06:01 I would also…
00:06:01 –> 00:06:06 I like to just sorta run my blade around the edge like this to smooth out the edge or run
00:06:06 –> 00:06:10 my finger around the edge, and that will make it even cleaner, but you can sand it after
00:06:10 –> 00:06:13 it has been baked.
00:06:13 –> 00:06:20 Another way to cut them out, and I’ve got a sample of some Mokume Gane slices that I
00:06:20 –> 00:06:26 just laid on top of another solid color of clay, so that I’d have a nice background on
00:06:26 –> 00:06:32 the back but an interesting pattern on the front, and you just stick it down to the glass,
00:06:32 –> 00:06:39 it works a little bit better, and this time, we’ll cut using another shape, well it’s the
00:06:39 –> 00:06:47 same shape, but we’ll do it in… use this shape…the actual shape rather than the opening,
00:06:47 –> 00:06:53 and I can see through it, so I can see where I would like to cut that piece out exactly,
00:06:53 –> 00:06:59 another tool you can use to cut out with is a dental tool, this is a very sharp little
00:06:59 –> 00:07:05 pointy tool and it works beautifully for cutting out things like this, and you would just run
00:07:05 –> 00:07:14 your tool along the side, like that, coming to the points…you have to clean off the
00:07:14 –> 00:07:19 tool every once in a while, hopefully my hand is not in the way, there we go, and then that
00:07:19 –> 00:07:22 will cut it out quite nicely.
00:07:22 –> 00:07:28 And they have kind of a frosted texture on them, so they’re not going to stick too badly
00:07:28 –> 00:07:34 to the clay, and they’re also going to come off nicely, so there I’ve got a nice little
00:07:34 –> 00:07:36 shape there.
00:07:36 –> 00:07:42 And another option is to use a straight pin, so this is exactly the same sort of thing,
00:07:42 –> 00:07:50 so I could take another shape…maybe one like this one here…oh, no those edges aren’t
00:07:50 –> 00:07:55 filed down yet, oh, I’ll just use the same shape, alright so I’ll just run this one through,
00:07:55 –> 00:08:01 and you can run around the edges with a straight pin…and I don’t know if people realize how
00:08:01 –> 00:08:10 beautiful they cut out, and it just takes a very sharp…makes a very sharp little line
00:08:10 –> 00:08:14 around, it’s not dangerous at all, so it’s great for kids if you’re working with kids
00:08:14 –> 00:08:19 at all, and it works really very nicely.
00:08:19 –> 00:08:26 Now one last little tip…and I’ll pop this off, when you go to bake them, a neat thing
00:08:26 –> 00:08:31 to do is to bake them on a curved form, so you can take a toilet paper roll and just
00:08:31 –> 00:08:38 cut it in half and then just bake your piece, and don’t worry about the paper being in the
00:08:38 –> 00:08:42 oven ‘cause it handles it quite nicely at this low temperature that Polymer Clay bakes
00:08:42 –> 00:08:50 at, so you can just lay your pieces onto the toilet paper roll and it will bake a really
00:08:50 –> 00:08:51 nice curve in it.
00:08:51 –> 00:08:56 One thing to keep in mind though, a toilet paper roll is paper so it can absorb the oils
00:08:56 –> 00:09:01 from the Polymer Clay while it’s sitting on there, so don’t leave it on there for a long
00:09:01 –> 00:09:05 period of time, if I was going to bake this later on this afternoon, I would wanna make
00:09:05 –> 00:09:10 sure I took them back off of here before I did that, otherwise, the oils will seep in
00:09:10 –> 00:09:16 to the cardboard and then it’ll make your clay a little bit more brittle and you don’t
00:09:16 –> 00:09:20 want that, but if you just do it right before you’re about to pop it into the oven, you
00:09:20 –> 00:09:24 can pop that in, put your tent on top and bake it like all the other instructions I’ve
00:09:24 –> 00:09:27 taught you already before, alright?
00:09:27 –> 00:09:32 So I hope that was helpful, I hope you will check these out, I’ve seen them at Michaels
00:09:32 –> 00:09:38 and they’re probably at all other craft stores too, they have lots of different designs,
00:09:38 –> 00:09:44 and they’re quite handy and perfect for working into your Polymer Clay projects, alright?
00:09:44 –> 00:09:48 So, if you liked this video, do let us know.
00:09:48 –> 00:09:53 And if you have suggestions for products you’d like me to test or techniques that you don’t
00:09:53 –> 00:09:57 quite understand, do leave those in the comment section below.
00:09:57 –> 00:10:02 And don’t forget we have absolutely tons and tons of videos, we’ve tried lots of different
00:10:02 –> 00:10:06 products and a lot of different techniques that may have the answer that you’re looking
00:10:06 –> 00:10:10 for, so don’t forget to search through those and check them out, alright?
00:10:10 –> 00:10:12 We’ll see you next time and bye for now.
Our goal is to translate these videos into as many languages as possible. If you are interested in helping with this initiative, then please do contact us and we will figure out a way to make it worth your while :)
Resource Links:
- Amazon: Sculpey Design It Templates **
- Related Video: Mont Bleu Glass Nail Files Polymer Clay Project
- Related Video: Hand Torched Headpins
- Related Video: Faux Metal Mokume Gane
- Related Video: My Brand New Atlas 150 Pasta Machine
Resources marked with a double ** asterisk are affiliate links. If you click on them and decide to buy something, we may receive some compensation. This does not affect the price you pay in any way. What it does do, however, is helps us to continue providing free videos for you, here at the PcT website. Using our links to purchase your tools and supplies, is always greatly appreciated.
Sponsored Ads & Special Promotions
Shareable Images


To share this full blog post anywhere on the web that allows links in comments, here's a shortened url to copy and paste...
>> https://mypct.ca/v700 <<
Want to chat about today’s post? That’s what the comment section below is for. Scroll Down… We’d love to hear from you!
Or... if you would like to request a topic for a future post, here is the link to do that… PcT Suggestion Box
If your dentist can’t supply you with tools, here is a site that has craft quality to purchase. Very fast service from this company in the USA
Cathy in MD
They also have the best prices on Xuron cutters.
Cathy in MD thanks so much for that link to the dental tools. I had ordered from them before but had forgotten all about them. They had the 6″ cotton swabs I have been looking for forever.
Cool site Cathy! I have book marked it for the future. Thanks for sharing that with everyone!
The video is very helpful. maybe you can give us some websites to purchase from.
thx,
debi
Hi Deb!
If you go to eBay or Amazon.com, and place “dental tools” in the search box, you’ll get tons of items to choose from and use on polymer clay.
Pretty handy templates to have. Thanks for the video Cindy. I had a carboard tube from some wrapping paper and cut it in different lengths and then cut them in half. I did cover mine with parchment paper like Jocelyn mentioned. Excitement is building for the next tutorial in October and all the changes coming. It sure has been a long dry summer! I think we are all ready for a pick me upper! I just spent all weekend printing out close to another 300 plus color receipes and got them all glued to cards and ready to start mixing again. I also have a request for a tutorial on using and making something with Angelina Fibers. How about it Cindy?
Thanks Dixie Ann! I have heard of Angelina Fibers but I haven’t seen them sold anywhere. Do they carry them in Michaels? I’ll keep my eye out for them.
Good old Amazon carries Angelina fibers
You can often find them on mixed media and felting sites as well
Cathy in MD
Cindy, I got mine off an Etsy Store. I have never seen them in Michaels. I am just trying to figure out what to do with them. I know you can bake the fibers with clay.
They sound cool! I’ll keep my eye out for them.
set = sec as in second
Edit comment function please! Hope it’s in the new rollout.
Thanks Cindy! Another must buy product and love the technique using the rollers.
Would add one thing. That cardboard absorbs like crazy so beware of leaching. Also, it can stick to a raw clay. I would advise folks to take an extra set and cover your rolls with a piece of parchment paper. Much less sticking, leaching, and you can make the coolest little round boxes with lids that just slide off the roll.
Salivating for the multi-step tute. Any hints? October or November?
I’m seeing the Kor Tools video on this page instead of the shiny new one :(
Oops… sorry about that. It’s all fixed now!