Vancouver Polymer Clay Guild JoolTool Demo
Video #525: With much less effort than hand sanding techniques, your polymer clay pieces will become beautiful and shiny!
More...

IN THIS POST: — jooltool — rotary tool — power tool — buffer — sander — polymer clay — buffing — sanding — polishing — guilds — vancouver — white rock — british columbia — lawrence smith — claudia rubenstein — joan tayler — anie piliguian — round beads — flat beads — abrasives — grits — (Topics marked with an asterisk* are discussed in the Comments Section below).
Topics Covered In This Video:
- Visiting with the Vancouver Polymer Clay Guild, out in White Rock, British Columbia, Canada.
- Demonstrating how easy it is to sand and buff your polymer clay using a JoolTool.
- The JoolTool is a rotary tool that has a variety of accessories you can use to sand, buff, polish, grind, sharpen… and much more.
- In this video, I do a quick demo, using the different abrasives suitable for polymer clay sanding and buffing.
- The JoolTool can be used with flat, round, and sculptural polymer clay pieces.
- For the flat pieces, the Trizact disks and Microfinishing Films are used on the see-through Ninja Discs and can be used to shape and smooth polymer clay.
- For Rounded surfaces, the 3-M Bristle Brushes are used for sanding the surface smooth.
- The felt Ninja Disc and the Jeweler’s grade Muslin Buffing wheel are used for polishing to a high shine.
- One advantage to the JoolTool, besides just being a faster way to sand and buff your polymer clay, is that it doesn’t take much effort to hold your piece, since it is the machine doing all the work.
- It is great for people with hand mobility and strength issues, like Arthritis and Carpal Tunnel Syndrome.
- Much faster and easier than sanding by hand
00:00:04 –> 00:00:09 Hi guys, its Cindy Lietz, your Polymer Clay Tutor, and today we are going to be demoing
00:00:09 –> 00:00:14 the JOOLtool, and I thought I would show it to everybody here at the Vancouver Polymer
00:00:14 –> 00:00:15 Clay guild.
00:00:15 –> 00:00:22 They haven’t seen of these yet, and I wanted to show them how easy it was to use to buff
00:00:22 –> 00:00:26 and sand your Polymer clay pieces, so first, I’ll just do a quick little demo and then
00:00:26 –> 00:00:29 I’ll have a couple of you guys try it, okay.
00:00:29 –> 00:00:37 Now I’ve got…this is a JOOLtool, it’s a rotary tool, when you turn it on, it…you
00:00:37 –> 00:00:44 know spins, and we can put different types of abrasives and things on them, and I’ve
00:00:44 –> 00:00:50 got…I made this funky little tree, but I’ve got all the different abrasives on here.
00:00:50 –> 00:00:55 If you’re going to be working on a flat Polymer clay piece, such as…like I’ve
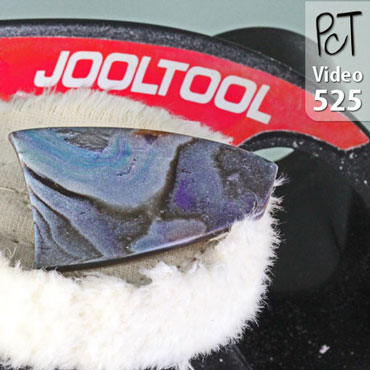
00:00:55 –> 00:00:57 got a piece of faux…
00:00:57 –> 00:01:06 It’s faux Abalone, and if I was gonna sand and buff this, what I would need…and I’ve
00:01:06 –> 00:01:11 taken some time to demo…to try all the different abrasives to make sure we’ve got the right
00:01:11 –> 00:01:19 ones for Polymer clay, but, what I’m gonna start off with is the 5 micron orange Trizact
00:01:19 –> 00:01:26 buffing…or sanding disc, and you just easily tighten it on to the machine.
00:01:26 –> 00:01:31 Now, normally we’d be not all crowded around and sitting here, we’d have it sitting down
00:01:31 –> 00:01:36 at a lower spot so that I can see from the top of it quite nicely.
00:01:36 –> 00:01:41 But I’ll just show you how this works, all you need to do is lift your piece up…if
00:01:41 –> 00:01:48 you’ve got a flat piece, you just lift it up and touch the surface, and it will sand
00:01:48 –> 00:01:58 it real quickly, and it’s safe and easy to work, and then you can go through the different
00:01:58 –> 00:01:59 grits.
00:01:59 –> 00:02:05 What you would do here, is you’d have a vacuum hooked up to the end here to catch
00:02:05 –> 00:02:12 any of the fine particulates, and that’s how that part works.
00:02:12 –> 00:02:16 Then when you get sanded for a little bit, then what you do is you unscrew it, and you
00:02:16 –> 00:02:22 move on to the next grit, and I’ll do some more proper demos where you can see in there
00:02:22 –> 00:02:24 better, but I wanted to show these guys how it works.
00:02:24 –> 00:02:33 Now the next one that I would be using is the 9-micron micro finishing film, and it
00:02:33 –> 00:02:40 does a beautiful job, and you just do the same thing, you just lift it up from underneath,
00:02:40 –> 00:02:46 now if you can see from the top side, you can see right through that disc, and so it’s
00:02:46 –> 00:02:50 easy to see your work, so if I have this down in front of me, I can see my work and work
00:02:50 –> 00:02:59 on it really easily, then I would move to the next phase…now I’m just gonna quickly
00:02:59 –> 00:03:03 show you these things, and then I’ll get Laurence to try, he’s brought a little…
00:03:03 –> 00:03:12 his faux Jade bowl here, so I would move on to the felt disc, I’ve got a felt disc here…
00:03:12 –> 00:03:20 you can see how quickly and easily it is to change the discs, which is very cool.
00:03:20 –> 00:03:26 Trust me on…you know if you’re using like a Dremel and you have to undo it, and you’re
00:03:26 –> 00:03:35 switching back and forth, so this will buff it up really fast… and I know you can see
00:03:35 –> 00:03:43 super well, can’t you, but can use this one, and the next thing you would do is use
00:03:43 –> 00:03:51 the…it is a buffing wheel, but the nice thing about this particular muslin is it’s
00:03:51 –> 00:03:56 like super high quality, it’s a jeweler’s quality buffing wheel, and I’ve seen nothing
00:03:56 –> 00:04:03 like it, I had a…you know just a regular one that you’d get from Canadian Tire, and
00:04:03 –> 00:04:11 this is way better, it just buffs up beautifully… and I don’t want anything shooting out over
00:04:11 –> 00:04:25 her way, but you can get a beautiful shine on it real quickly…but it’s easy to work
00:04:25 –> 00:04:36 with and real simple to do, but what’s really cool is that you can also do rounded and shaped
00:04:36 –> 00:04:44 pieces, and like all kinds of different things, so I can use this blue abrasive disc…what
00:04:44 –> 00:04:51 micron is this, I believe this is like15 micron, something like that, and this makes doing
00:04:51 –> 00:04:58 round beads, and dishes, and bowls, and all kinds of things way easier.
00:04:58 –> 00:05:07 So this is the first grit, the blue grit, and all you’d have to do is just grab your
00:05:07 –> 00:05:14 piece on there, and I’ll get you to try that Laurence, and see how easy it is, just
00:05:14 –> 00:05:21 touch it up against there, see it’s not…you can push a little harder, and it’ll just
00:05:21 –> 00:05:24 start sanding your piece.
00:05:24 –> 00:05:29 Depending on the speed of the motor, if you have it on real high, then it would take off
00:05:29 –> 00:05:36 more material, and if you have it on really slow, then it would take off less, and you
00:05:36 –> 00:05:41 can see how quickly it’ll start taking out any of the fine scratches.
00:05:41 –> 00:05:43 (L)Right (C)Can you see that?
00:05:43 –> 00:05:47 (L)Yeah (C) And you’ve hardy done anything at all, if you go a little bit longer…we’ll
00:05:47 –> 00:05:51 turn it up a bit, see, there’s a scratch on the bottom…the camera won’t see all
00:05:51 –> 00:06:01 this but Laurence can, if you kinda rub it on there, you can push right on…now let’s
00:06:01 –> 00:06:06 see is it done yet, yeah it’s starting to come out, but if you find it’s not removing
00:06:06 –> 00:06:08 enough, then you just speed up the speed a bit.
00:06:08 –> 00:06:09 (L)Oh, neat.
00:06:09 –> 00:06:15 (C)And you just have to start pushing a little harder, and you can…the nice thing is you
00:06:15 –> 00:06:21 can go around your edges and all kinds of stuff really quickly, just try that, and then
00:06:21 –> 00:06:31 what you do is you switch through all the different grits, see how it goes a little
00:06:31 –> 00:06:32 faster.
00:06:32 –> 00:06:37 (L)And it doesn’t go flying across the room.
00:06:37 –> 00:06:43 (C)Yeah, it doesn’t go flying across the room, see how easy that is to use?
00:06:43 –> 00:06:44 (L)Oh, yeah.
00:06:44 –> 00:06:49 (C)And it’s quite cool if you’re doing a lot of like round pieces, I was gonna get
00:06:49 –> 00:06:54 her to try it…Claudia, maybe you can see it from that angle, we’ll try not to have
00:06:54 –> 00:07:05 anything on the surface, and you see how easy it is to hold on to it, it’s
00:07:05 –> 00:07:11 not trying to grab it and throw it anywhere, and you can start getting a shine on it fairly
00:07:11 –> 00:07:17 quickly, well at this stage, you’re just getting…you’re removing fingerprints,
00:07:17 –> 00:07:22 scratches, that kinda thing, and then you can switch over to the other grit, it’s…like
00:07:22 –> 00:07:28 we don’t have a ton of time here, it’s easy to switch to the another grit, you would
00:07:28 –> 00:07:36 next go to the…this is 5 micron, I believe, and it’s the Peach colored one…am I going
00:07:36 –> 00:07:43 the right way…it was backwards, then you would go to the next grit, and you would find
00:07:43 –> 00:07:54 that very quickly you’re going to start getting a buff on here too.
00:07:54 –> 00:08:04 Then you can switch over to the next grit, this is the 2 micron, I believe, and then
00:08:04 –> 00:08:26 you would go through this one, and then we would go through the buffing wheel, can you
00:08:26 –> 00:08:28 feel it getting smoother there?
00:08:28 –> 00:08:33 I’ll just turn it off and try the buffing wheel, and the nice thing about this is that
00:08:33 –> 00:08:37 it saves…it really is nice on your hands, it doesn’t hurt to hold it.
00:08:37 –> 00:08:42 I don’t know, a lot of you have probably spent a fair amount of time…you don’t
00:08:42 –> 00:08:46 have to push too hard with the buffer, is it…can you see it…the shine’s starting
00:08:46 –> 00:08:48 to show up?
00:08:48 –> 00:08:54 The thing about the JOOLtool that’s really nice is that…oh, now you’re starting to
00:08:54 –> 00:09:02 get a shine right on the top there, yeah, you can see it now… it doesn’t take a
00:09:02 –> 00:09:08 lot to hold on to it, and so, when you’re doing a lot of hand sanding and stuff like
00:09:08 –> 00:09:14 that, it can get exhausting, especially if you got like carpal tunnel issues or arthritis
00:09:14 –> 00:09:19 issues, that kinda thing, and you can do a beautiful job on the rounded surfaces and
00:09:19 –> 00:09:21 things too.
00:09:21 –> 00:09:25 And yeah, especially if you spend the time that you need to at each of the grits, you
00:09:25 –> 00:09:31 can get it to a really, really high shine, and it’s just a gas.
00:09:31 –> 00:09:34 Can you see that?
00:09:34 –> 00:09:39 Yeah, it doesn’t take too much effort, and you get something quite beautiful and shiny.
00:09:39 –> 00:09:43 (E) It would make short work of my buttons that I do with the wet sanding…that takes
00:09:43 –> 00:09:44 forever.
00:09:44 –> 00:09:50 (C) Yes, and you can use…on the new JOOLtool, they actually have a little…a dish at the
00:09:50 –> 00:09:56 front that holds water, so you can also do it with the wet sanding, and that will make
00:09:56 –> 00:10:01 a difference in the speed of it, and it…yeah, it makes a big difference, right?
00:10:01 –> 00:10:07 And then when you’re doing a lot of… especially the small tiny round beads and things like
00:10:07 –> 00:10:12 that, it can… having something that will speed it up is quite a fun thing to do, so
00:10:12 –> 00:10:13 I just thought I’d show you that, what’s that?
00:10:13 –> 00:10:18 (L)I’ll take this one home with me, (E)I was just going to say I think the guild needs
00:10:18 –> 00:10:19 to buy one.
00:10:19 –> 00:10:24 (J) You can donate it to the guild (C)Oh, yeah, what about that?
00:10:24 –> 00:10:31 (L)We’ll keep it at my place (C) Alright, so I hope you enjoyed that, and there’s
00:10:31 –> 00:10:36 just a little bit more, I’ll be doing lots more demos on the JOOLtool and the particular
00:10:36 –> 00:10:41 tools on that, but I thought I’d show these guys, and I’m glad that you guys got a chance
00:10:41 –> 00:10:46 to try it yourself, and you can play with it again later…after we’re off camera.
00:10:46 –> 00:10:51 And if you enjoyed this, please let us know in the comment section below.
00:10:51 –> 00:10:56 And if you’ve got suggestions for future videos, leave those in the comment section
00:10:56 –> 00:10:57 as well.
00:10:57 –> 00:11:00 Alright, well we’ll see you next time and bye for now.
00:11:00 –> 00:11:02 (ALL)Bye.
Our goal is to translate these videos into as many languages as possible. If you are interested in helping with this initiative, then please do contact us and we will figure out a way to make it worth your while :)
Resource Links:
- Related Video: Vancouver Polymer Clay Meetup
- Related Video: JoolTool Introduction Buffing Polymer Clay
- Related Video: How to Buff Polymer Clay Using a JoolTool
- Related Video: How To Get Shiny Polymer Clay Using Renaissance Wax
- Amazon: JoolTool **
Resources marked with a double ** asterisk are affiliate links. If you click on them and decide to buy something, we may receive some compensation. This does not affect the price you pay in any way. What it does do, however, is helps us to continue providing free videos for you, here at the PcT website. Using our links to purchase your tools and supplies, is always greatly appreciated.
Sponsored Ads & Special Promotions
Shareable Images


To share this full blog post anywhere on the web that allows links in comments, here's a shortened url to copy and paste...
>> https://mypct.ca/v525 <<

Want to chat about today’s post? That’s what the comment section below is for. Scroll Down… We’d love to hear from you!
Or... if you would like to request a topic for a future post, here is the link to do that… PcT Suggestion Box
Hi Julia – The info for Leslie was about purchasing her JoolTool. In regards to the upcoming Jool Tool Course… with all the site reno’s we are doing, unfortunately it will be closer to the end of the year before we can get that release. Our apologies for the delay.
Hi Cindy,
I just noticed that Leslie asked about the JoolTool, and you said that you have sent her an update. Can I have an update too? I am SO needing and wanting help with working my JoolTool, and know that you and Doug have been working on some more detailed instruction, dare I ask, yet again, When?
Julia G
Hi Leslie… I just sent an update to you via email. Check your inbox :-)
Hi Cindy,
Do you have an update on the jooltool kits?
Are you selling them and will you ship to the states?
best wishes, leslie
That’s perfect! A kit for polymer clay and videos on how to use it correctly. More than I could have wished for. Thanks for all time and care you and Doug put into everything you do for us clayers.
Happy Holidays all!
Happy holidays to you too Dawn! I hope we can get this kit out lickety split… its a good one!
Hurray, I finally solved the problems of hooking up a vac hose to my JoolTool! Most of the small vacuums hoses are too small for the hose attachment on the JoolTool. I found a little Stanley 1.5 gal. Wet/dry vacuum at Walmart for $20 that works great. I took some quilt batting and wrapped it several times around the end of the hose and then wrapped duct tape around that several times. The hose now fits nice and snug, the vacuum sits right below the JoolTool on the floor and everything works terrific! I don’t recommend using a regular vacuum if you are going to be using water, a wet/dry is what you really should use. You don’t want any electrical zaps. :)
Wow what an excellent price for a shopvac Dixie Ann! I doubt we could find anything that cheap here in Canada unless we shopped on Craigslist or something.
Thanks for the update, as I have been wondering too. I will wait however long I need to because I know that it will be sooooo worth the wait! Cindy – you and Doug always go above and beyond to make sure we are well educated and well taken care of, and your videos are of the highest value and quality. Though we are waiting patiently and chomping at the bit to get our hands on this thing, know that we thank you for all of your hard work!!!
While we wait, can you give any “prep advice” for those who know they want to purchase it? I’m assuming a small shop-vac to suck up the wet particles would be advised? I was hoping a regular vacuum would suffice but I spoke with customer support of our brand of vacuum (Shark) and they advised against using it for wet sanding particles. Also, have you found that it’s necessary for it to be secured to a base? If so, I will start looking around for something that will work for my setup. My hope is that anything extra I will need to make this thing work, I would like to purchase in advance so that once I have it I can just set it up and plaaaayyyyy!! :-)
Thanks! And have a Merry Christmas and a Happy New Year!
Hi Karen, Dixie Ann is right a little shop vac will work perfectly. The vacuum fitting may need some tweaking like she explained as well… Becky Sue had a problem with her vacuum sucking up beads and buttons if she accidentally let go so she suggested adding a screen over the vacuum nozzle. She used a section of an onion bag… which has large enough holes to let all the sanding bits through but small enough to catch the beads. I taped a section of an onion bag on the end and added enough duct tape to fit the hole well. There are probably some vacuum fittings out there that would work perfectly but I haven’t hunted them down yet.
In regards to bolting it down, I haven’t found that to be necessary, though you will want to either stand when using the machine or put it on a low enough table that you are able to see it from the top and the wheel isn’t spinning toward your Face.
You may also want a way to store your disks… I show a cute little wire tree that works well for me in the videos we did on Christmas day, but a box or rack with dowels would work well too. (That you may want to wait to figure out until you actually have the machine.)
Other than that, there isn’t much else you can do to get ready. I sure hope we can get the kit and videos ready soon. I know a lot of you are anxious to get going.
Thanks for the update, i know it will be well worth it when it is ready. Thanks for all the hard woek you guys do. Have a very merry christmas and a prisperous 2015
Hi Cindy, just wondering how the Jool Tool videos and kit are going?
Me too. My money is saved up and burning a hole in my pocket. (:
Me three!! Santa has my order. I just want to give him the specifics. LOL
Hi Guys, I am sorry to say that we still have not got the JoolTool kit ready yet. However, you will definitely hear from us when things are ready to roll. Emails will go out, and there will be announcements at the blog as well.
We just completed the filming for a 34 part JoolTool Training course, that will be made available to customers who purchase their machine through us. Doug is now working on getting all the video editing done.
As you can imagine, it is a big job. The reason we decided to go the extra mile in creating a training course, is because there we were seeing too many customers using the JoolTool’s incorrectly with their Polymer Clay… and experiencing frustration rather than joy.
The machine has traditionally been used more by wire jewelry and gem artisans (hard materials), and as such, most all of the training videos floating around out there, were not created with polymer clay in mind. We want to ensure that your JoolTool will be a joy to use, as it is for me.
Sorry that this is taking longer than you were hoping for. Maybe Santa will hold onto your money for you until we are ready for him to process his order?
Hi Cindy..
Thanks for the wonderful demo..It was always in my list. I wanted to pick up this tool sometime this week or the next, as one of my friend is coming from US to India and don’t want to miss this opportunity.
I sold some things around the house and have been saving up for the Jool Tool. I am ready to buy! Hopefully, you will have a post soon on that. I feel like the Jool Tool is going to really make my work soar and be the difference between amateur and professional work! Waiting with baited breath!
I know Lena, I am sorry we are taking so long. I hope we are ready to post soon too.
Oooh. Guilt! Guilt is good. (;
LOL. Kidding you. Yes. I feel like I’m dying over here waiting, but I will live. I am just excited. I know it is a big deal to get everything in order. And, I know it will be great when you do.
Really enjoying the new tutorial. Happy it was nothing that needed sanding. LOL. Almost done with a new necklace (instead of the bracelet) and finished a little fairy door! FUN!
I am probably alone here, but I do hope that the focus of the paid tutorials do not turn to relying on the Jooltool for the sanding, buffing, finishing stages.(Maybe turn those to a separate video segment if they do make their way into the paid tutorials?) Lets face it, there are many of us out here that may not be able to afford it. Yes, I have been saving for it, but when all is said and done if the package ends up being over a certain price point, I will not be able to get it. *sad face*
I do know this tool would be absolutely invaluable for my nerve condition. It would certainly allow me to play in my studio for longer than I can now. It would mean that I could actually sand a piece and then not have to take 3 days off afterwards because I cannot feel my fingertips and hands at all afterwards. It might also cut down on some other issues that I have that have kept me out of my studio as of late. I surely do want it. I just have to keep reminding myself about priorities.
I look forward to seeing the “kit” that has been put together for this. I know, like others have said, trying to figure out which one is just right and figuring out which parts and attachments are just the right ones for polymer clay are a bit daunting. So I am very much looking forward to seeing what has been put together.
Hi Chelsea, don’t worry I would never expect that everyone would be able to afford a high-end tool such as the JoolTool and therefor would not include videos in the membership that would require the use of it. I will however feature tools I love, no matter the price, in the free videos whenever I think it would interest people. As far as the JoolTool Training goes, that will be for those who buy the JoolTool and not for those who do not.
Anytime I use a product in a paid tutorial for the membership, I try to use products that are reasonably priced and as widely available as possible, or can be substituted in some way. For people that are tight on funds, and don’t want to purchase the materials for a tutorial, then buying the tutorials on a one by one basis from the back issues, rather then getting what we send you in the membership, is probably the better way to go. Of course the videos will be more expensive that way, but at least you only get the videos that you want to buy the supplies for.
I hope that makes sense!
I always feel like I sound like that “negative Nancy” but it was not meant to come off that way. I, for one, am very excited about the JoolTool. I do hope I am in the camp that can afford it.
That said, I am a yearly subscriber (however a newer subscriber) as I think what you teach is invaluable – even if I don’t have all the tools or supplies. I truly learn something new in every single video that I watch of yours. I cannot thank you guys enough for that.
I was just concerned about the JoolTool taking more centerstage and you did set that anxiety to ease a bit.
Just keep doing what your doing and I’ll keep learning from ya! :)
Hi Cindy,
Great demo of the JoolTool and really looking forward to learning what you have in store for us
Now this might sound like a crazy question but as the surface area is considerably more than a Dremel, can two people use it at the same time
Here in the UK it will cost us a lot more to purchase and ship so a couple of us thought we could “share it”. Obviously we would not want to burn out the motor, but for tiny beads??? What are your thoughts about this?
……….cheers xx……………
Hi Elaine, the JoolTool is really designed for one person to use it at a time. The only thing I can think of where two people could use it would be one of those buffers with the two ends on it. Even then it might be a little crowded for two to use one of those and they’d have to both need it at the same speed to work.
If you’re talking about taking the machine back and forth between two houses, than that would not be a problem at all. The JoolTool is small and portable and would be easy to share between friends (Though I’d have difficulty sharing fairly!) ;)
Hi everyone, we will have all your answers in regards to the JoolTool very soon. Doug and I are right now working on a really awesome launch with training videos and prizes and such. It will be worth your while if you can just hang on for a bit longer! I know it’s hard to wait but we are close… I promise! :)
PS: Yes Suguna, you will be able to sand and buff even the tiny round beads… so stay tuned!
Thanks Cindy..That means good bye to hours of rotation in the lortone tumbler.i got so tired that i stopped sanding small beads ..plus the drilling vice looks like a good option..
Hope it all fits the budget :)
This was a great demo. I had heard of a “jool tool” but didn’t understand what it was. Obviously, I cannot live without one (now). LOL.
I popped over to Amazon to look at prices and saw they had deluxe kits, pro, etc. Do you have an opinion of which is needed? I see that the Jool Tool could also be used for working with harder materials like stones – so maybe I don’t need the top of the line kit? Just kind of wondering what is the “bare bones” version I might want or if I would be better off saving up for a deluxe one.
Thanks for the great demo!
Lena
Speedy recovery to karon. This itself gives me lot of motivation to try more!
And Cindy..can you let me know if 8mm and 10mm round and oval beads can be sanded with this tool? I mean without hurting the fingers :)
Also Cindy, is there a whole kit that can be purchased?
Do you have a Canadian source for the accessories? I have the Jooltool with the felt pad, but would love to get the muslim wheel and the sanding pads for round surfaces!
Thanks for your well wishes and concern. I am doing okay. My left side was effected by the stroke and I am learning what I need to do differently to be able to do what I love, the flowers. I am lucky to have one of the best hospital groups for stroke right here in Spokane. They are nationally acclaimed for their programs. I believe that I am recovering quite well and will have full use of all back eventually. But if not I will become adjusted to ” my new reality” . The Drs have already warned us that reality changes as we go. My family has been stalwart and always near to help me learn and progress. Though they would be happy to do everything for me and not let me lift a finger they too are learning to let me do as much as I am able.
Thus far I am able to do almost everything , being right handed is a great help there, with only a few things that I must learn differently. I am starting small, making sure that all steps can be done . I am looking forward to the ability to sand and buff on the jool tool as I am sure that it will be less strenuous on the motor skills I am redeveloping in my left hand and arm.
I have kept up on watching the videos and look forward to the time I can make the newest ones. I will be starting on the latest set tomorrow. It will be lots of fun .
Hurry with the kit to make my jool tool work … Oh yes you said I need more patience .. This is me being patient. Lol
Karon,
If, I were you I’d squeeze, condition, and warm up varied sizes of balls of clay. Then make snakes, then, practice working with just certain fingers. It teaches each nerve the proper way back, especially when you use both sides of your arms/hands at the same time, then split off into each side separately.
I do it, and I swear, if I am losing myelin, I will do my best to teach existing circuits a better path, plus encourages new nerves that pop out take over.
Hugs, prayers, and best wishes….
Jocelyn
Cindy,
So glad to see you have made strides to finishing this long awaited kit for the jool tool. I am a most impatient person. But am learning to be better. Health challenges have forced me to learn patience that I lack. The jool tool will be a most helpful addition to the new way I am learning to work with clay and many other things. Over the summer I suffered a stroke followed by a heart attack within a two week period. I think someone is trying to teach me lessons I have been unwilling to learn. Patience is the worst for me , so let me say thank you for all your hard work in getting this together for us. We really appreciate all your efforts in figuring this out . You are the best .
Oh Karen you poor thing! I have been thinking about you lately and have been wondering how you are, but had no idea you have suffered a stroke AND a heart attack! How awful. I hope you are feeling better now. I am so happy that you are here to tell us about it. Have you loss any use of your hands? Is that what you meant about learning new ways to work with clay and about being patient? I do hope you are still able to make your wonderful flowers. The JoolTool will definitely help with your finishing chores. We have the kit all figured out now and some training that we have filmed and are putting together that will be a great help. SO stay tuned… (which might require a little more practice of being patient.) ;) Please take care of yourself. I hope Dave is pampering you and that you are recovering quickly. All my love ~Cindy
Dear Karon;
I am sorry to hear about your recent stroke and heart attack. I hope you are doing better and have a great support group of people around you as you recover and adjust.
My Mom had a stroke back in 2011. We were lucky to have a great support team of family, therapists and friends. I really hated when someone would ask her when she ‘would be back to normal’. She would get a pained look on her face. I would tell her that she is ‘normal’–that this is her ‘new normal’–things may not be the same as before, but she is ‘normal’. Once she understood that and accepted it she went back to her paintings and puzzles and created many amazing pieces of her work that ‘normal’ people could only dream about creating. Yes it may have taken her longer to create and may have been more difficult to complete, but she did it.
I see from your post that you have accepted your setback by saying that you are learning to create ‘the new way’. Good for you. I know I am looking forward to seeing many more of your amazing creations and I think I can also speak for the rest of the PCT Community that they will be looking for your work also.
Good Luck!!!!! Keep claying!
Mari H
Hi KarenKay, so sorry to hear about your medical problems this past summer. Here is hoping you recover well and are able to get back to your clay play as I know how much it means to you doll! (((hugs)))
Oh, Karon, I am so sorry to hear about those health issues. Hope you and the hub will restructure so that you feel happier and more secure while your recover. And cardio/pulm rehab these days really really helps, especially if they have a pool program! Hope you are in a good program and feeling better each day.
And I agree, I so appreciate Cindy and Doug sticking with the enhanced JoolTool rollout. It will change the poly clay industry, and make tedious painful work much faster and safer. And allow more folks to enter the professional finish realm so they can turn their hobby into a small business.
When I get it, I am going back to old training by finding a couple of thin leather gloves at resale so I’ll feel more confident moving the object around, LOL!
I’m sorry to hear about your health problems! Do take care and get well soon! Your flowers are so amazing so, I hope you can keep up your beautiful craft! This Jooltool must be very helpfully for you. Still debating on getting one.
I really enjoyed seeing the demonstration on the Jooj Tool. I did not know anything about it.
Thank you,
Dawn
Thanks Dawn, it is a really neat tool to work with!
Love the jooltool, best investment I ever made (besides you Cindy)
:) You’re going to love the new training we are working on for the JoolTool too Dixie Ann!