How To Keep Bubbles Out Of Your Polymer Clay
Video #371: Tricks of the trade to help make your polymer clay projects look more professional.
More...

IN THIS POST: — bubbles — pasta machine — (Topics marked with an asterisk* are discussed in the Comments Section below).
Topics Covered In This Video:
- Trapping air in your polymer clay as you work with it can cause disappointing bubbles to rise to the surface of your finished pieces.
- Avoid using squishy clay as a way to avoid trapping air in your polymer clay.
- Use a thicker setting on your pasta machine.
- Don’t trap air in the folds of the clay, make sure it has a way to escape.
- Gently pull sheets in both lengthwise and width wise to help release trapped air from clay.
- Bake flat polymer pieces in a tile sandwich (smooth tile on bottom – paper layer – clay in middle – another paper layer – smooth tile on top).
- Bake pieces upside down to let the air rise to the back of the piece rather than the front.
- In a future video, I will show you how to fix or minimize the look of bubbles should they still appear after taking these precautions.
Do you have problems trapping bubbles in your polymer clay pieces? And what have you done about them in the past?
Looking forward to hearing from you!
00:00:03 –> 00:00:07 Hi guys, its Cindy Lietz, your Polymer Clay Tutor, and in today’s studio tip, I’m going
00:00:08 –> 00:00:12 to talk about avoiding bubbles in your Polymer Clay pieces.
00:00:12 –> 00:00:20 Now if you’ve ever pulled out a piece from the oven and discovered bubbles in it, you
00:00:20 –> 00:00:27 will know how disappointed you will feel, and this happens because you’ve trapped some
00:00:27 –> 00:00:32 air into your Polymer Clay, now there are few things that you can do to avoid trapping
00:00:32 –> 00:00:34 air in the Polymer.
00:00:34 –> 00:00:42 First of all, a really, really soft clay can be a problem, it’s just squishier, and it
00:00:42 –> 00:00:51 traps air easier, so you may want to leech some of the Polymers out of the clay; and
00:00:51 –> 00:00:54 I’ll show you that in some other video in another time, but another thing that you can
00:00:54 –> 00:01:01 do is that, when you’re rolling it out, you can do a few things, first of all, try rolling
00:01:01 –> 00:01:10 it out…or when you’re conditioning it, do it at a thicker setting, the thicker settings
00:01:10 –> 00:01:12 trap less air into the clay.
00:01:12 –> 00:01:15 I’ll show you what I mean, when you have a really thin setting, so I’ll go right down
00:01:15 –> 00:01:23 to something small here, you can…when you go to fold it and put it back together…now
00:01:23 –> 00:01:28 look at this, I jumped straight from a thick to a thin setting, it really rippled up, but
00:01:28 –> 00:01:33 say I was to do that and then try to run it through the pasta machine again, you’re really
00:01:33 –> 00:01:39 trapping a lot of air into the clay that way.
00:01:39 –> 00:01:44 Another thing that causes air to be trapped in…here I’ll come back a little bit, at
00:01:44 –> 00:01:53 least half here, is if you…here first I’ll run it through, and then if you fold it, and
00:01:53 –> 00:01:58 then let the air…if you’re going in cut side down and let the air get trapped in that
00:01:58 –> 00:02:02 fold, that can cause you problems.
00:02:02 –> 00:02:07 If you fold it all up, like this and jam it in without having any way for the air to escape,
00:02:07 –> 00:02:15 that will also cause you problems, and you can see, hopefully you can see…I’ll try
00:02:15 –> 00:02:24 it again, the air is getting trapped in this sheet…I don’t see it as easily, but it can
00:02:24 –> 00:02:26 get trapped in there really badly.
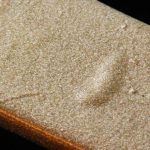
00:02:26 –> 00:02:32 One trick you can do to…if you are getting bubbles trapped in there, is to pull the sheet,
00:02:32 –> 00:02:43 so I’ll just roll it out at a nice thicker setting, so like this, and here’s a little…here’s
00:02:43 –> 00:02:48 a few bubbles, you can see them here, what you can do is if you give the sheet a bit
00:02:48 –> 00:02:57 of a pull, in both directions, what will happen is, is it will kinda let the surface area
00:02:57 –> 00:03:04 allow the bubbles and air to escape from the clay, and that can really make a difference.
00:03:04 –> 00:03:12 Another thing you can do is when you go to bake your clay, you can do it…I have a couple
00:03:12 –> 00:03:17 of glass tiles here, something smooth, but when you go to bake your clay, you wanna put
00:03:17 –> 00:03:26 your piece onto a piece of a tile or onto a piece of paper and lay another piece of
00:03:26 –> 00:03:34 paper on top, and lay another flat tile on top, and what that will do is that will kind
00:03:34 –> 00:03:42 of keep the air from…it will keep the piece a lot flatter, if you turn your piece upside
00:03:42 –> 00:03:48 down, then any bubbles that could be trapped in there will float….well they sorta float,
00:03:48 –> 00:03:52 but they expand and they come to the top side, therefore, being on the back side of your
00:03:52 –> 00:03:58 piece, in another video, I will show you what you can do if this does happen to you and
00:03:58 –> 00:04:06 how you can kinda fix that, it’s not always a 100%, but you can get a much…you can fix
00:04:06 –> 00:04:09 it to a certain extent, so I’ll show you that another time.
00:04:09 –> 00:04:11 So I hope that was helpful for you.
00:04:11 –> 00:04:17 Make sure that you’re using a thicker setting, make sure that your clay isn’t too soft and
00:04:17 –> 00:04:21 squishy, make sure that you’re not trapping air into your clay and you will have a lot
00:04:21 –> 00:04:26 less bubbles in your Polymer Clay pieces at the end of the day.
00:04:26 –> 00:04:32 So I hope you enjoyed that, please click that thumbs up button and like it for us, that
00:04:32 –> 00:04:34 would be really great.
00:04:34 –> 00:04:40 And my question is for you today, do you have problems trapping bubbles in your Polymer
00:04:40 –> 00:04:41 Clay?
00:04:41 –> 00:04:44 And what have you done about it in the past?
00:04:44 –> 00:04:46 So I will see you next time.
00:04:46 –> 00:04:48 Bye for now,
Our goal is to translate these videos into as many languages as possible. If you are interested in helping with this initiative, then please do contact us and we will figure out a way to make it worth your while :)
Resource Links:
- Related Video: Fixing Bubbles in Your Flat Baked Polymer Pieces
- Related Article: Conditioning Polymer Clay without Trapping Air Bubbles
- Related Article: Pendants and Flat Beads Smooth and Bubble Free
- Related Article: Baking Flat Polymer Clay Sheets – Common Problems
- Related Video: Using a Tile Sandwich for Baking Flat Polymer Clay
- Related Video: Most Common Polymer Baking Questions… Answered
Resources marked with a double ** asterisk are affiliate links. If you click on them and decide to buy something, we may receive some compensation. This does not affect the price you pay in any way. What it does do, however, is helps us to continue providing free videos for you, here at the PcT website. Using our links to purchase your tools and supplies, is always greatly appreciated.
Sponsored Ads & Special Promotions
Shareable Images


To share this full blog post anywhere on the web that allows links in comments, here's a shortened url to copy and paste...
>> https://mypct.ca/v371 <<
Want to chat about today’s post? That’s what the comment section below is for. Scroll Down… We’d love to hear from you!
Or... if you would like to request a topic for a future post, here is the link to do that… PcT Suggestion Box
Hi Cindy:
My issues with bubbles always shows up when I’m trying to cover clay with a decorated sheet, I’ve tried adding the sheet to raw clay and I’ve tried adding it to baked clay to try to solve the problem. I suppose that part of the issue is that I’m not seeing the bubbles before baking.
One tip that might prove useful is to apply a thin layer of polymer clay glue on both pieces, then slowly but surely ease the fabric on in one direction, carefully smoothing as you go. Using a bright concentrated light source and a magnifier can help spot those bubbles the second they crop up. Working in one direction at a time helps guides the bubbles out to a seam, where they escape. Always try to work outward, never inward, since inward seams to trap more air. Hope that helps. Also would use the search facility for links, there are a ton of suggestions here on this site that will prove useful. All best.
I just found you, Cindy and it is so refreshing to see that you are “real” on your videos! Great tips and will be back to see more. Thank you!
So nice to have you here Peggy! I am so glad you found us. Welcome to our little clay family. make sure to ‘take a swim’ in the sea of information around here! I think you are going to love what you learn!
Thanks for leaving such a kind comment! I really appreciate what you said. Hope to see more of you around here!
Hi Cindy! (: I tried dping them but bubbles keep on showing. Now, thing is that Im currently using Du-kit for my projects and I accept orders. I’ve only just begun and I dont have a budget for an oven. Instead of using an oven, I use an oven toaster. I have my thermometer to check the heat. I alsohppen to have a pasta machine and usually knead using it. Bubbles just keep showing up even if I try those… please help…. ):
Hi Basti, I am not familiar with that clay, but if it is quite sticky you may find it traps air easily. Use the search box to find info on leaching the clay to make it firmer. And when you roll it through your machine make sure to put the fold side in first so that you aren’t trapping air in. Plus when the sheet comes out of the rollers, give it a tug to stretch the clay and release the air. For anymore info, try the search box. Good luck!
Good information here, I do have periodic problems with bubbles from time to time, I think everyone does. I like Lyn’s suggestion of using paper canvas too. My question is how much is too much weight to put on a flat piece of clay while baking it? I normally sandwich my flat pieces between 2 tiles like Cindy shows in her video. Jocelyn says she adds a lot of weight. So if I am baking a flat pendant and I have turned it upside down, is one tile enough or should I use more and if so how many? I did notice when baking my last piece which had a slightly domed top, it flattened it out more just using the one tile. I thought it looked better with the slightly domed top but it did come out bubble free.
I generally don’t weight mine with anything more than a tile but if you are having problems, then definitely try it. If I am pretty sure my clay went in bubble free, then sometimes I don’t worry about even placing the top tile on (like in the case of a domed piece like you were mentioning) but I do try to at least turn it upside down. I can still end up missing some though (like in the Butterfly Barrette I showed in the tutorial the other day.) I was able to pretty much fix that though with the re-heat method. So all is good… Phew!
You are such a doll, Cindy! Love your lessons!
Hi Cindy: new to your blog and am enjoying all of your great tips. In regard to fingertips I find texturizing my pieces does prevent them from showing up as much so I do that whenever possible. I use sheets of paper canvas a lot because they give a subtle texture and are easy to put through the pasta machine with the clay. I also use pieces of them exclusively when finger-pressing pieces (I.e. if producing petals or thin discs) – cut pieces of canvas about 1″x2″ and fold in half so that you end up with a piece that you can press the clay with between your thumb and index finger. This way both back and front of the piece gets textured at the same time as well.
Lyn
I use wallpaper samples to texture clay. They come in all sorts of nice textures – like linen or leather or carving. The “dryness”of the paper stops it sticking to the clay, or you can use mica powders or cornflour as a release. Also, you get them free from wallpaper shops.
Excellent information as always, Cindy!
One suggestion I have for dealing with air bubbles is to use a sharp blade, holding it at an angle where it’s almost flat rather than straight up and down, and slice into the air bubble at one of its sides before pressing the air out and re-sealing the sliced part. That will be almost invisible, and much less noticeable than the mark you’d get if you cut into the bubble with a near-vertical blade or if you just poked a hole into it with a skewer or other sharp point. That can be important when the air bubble happens when you decorative sheet is ready or almost ready for use!
Also, deal with air bubbles when you notice them. If you keep conditioning air-bubbled clay the bubbles might appear to go away, but sometimes the trapped air simply becomes distributed so finely that it no longer makes noticeable bubbles when the clay is uncured. These can still cause dimpling or uneven surfaces when the clay is cured as the air expands, and they can also create visible imperfections in translucent clay.
Finally, I don’t quite agree with the recommendation to condition clay at a thicker setting, at least for Kato Polyclay.
Kato is more easily and more quickly conditioned at a medium to medium-thick setting than at a thick setting, and because it’s firmer and less sticky than many other brands this doesn’t seem to increase the likelihood of air bubbles being trapped. On my latest pasta machine I do most of my conditioning at the third and fourth thickest settings, which are 2.1mm (roughly 6 playing cards thick) and 1.5mm (roughly 4 playing cards thick) respectively.
Additionally, if you have any Kato of the previous formulation that tended to crumble, it’s almost impossible to condition at a thick setting! You’ll just get handfuls of crumbs and small pieces which you’ll have to try to squish together to feed through the machine, which is extremely frustrating. You’re also fairly likely to have some air trapped between those collected squished bits, so using a thick setting is counterproductive with that type of clay. For that Kato formulation, I start by working my way down to a medium thin setting before I do any folding, and I do much of the conditioning at medium thin before backing off to my normal medium setting once it’s behaving fairly nicely.
Thank you Sue!
Love the stretching technique Cindy. Find that works really well. Weird that Kato responds so differently, but I agree, it does. Wonder why.
Also, I weight stuff, lots of tiles after I turn it right side down. Think it smooshes the air out.
Funny, that you couldn’t find any bubbles at first! I noticed that when you put the bunched pc in the machine, you put it in with an opening pointing upward! Lots of years of “automatic” practice!
Nettonya, yeah I saw that too. Had to force myself to do it wrong and still let the good habit slip through! lol
Great tut again!!!
Preaching to the choir! Tried to cover a project the other day and >thought< I got all the bubbles out between the layers :(
Thank you Cindy!!
sigh.. i just had this problem yesterday! probably didn’t put folded side down in the pasta machine…