Fixing Bubbles in Your Flat Baked Polymer Pieces
Video #372: Even when flaws show up after baking, there is still something you can do.
More...

IN THIS POST: — bubbles — flat pieces — (Topics marked with an asterisk* are discussed in the Comments Section below).
Topics Covered In This Video:
- Sometimes, when baking your polymer clay pieces, a bubble or two will show up when you take it out of the oven. In a previous video (Avoiding Bubbles in Your Polymer Clay), I demonstrated how to avoid trapping air in your clay before the piece is baked. But in cases where some bubbles are missed, or if you have some old pieces with bubbles showing, today’s video will teach you a quick trick to help fix, or at least minimize the look of those pesky flaws.
- You can either work with the bubbled piece while it is still warm from the initial bake… or you may also re-heat to get the polymer temperature back up.
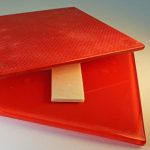
- Sandwich hot bubbled clay between two smooth heat proof surfaces and apply pressure until the piece is cool. I used to smooth glass tiles in the video.
- This process should flatten the bubbles and make them disappear or appear less noticeable. If it hasn’t worked to your liking, repeat process by re-heating, and try again.
00:00:04 –> 00:00:07 Hi guys, it’s Cindy Lietz, your Polymer Clay Tutor, and today’s Studio Tip, we are talking
00:00:08 –> 00:00:12 about Poly Bonder Glue by Lisa Pavelka.
00:00:12 –> 00:00:18 Now this is a really neat little glue, it’s a…it’s like an instant glue but it’s a
00:00:18 –> 00:00:24 high heat one, so it can handle going into the oven, and Lisa Pavelka is one of the Polymer
00:00:24 –> 00:00:28 Clay Artists who’s been around in this industry for a long time, and she specially developed
00:00:28 –> 00:00:32 this to work with Polymer Clay, so you know it’s going to work.
00:00:32 –> 00:00:39 Now, what’s neat about it is that you can use it for gluing together raw clay to raw
00:00:39 –> 00:00:47 clay, raw clay to baked clay and raw clay…and baked clay to anything that’s non-porous like
00:00:47 –> 00:00:52 metals and glass and things, so it really has a lot of neat uses.
00:00:52 –> 00:00:58 Now for example, when I’m making these Micro Mosaic Pins, there’s a…it has to be done
00:00:58 –> 00:01:05 in several stages, and the mirror itself…glass doesn’t stick to Polymer Clay, so you’ll need
00:01:05 –> 00:01:12 to glue it in, but I can’t do it at the end because I need to do it before the whole project
00:01:12 –> 00:01:17 is grouted, so I need a glue that can handle going back into the oven, so the Poly Bonder
00:01:17 –> 00:01:22 is perfect for that, I can glue the mirror down, grout my project, pop it back into the
00:01:22 –> 00:01:23 oven.
00:01:23 –> 00:01:30 I also use it in a different process here where I’ve got the layering, and I’ve got
00:01:30 –> 00:01:34 the pin back and things, so it works beautifully for that purpose.
00:01:34 –> 00:01:42 Another use…works great for, is something like making stud earrings, now I’ve got
00:01:42 –> 00:01:50 a little slice from one of my Shaded Rose Cane tutorial, and it’s a little slice from
00:01:50 –> 00:01:53 it, and I’ve baked it in a little cup shape.
00:01:53 –> 00:02:01 Now, to make it into a stud earring, I need to glue on a earring back onto the back, now
00:02:01 –> 00:02:07 the problem is, is that you’ve got a flat surface with the metal here from the earring
00:02:07 –> 00:02:13 back, and then you’ve got a cupped surface from the clay piece.
00:02:13 –> 00:02:18 When I go to glue those together, and I’ll just show you quickly how this product works,
00:02:18 –> 00:02:23 it’s on a little brush, there’s a little brush inside, and it’s like a super glue and it
00:02:23 –> 00:02:29 works instantly, so I can just add a little bit to the back of this piece, and then stick
00:02:29 –> 00:02:39 it right down to my clay, like that and it bonds just instantly, I’ll center that a
00:02:39 –> 00:02:40 little bit, there.
00:02:40 –> 00:02:45 Now, because like I said, this is a flat surface on the back of the metal, and a cup surface
00:02:45 –> 00:02:49 here, I would be concerned over time that those 2 might become separated, because it
00:02:49 –> 00:02:58 isn’t a complete bond, so what I like to do is I like to take a really thin sheet of Translucent
00:02:58 –> 00:03:04 clay, and I have a little bit rolled out here, and use a tiny little circle cutter, cut a
00:03:04 –> 00:03:11 piece that will fit over…just a second, it’s stuck in there, fit over the back of
00:03:11 –> 00:03:22 the earring, and slide it right down over top of the back here, and right over the metal,
00:03:22 –> 00:03:26 and then I can just press it down to the clay.
00:03:26 –> 00:03:31 So you’ve got clay touching clay, and you’ve got a nice protected bond there, and I don’t
00:03:31 –> 00:03:34 ever have to worry about it coming apart.
00:03:34 –> 00:03:39 Then I can pop this back into the oven, and because of the high heat glue that this is,
00:03:39 –> 00:03:44 I know that it’s not gonna have any issues after it’s baked, and then I end up with a
00:03:44 –> 00:03:49 strong bond on a pair of earrings that will work for a long time instead of just a short
00:03:49 –> 00:03:50 time.
00:03:50 –> 00:03:53 So I hope that was helpful for you.
00:03:53 –> 00:03:57 If it was, make sure to press that Like button, I’d really appreciate it.
00:03:57 –> 00:04:03 And my question for you today is, have you ever tried the Poly Bonder Glue by Lisa Pavelka
00:04:03 –> 00:04:05 and if you have, tell us all about it.
00:04:05 –> 00:04:09 Leave your answers in the comment section below, that would be great.
00:04:09 –> 00:04:13 And don’t forget to subscribe, we have new videos coming out every week and you won’t
00:04:13 –> 00:04:15 want to miss a thing.
00:04:15 –> 00:04:17 So we’ll see you again later, bye for now.
Our goal is to translate these videos into as many languages as possible. If you are interested in helping with this initiative, then please do contact us and we will figure out a way to make it worth your while :)
Resource Links:
- Related Video: Avoiding Bubbles in Your Polymer Clay
- Related Article: Conditioning Polymer Clay without Trapping Air Bubbles
- Related Video: How To Keep Bubbles Out Of Your Polymer Clay
- Related Article: Pendants and Flat Beads Smooth and Bubble Free
- Related Article: Avoiding Common Problems When Baking Flat Sheets
- Related Video: Using a Tile Sandwich for Baking Flat Polymer Clay
- Related Video: Most Common Polymer Baking Questions… Answered
Resources marked with a double ** asterisk are affiliate links. If you click on them and decide to buy something, we may receive some compensation. This does not affect the price you pay in any way. What it does do, however, is helps us to continue providing free videos for you, here at the PcT website. Using our links to purchase your tools and supplies, is always greatly appreciated.
Sponsored Ads & Special Promotions
Shareable Images


To share this full blog post anywhere on the web that allows links in comments, here's a shortened url to copy and paste...
>> https://mypct.ca/v372 <<
Want to chat about today’s post? That’s what the comment section below is for. Scroll Down… We’d love to hear from you!
Or... if you would like to request a topic for a future post, here is the link to do that… PcT Suggestion Box
Hello Cindy.
I am very new to polymer clay and have just found your tutorials on you tube.
They are so very helpful and you explain everything very clearly. I’m subscribed to your channel and am going through all of your tutorials.
I hope you don’t mind me asking this question here? But!
Can you tell me please, what is the best way to store polymer clay.
I put some in a plastic container but it went very sticky and seemed to melt and break down the actual side of the plastic box, why did that happen? I thought it would be ok as I have seen people on you tube wrap their clay in plastic bags, do they also melt?
what about wrapping it in baking paper? would that be ok or would it dry out the clay?
How do you store your clay?
Thank You.
Tricia.
Hi Trica, welcome to the blog. At the top of every page is a Search Bar. If you type in “how to store Polymer Clay” You will have several results to look through that will answer your question. Cindy has one of the most comprehensive search features and it covers just about any question you may have on polymer clay and it’s properties. Hope this helps.
Thank you Dixie Ann.
I’ll have a look now. :)
Dixie Ann is right Tricia. The search box is the perfect way to find tons of info here. You should be able to find the answers to all your questions about storing polymer clay.Thanks for helping Tricia, Dixie Ann!
If you haven’t found it already, here is a link to a video where I show how I store my polymer clay in bins.
Hope that helps!
Hi, All!
I used to get more bubbles while sheeting than after baking, but the other free video helped me with that, Cindy. And I always check and re-check myself before I bake for bubbles. As I find them, I poke the with the finest needle I have and then smooth down gently.
But I never saw this trick before—it would never have occurred to me in a million years! Will try it next time…except I hope there IS no next time!
Best wishes to one and all for a peaceful and happy future, if everyone were crafters there would really be peace in the world, No where else do you find a group of people who love to share and are so giving of their time and knowledge.
Having said that I made the mother of all bubbles last week. I am not one to see things go to waste so as I was putting the final strip of packing tape on a package for my daughter the tape ran out and instead of throwing it away I clearly saw a large bangle bracelet in my hand. I covered it with liquid clay and baket to give me a sealed surface to work on then wrapped it in a sheet of clat inside and out it was beautiful then I baked it and what I got was very nice except that there was two huge bubbles on either side of the outside.
Is there any way to get the results I want without the bubbles.
That sounds like a neat idea Cheryl. Sometimes really thin sheets can be more of a problem trapping air then thin ones are. You could try a little thick sheets if they will work in your design. Plus you can try using Bake and Bond between the layers and really paying attention that you smooth it out well before baking. Or you could try the technique in this video should it end up creating bubbles any way. Hope that helps a little. Good luck! Let us know if you figure it out.
Hi Cheyrl
maybe you could use a needle tool and make a small hole in the raw clay for the air to escape
maybe on both sides
if this isn’t the ‘look’ you’d like you could back fill the cured piece w/ raw matching clay and re cure
just a thought :)
sounds like a stroke of genius to me, I’ll try it and let you know, Thanks
I’m sitting here with a sore throat and a pounding headache but I just watched your studio tip on flattening out bubbles and I must agree that is one of the best tips you have done Cindy my dear. As hard as one tries to prevent bubbles it always seems to be a problem 9 times out of 10.
The Boston Tragedy was especially scary for us. My son had
stayed at the hotel 2 blocks from the bomb site earlier and to see all that happen was especially difficult for him.
(((hugs))) to everyone.
Boy is it ever addicting! Sometimes I put a timer on just so I don’t get lost in there
Sure is quiet around here today… The sad and scary news of the bombs at the Boston Marathon are on people’s minds today. My heart goes out to everyone who has been touched by this tragedy. It breaks my heart that this kind of thing can even happen. If we just had more love and understanding for one another, we would have peace in this world.
My Love to each and every one of you.
btw, I love all the pc pics you find and share on Pinterest. They’re so inspirational and I’ve re-pinned a bunch of them. Trouble is – it’s ADDICTING! Bet ya can’t pin just one, lol.
Wow, that was a great tip Cindy thank you. I don’t usually wind up with too many bubbles in my pieces, but I’m thinking of a piece I did a while ago that had one in the front. I sanded and finished it, but I may pop it back in the oven and give this a try.
That’s a great idea Michelle! Let us know if you are able to fix it.
Oh my God!! This happened to me today!
Thanks dear, very useful tip. Like always.
You’re most helpful, thank you :)
oh and what I do, I take that razor-sharp box opening knife and slice very very thin layer of a bead, sure it leaves either a very thin layer of clay on top of air-source, or cuts it right open, but then you can fill in the cap with same color(s) clay and heat just that one spot, but this had to be done before it cools down totally, because it? kinda doesn’t fuse together after it’s fully cold. The result is actually quite fine, but as you can’t double-cool the piece, you have to find a way to sort of apply hard heat only onto that one spot, so what I do is I take that lighter, the one “wind resistant” and just cook? the crumple of clay I set in there like that. Gotta be very careful, for it can absolutely burn the clay or cause more bubbles to appear from the “boiling point” effect if it’s too hot for too long.
I like your ideas Kazak. Thank you so much for sharing them! Like you said, I would caution against using a lighter to heat the clay though. It can be extremely difficult not to burn or bubble the surface. A heat gun, or an oven as I suggested in the video, is a much safer way to reheat your clay.
If you can reheat clay anyway, why can’t you just re-cure in the oven? Love the slice and fill idea.
To check that I’m understanding this correctly, you’re carefully slicing the top of the air bubble off, then back-filling it with the same clay, right?
If so (good idea, by the way!), can’t you just re-cure the piece after back-filling? If you add a thin smear of liquid polymer clay inside the hole to be filled first, and then back-fill it with clay of the appropriate colour, there shouldn’t be problems with the new raw clay failing to adhere to the old cured clay (although there would be if you didn’t use the liquid polymer clay first). That would avoid the possibility of burning the clay by trying to use a lighter to cure only one small spot.
(While I haven’t done this to fill air bubble pockets, I *have* done this for other repairs, and for re-filling holes drilled into cured clay for the insertion of headpins etc., and it works well in those cases even though you’re only adding a small amount of raw clay. And of course multi-step construction techniques where you add raw clay to cured clay and then re-cure the combined piece are pretty common.)