Using a “Tile Sandwich” for Baking Flat Polymer Clay
Video #676: The trick to keeping those ugly bubbles from showing up, is to sandwich in between two ceramic tiles.
More...

IN THIS POST: — baking — flat polymer clay — tile sandwich — ceramic tiles — bubbles — blemishes — smooth polymer clay — (Topics marked with an asterisk* are discussed in the Comments Section below).
Topics Covered In This Video:
How to bake flat polymer clay in a tile sandwich.
I received a question/request from another YouTuber, called SweetBioDesign, for a way to bake flat pieces so that they don’t curl up after baking.
I also had this issue way back when I baked directly on a ceramic tile, where I’d get little bubbles on the top and weird gaps and shiny spots on the back of all my flat pieces.
So years and years ago, I started baking my clay pieces in between a ceramic tile sandwich.
You need two smooth ceramic tiles with no embossed patterns or textured surfaces.
The tile sandwich… place one tile smooth side up on the bottom. Then add a piece of plain office paper on top of the tile. Then your flat polymer clay piece. Then another piece of paper. Then lastly, the other tile, smooth side down.
Bake the tile sandwich in the oven for one hour… at the correct temperature for the brand of polymer clay that you are using.
The piece will come out perfectly flat and smooth on both sides.
00:00:03 –> 00:00:09 Hi guys, its Cindy Lietz, your Polymer Clay Tutor, and today’s PcT Studio Tip, we’re talking
00:00:09 –> 00:00:14 about how to bake flat Polymer clay in a tile sandwich.
00:00:14 –> 00:00:20 Now, I’ve been doing this for a long time, but I got a request… or a question from
00:00:20 –> 00:00:30 another YouTuber, their name is SweetBioDesign, and they asked about baking flat Polymer clay
00:00:30 –> 00:00:36 so that it doesn’t bend up when you’re baking it, and I’ve also had this issue years ago
00:00:36 –> 00:00:47 when I used to bake on a flat tile where you would get little bubbles in the piece, and
00:00:47 –> 00:00:51 the back was all kinda mottled, and didn’t look very good.
00:00:51 –> 00:00:53 So I figured out…
00:00:53 –> 00:00:57 I’m not sure if it was totally on my own or if I remember reading…I don’t know, but
00:00:57 –> 00:01:02 it was years and years ago I started doing what is called a tile sandwich.
00:01:02 –> 00:01:08 And here is a tile sandwich, now you need to put… you need to have 2 tiles and each
00:01:08 –> 00:01:13 side needs to be smooth, so you can’t have it embossed with some sort of pattern or anything
00:01:13 –> 00:01:15 like that.
00:01:15 –> 00:01:21 But what you do is you take your flat piece of Polymer clay… this is stuck to the paper
00:01:21 –> 00:01:26 now, so you have your tile at the bottom, you have a piece of paper, put your piece
00:01:26 –> 00:01:33 of Polymer clay on there, put another piece of paper on top…make sure there’s no printing
00:01:33 –> 00:01:39 or anything on it, and then the flat tile upside down on top.
00:01:39 –> 00:01:46 Then when you bake it, I always bake my… this is Premo! clay I’m working with, so if
00:01:46 –> 00:01:53 I’m baking it, I’m gonna bake it at 275 Fahrenheit, and then I’m gonna bake it for 1 hour, but
00:01:53 –> 00:02:01 while it’s inside there, with the pressure on top, and being between the 2 sheets of
00:02:01 –> 00:02:06 paper, you’re going to get a super, super smooth piece.
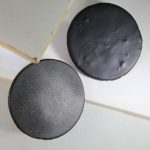
00:02:06 –> 00:02:13 So see this one here, it’s perfectly flat, perfectly smooth and it’s smooth on both sides,
00:02:13 –> 00:02:19 and this one was cut out at the same time right beside it and it’s got bubbles in it,
00:02:19 –> 00:02:27 and it’s got a funky back, so that is how I baked my flat pieces on a tile sandwich,
00:02:27 –> 00:02:28 alright?
00:02:28 –> 00:02:33 So I hope that was helpful for you, if it was, do make sure to leave a comment and let
00:02:33 –> 00:02:34 us know.
00:02:34 –> 00:02:40 And don’t forget, if you have any suggestions like SweetBioDesign had, where you have something
00:02:40 –> 00:02:46 that’s a challenge, make sure to check out our previous videos, we may have already done
00:02:46 –> 00:02:51 a video on it, but if not, you can leave your suggestion in the comment section below and
00:02:51 –> 00:02:56 hopefully we can get to filming that problem for you, alright?
00:02:56 –> 00:02:58 So we’ll see you next time and bye for now.
Our goal is to translate these videos into as many languages as possible. If you are interested in helping with this initiative, then please do contact us and we will figure out a way to make it worth your while :)
Resource Links:
- Related Video: How To Keep Bubbles Out Of Your Polymer Clay
- Related Video: Fixing Bubbles in Your Flat Baked Polymer Pieces
- Related Article: Avoiding Common Problems With Baking Flat Polymer Clay
- Related Video: Baking Polymer Clay Pendants in a Ceramic Tile Sandwich
- Amazon: 6x6 Matte Ceramic Tiles (4) **
Resources marked with a double ** asterisk are affiliate links. If you click on them and decide to buy something, we may receive some compensation. This does not affect the price you pay in any way. What it does do, however, is helps us to continue providing free videos for you, here at the PcT website. Using our links to purchase your tools and supplies, is always greatly appreciated.
Sponsored Ads & Special Promotions
Shareable Images


To share this full blog post anywhere on the web that allows links in comments, here's a shortened url to copy and paste...
>> https://mypct.ca/v676 <<
Want to chat about today’s post? That’s what the comment section below is for. Scroll Down… We’d love to hear from you!
Or... if you would like to request a topic for a future post, here is the link to do that… PcT Suggestion Box
Hi Cindy, I was just curious on the baking. I’m assuming baking with paper is not going to catch fire or anything? Also, usually I bake things at 275 for 15 minutes. It won’t burn if I back for an hour?
Hi Bryanna,
Paper won’t burn at the temperatures we use for clay. The clay will also not burn as long as you stick to 275. In any case, it’s better to bake the clay covered with a foil pan or paper tent of some kind. This way any fumes due to spikes will be contained. 15 minutes isn’t enough to make strong, durable pieces.
Cindy,
I am covering tin boxes with sheets of polymer clay before decorating them and no matter how careful I am, I still get bubbles. On the one I backed today, I put a sheet of stock paper and then a tile on top but I still got bubbles. What am I doing wrong or other steps do I need to take to prevent bubbles.
Susan
That was helpful! Actually I never realized baking a flat tile flat was a problem, but then I’ve never tried that particular event. However, one day I will . . . . Thanks
Hi Cindy, thanks for the recap on baking flat pieces. I was just getting ready to make a journal cover and texturize it with a couple of the Kor-Tools. Do I still want to bake it ala sandwich style after I have manipulated the clay sheet with a textured design or should I leave the top tile off? I have never tried this so I am concerned about any bubbles showing up on the backside with no weight on top.
Hi Dixie Ann, if you stick it down to the paper well with no air pockets you can bake without the top tile if you want. If you are still concerned, I would bake for about 10-15 miens without the tile, to set the pattern, then add the tile to bake the rest of the hour. That should help prevent bubbles without ruining your texture.
Thanks Cindy, that sounds like a great idea. Also do you want a copy of my sales for the Jool Tool send to you. I purchased it several months ago. I can scan it as a PDF and email it to you if you wish. Let me know.
I found this tip in a discussion somewhere on this blog and I’ve been baking flat pieces like this for the past two weeks. This definitely helps with bubbles and preventing pieces from curling up. But I’m still seeing a weird sort of depression in the center of my flat pieces: like the center of a cake might sink, just a touch. This isn’t visible until I start sanding, and it takes so long to get the whole piece level. Does this happen to anyone else?!
Hi Krithika, make sure to stick your piece down to a piece of paper first before baking… this should help with that weird depression on the back.
I do put the clay face down onto a piece of paper. I’m experimenting with using a bone folder to “burnish” the paper on the clay lightly before I put it between the tiles. I’ll see if that helps!
Also, I use plain paper from a letter pad that’s a nice size for the tray and tiles I use. I notice they seem to get all wonky. I wonder if using stiffer card stock will help.
A stiffer card may work better for you. Let us know if it makes a difference.
So much to learn. Thanx Cindy for your insights :)
This video was only a couple days late! I had just made a journal cover and I had problems with the pieces bending and getting bubbles.
Thanks for the tip! I’ve always wondered how to get rid of the bubbles I sometimes get in my clay.